The best gifts for the New Year made of paper

Days follow each other, and now it's December outside the window. Imperceptibly, houses are filled with New Year's mood, which means that an urgent need to start preparing gifts for relatives and friends. Therefore, we have prepared several available ideas for decorating gifts for the New Year with our own hands. It is easy to create original presentations by yourself from plain paper, cardboard and glue to please family and friends. Gifts can be made using the quilling technique, scrapbooking or modular origami.

Sweet package with a bow
It's so nice to do something with your own hands, especially when children are helping you. Many of them simply adore sweets, lollipops, chocolates and other sweets. Therefore, a sweet bag with a bow will be a great gift idea, and the adults in their hearts are probably still children who love sweets. To make such a delicious surprise, you will need:
- A4 paper, unusual and bright looks especially good;
- one sheet of red paper, flexible as desired;
- some white, yellow and black paper;
- glue.

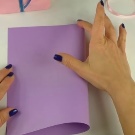
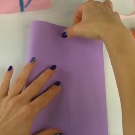
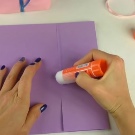
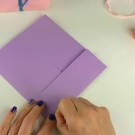
We fold the first paper sheet in half, but leave a small gap, bend it too, and only then apply glue, connecting the ends of the paper. But this is only the beginning, we still need to form the bottom, so now we select one of the perpendicular sides and bend it again by 4-6 centimeters, straightening it on the sides to make triangles. Take both petals to the center, let go, go through with glue - the bottom is ready. It remains only to carefully, bend along the glued edges along the ruler, then straighten the resulting shape.It turned out to be an ordinary paper bag.
But this is only half of the work, because now a bow is still needed. We cut out all the necessary elements from paper, preferably red (after all, we are making Santa Claus), imitating an ordinary ribbon bow.
We glue white ovals to the ends of the hanging ribbons, and then pre-cut boots from black paper, creating the legs of a Santa bow. The last decoration is a black strip in the middle of the bow, and a yellow "buckle" is attached to it, which strengthens the structure.
Now we fill our bag with sweet gifts, glue it on top, having previously wrapped it, and glue the bow as a decoration.
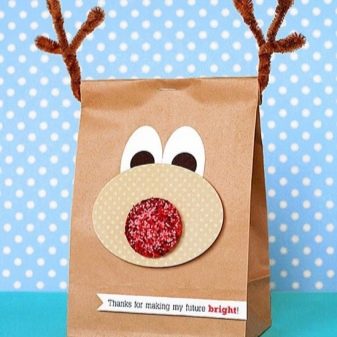
Santa's Reindeer Sweets
In this gift, you must first make a deer. Yes, the one who is in the team of Santa Claus. It is also a well-known and characteristic symbol of Christmas and New Year, which means it is perfectly recognizable and appropriate in a gift. You can find a blank, or you can draw it yourself.
We will need a sheet of paper again to form the bag. We glue the deer on a blank paper, which will be a bag in the future. At this stage, we advise you to make the deer antlers out of cardboard and stick them out a little outside the sheet of paper, making the whole structure more interesting. Next, we cut out the belly of the deer, and on the back side we glue the film so that we have a window inside.
We form the package according to the scheme described above, in a "bag with a bow", we get a new interesting gift wrapping. Inside it you need to put sweets or a gift, which can now be seen through the belly of our deer. This time we do not glue the bag, but decorate it with handles made of ribbons, laces or the same strips of paper.
To top it off, you can decorate the bag with various little things, stickers, cut out Christmas trees or snowflakes, putting everything on glue. This will make your gift more personal and memorable for the person to whom you prepared it.

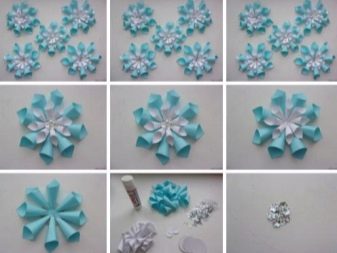
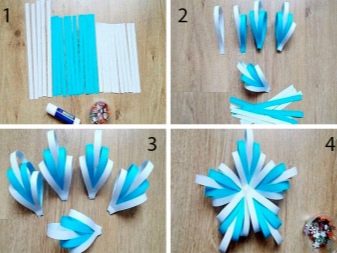
Volumetric snowflakes
Snow and snowflakes are what we need so much in the New Year. Surely everyone remembers what huge snowflakes we made in school and kindergarten. To make them, we need:
- a lot of paper;
- scissors;
- thread.
Everyone knows the progress of the work, first we form the petals of our snowflake. A square is cut out of paper and folded in half, followed by a smaller square, and folded again. You need to repeat several times to make the snowflake appear voluminous. It is advisable to process the edges of such a snowflake with scissors again to add patterns, and with them the unusualness of your craft. Now we fasten 6 petals into one snowflake and we get a volumetric version, which is not a shame to give to the child.
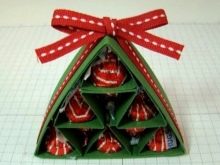
Christmas trees with wishes
The origami technique and applique work harmonize very well with each other, so they can be used to make extremely simple, but heart-pleasing gifts. For such a craft you need:
- red and green paper;
- glue;
- scissors;
- some kind words and wishes.
On green sheets, you need to cut 5 identical Christmas trees. They will form the main standing tree. Now we glue all these parts together and get a volumetric toy. At the very end of this Christmas tree, we glue a star cut out of paper.
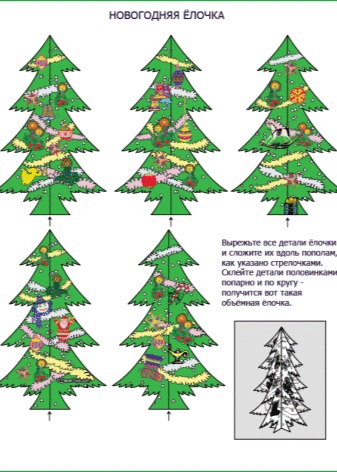
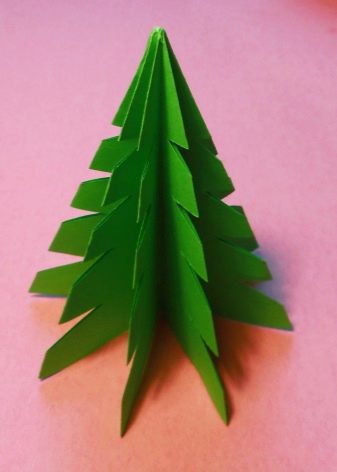
The main thing remains: we write the sides of this Christmas tree with wishes and warm words of congratulations. Such a simple and warm gift for the soul can be made in a matter of minutes.
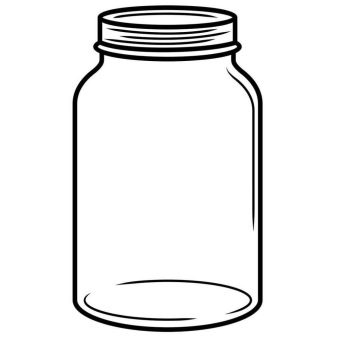
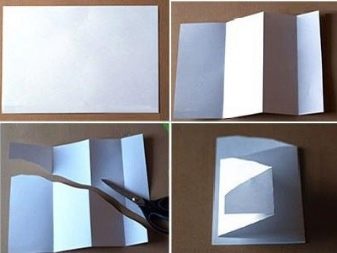
Sweets envelope
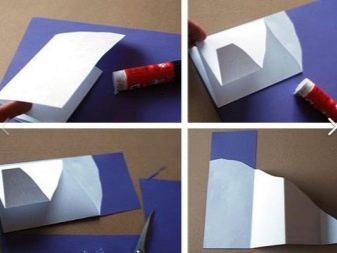
An extremely simple idea to implement - a postcard in the form of a can. On half of the sheet, you need to draw the outline of the can or print it. In the middle of the jar we cut out a window, and from the inside we glue it with a piece of transparent polyethylene. Next, we fold the sheet in half with a fold and fix it with glue, as we did with the bags earlier. We also just fold the paper underneath and glue it.
Now it's done it remains to fill such a simple bag with sweets, and then glue it on top just like below, forming a simple but original envelope with sweets You can make a lot of such sweet envelopes and present to all your friends, classmates and colleagues. This will delight them, and you yourself will spend little effort for this, but put your soul into a gift.
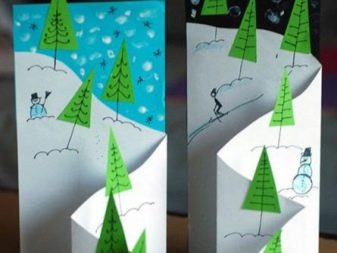
Volume postcard
Anyone can make this card: both a child and an adult - because it combines simple origami techniques and applications. We will need:
- colored markers;
- glue;
- white sheet of paper;
- colored paper.
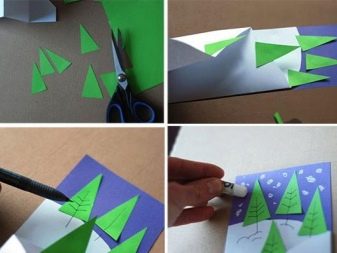
We take a sheet of paper and fold it into an uneven accordion, followed by cutting off the corner along an oblique line. After that, we glue our blank to a strip of blue or blue paper. Next, we take green paper and cut out our Christmas trees with simple but varied triangles. We glue them all over the postcard, not forgetting to fill in the white fragment, do not worry about crawling out of the border.
Then we take felt-tip pens and decorate the card in every possible way: draw snowflakes, draw Christmas trees, outline snowdrifts. So we got a fairly simple version of the postcard, the main thing is to approach its creation with soul and warmth. It can be presented to anyone: a teacher or teacher, friends or acquaintances.
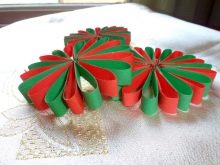
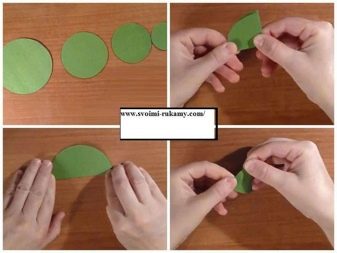
Christmas trees made of paper accordions
The simplest and most original homemade products are obtained from paper accordions. Both a child and an adult can add these. A colored herringbone made from several layers of paper is a prime example. Each accordion in it is simply neatly folded, and then glued in close. If you want to further decorate your green accordion tree, then carefully treat it with hairspray, and until the latter has dried, sprinkle the structure with confetti and sparkles. So you add a festive mood and elegance to her, which will delight your loved ones.
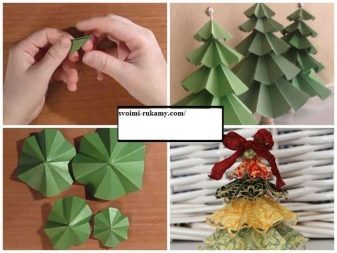
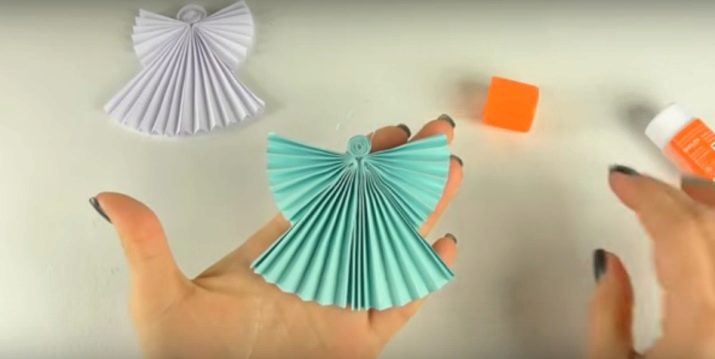
You can also make cute and lovely New Year and Christmas angels. Starting with the blank, you need to outline the outlines of the head, clothing and characteristic angel wings.
By folding white paper figures, you will cut out an angel that will be a gift filled with your love. Present it to everyone you want to make happy in the New Year.
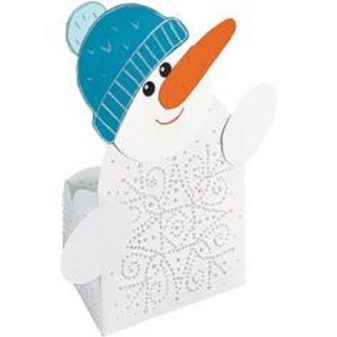
Christmas candlesticks-snowmen
You do not have to worry about violations of fire safety, because the flame in such candlesticks will be exclusively made of paper, and not real. Such candlesticks can be displayed open, like a postcard, on a regular work table or on a souvenir shelf. Lovely candlesticks depicting snowmen are perfect for a gift for both adults and children. So how do you make gifts like this?
- On a thin piece of paper that transmits light, draw a pattern or print inside to decorate the tummy of our snowman candlestick.
- Make a base stand out of thick paper.
- Cut out the snowman and line up the draft with your design.
- Place the blank on a terrycloth towel with the patterned draft on top.
- Now you can pierce the pattern using a thin needle. Make sure that both the draft and the snowman are pierced and buried in the towel. So work through the entire pattern.
- After cutting out the hands and head of the snowman, then make everything else out of paper: a hat and a scarf, a nose and a mouth. They can be decorated with colored pencils.
- Putting it all together, you get a wonderful candlestick.
It's easy to make it glow - glue the yellow paper on the back. Here is such a top cute and simple New Year gifts made of paper can greatly facilitate your life, and also surprise all your friends and acquaintances with creativity and, most importantly, sincerity. This will especially brighten up the holiday. Remember that homemade souvenirs delight much more than purchased ones.
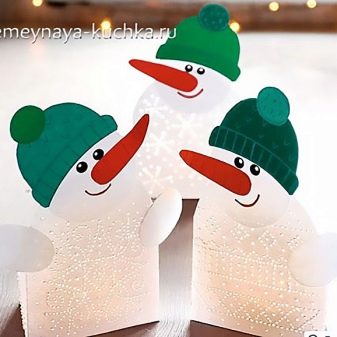
See below for a master class on creating a paper snowman.


