All about jute filigree

Jute filigree is an amazing type of folk art that allows you to make unusually attractive openwork things from ordinary rope (jute twine) sold in all hardware stores.


What it is?
The art of jute filigree cannot boast of an ancient origin, but the technique of jewelry filigree, from which the weaving methods were borrowed, is rooted in the distant past. Unlike working with precious metal, rope art does not incur high costs. In addition to the rope, glue and a stencil are used, on which intricate curls are superimposed.
Since the basic element is plant twine, this technique is also called rope filigree.

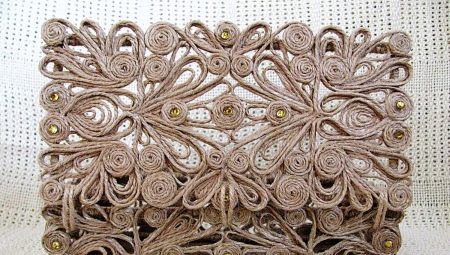
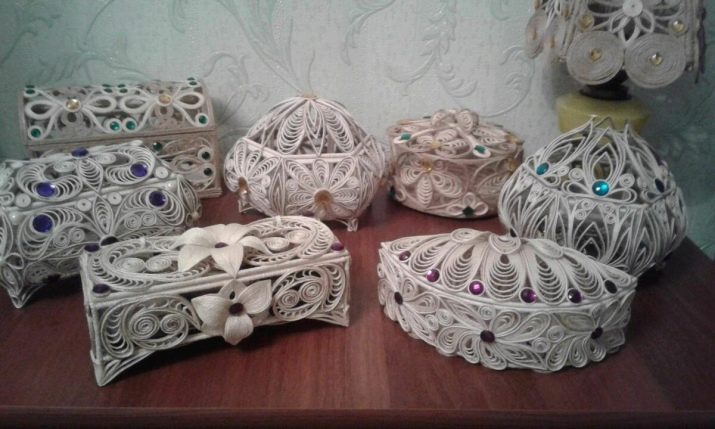
With the help of jute, many decorations, household items that decorate the interior are created. It can be boxes, lampshades for table lamps, vases, baskets, rugs and many more interesting things. Jute crafts have many advantages:
- they are safe, created from natural, environmentally friendly material;
- durable, always retain their original shape;
- plastic, easy to process;
- hygroscopic, absorb water and stay dry;
- go well with cotton threads, lace, seashells, ornamental stones;
- things woven using the jute filigree technique create a warm and cozy atmosphere around them.


But jute also has disadvantages:
- in the process of work, the threads rub their hands;
- the fiber tends to crumble, small particles are in the air and can harm people prone to allergic reactions.

History of origin
To be objective, the history of jute filigree should be viewed from two approaches: what is filigree and where did the jute twine come from. Thanks to the combination of unusual material and amazing technique, spectacular and original works are created. Initially, filigree was called an openwork pattern soldered onto a metal object using a thin gold or silver wire.
The ancient Egyptians were the first to decorate things with such a technique even before our era, their idea was taken up by the Greeks, Phoenicians, Hindus, and much later, under the name "filigree", unusual weaving began to be used in Russia. It fully blossomed and strengthened by the 17th century. For weaving, threads were used, mainly of precious metals, since they were the most ductile. Much later, people realized that the same patterns can be created in an easier and cheaper way, using a flexible rope (jute twine) instead of wire.

Jute fiber is massively distributed on the planet and ranks second after cotton.
It is extracted from jute, a shrub that grows in countries with warm and humid climates. In less than six months, the shrub grows four-meter stems with fibrous bark, from which material for future threads is extracted.
During the Crimean Wars, Russia stopped supplying flax to Europe, and residents of European countries bought jute from India, using it to make fabrics. They were rough canvases, but still better than nothing. Today, jute twine is used as packaging material, and plants are tied up with it. And the craftswomen have mastered the most beautiful skill - jute filigree.


Variety of patterns
You can find many basic patterns on the Internet, but true craftsmen prefer to make their own designs for products.
First, you need to learn how to lay out simple curls from jute, and only then on their basis it will be possible to implement any fantastic patterns.

The following elements can be considered classic.
- Ring. With the help of a thread, a circle of the correct shape is formed.
- Semiring. Half a circle is carefully drawn.
- Cucumber. Two pieces of jute are laid out in arcs at the top and bottom, connecting at both sides. The shape vaguely resembles an elongated oval or cucumber.
- Pear. The two ends of the thread are connected, laying out a pattern in the form of a drop or an elongated pear. At the same time, one side is rounded, and the other narrows and closes.
- Tooth. A piece of jute is folded in half to create a right angle. It turns out a simple drawing in the form of a check mark, which we put in the text.
- Head. A loop is made at the end of the bent thread. The drawing resembles a comma.
- Stenek. From the twine, a spiral is made with a freely hanging end.
- Double curl. One end of the jute is twisted to the right, the other to the left.
- Little grass. The thread is bent in half, both ends are twisted slightly. The element looks like two curved stems.
- Developing. The element looks like a "tooth". Jute also bends in half, forming a tick, only its "wings" are not straight, but curved in an arc.
- Curl. The twine is laid out in an arc with rays downward, then the ends are twisted with loops into the inner part of the picture.
- Snake. The thread, making small turns to the right and left, is located in the form of a loop-like creeping snake.
- Petal. The element is similar to a "pear", that is, jute is connected by two ends, but does not form a drop, but a symmetrical pattern of an elongated petal.
- Tee. Schematically, this is how a lily is drawn. The twine is laid out with three petals: the central one has a rounded shape, two side ones are pointed and turned to the sides. Both ends at the bottom complete the pattern.
- Grain. The fiber rolls into a tiny grain and looks more like a fat point.

Knowing the patterns listed can give a beginner a good start. In the future, many people themselves come up with elements of jute filigree and with their help they collect their own original drawing. You need to work out the techniques of twisting different elements in advance, even before starting work. To gain experience, you can pay attention to the quilling technique. Professionals often borrow Celtic, Khokhloma, Gorodets patterns.


Craft ideas
Jute filigree items can be a good gift for any occasion. Caskets, paintings, lamps make the interior special and unforgettable. Crafts are carried out in a wide variety of ways, we suggest you make sure of this with beautiful examples.
- Openwork napkin holder in the shape of a swan.


- An exquisite picture in the style of rope filigree can become a worthy part of the interior.

- Designer filigree jute jewelry will suit women who prefer folk style, spiritual practices or natural materials in their wardrobe.

- Jute flowers are incredibly varied and beautiful.

- Vases decorated with rope filigree can have a glass base and be functional, or they can consist only of jute threads and can be used for dried flowers.


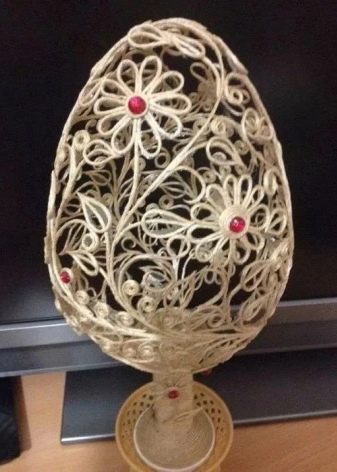
- This jute Easter egg, made with love, will be a good decoration for a bright holiday.


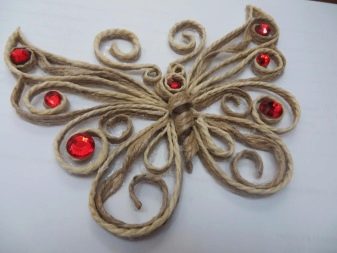
- The abundance of various butterflies in rope practice speaks of the endless flight of the imagination of the craftswomen.


- Refined work "Panel with a peacock" can decorate the wall of the living room.


- Continuing the theme of the peacock or the firebird, we will give an example of the volumetric execution of this wonderful bird, inlaid with rhinestones and beads.


- A sweet tooth will be delighted with a delicious candy bowl. Thanks to the woven handles, sweets can be carried with you.

- Intricate trays are made of jute for decorating a table or carrying light objects.


- Each craftswoman has her own rope dolls, not a single beauty is repeated.


- New images are acquired by ordinary New Year's toys if they are made from twine.

- A jute cat can become a portrait of your beloved pet.


- The lampshade made with rope technique brings a special atmosphere of peace and comfort to the interior.

- A horse often becomes the subject of an image on jute panels, in this case a refined airy figure of a pegasus is presented.


Amazing examples of jute filigree technique can be cited endlessly. They delight the eye and decorate the room. Next, let's talk about how you can make them yourself.

Tools and materials
Rope filigree does not require special expenses. Everything you need can be found in every home or bribed in hardware and stationery stores. For work you will need:
- jute twine, thickness corresponding to the future craft;
- transparent moisture resistant "Dragon" type glue;
- paper sheet and transparent file;
- tweezers, with which they work with twine material;
- knitting needle to eliminate excess glue;
- needle or awl for laying out curls;
- varnish to stiffen the finished product;
- pre-prepared stencils;
- toothpicks for distributing glue;
- a clerical knife to cut off the remnants of dried glue;
- plate under the press during drying.
If you plan to change the color of the jute, you should prepare in advance acrylic paint of a suitable shade.
It should be remembered that the twine material is painted, not the finished product. The final work can be decorated with any decorative elements - rhinestones, shells, colored cord, lace.

When choosing jute, you need to pay attention to its size. To create a vase or casket, a thread of 1.2 mm is enough. The larger the product, the more voluminous the twine will be needed. Before starting work, you should take care of the circuits. The stencil can be done independently or purchased ready-made. When transferring a drawing to paper, it is necessary to make allowances for the thickness of the jute, otherwise, during the process of laying out, an offset of the lines will be found, which means that the sketch is too small.

Execution technique
We offer a master class for beginners, where we will tell you step by step how to create a jute filigree with your own hands.The first step is to prepare a template, you can print or draw on a sheet of paper yourself. The sketch is placed in a transparent file. At the end of the process, it will be easy to remove the glued craft from it. Before embarking on creativity, hands should be well lubricated with cream, then the adhesive composition will not linger on them.
There are two ways to work with glue.
- The first option is easier, but less effective; novice craftswomen turn to it. In this case, only the outline of the sketch is smeared, on which the twine blank is laid out.
- In the second version, glue is applied to the drawing and the twine itself. The glue should be carefully rubbed into the jute to remove excess hairiness and make the surface smooth and elastic.

The carefully glued twine quickly forms into pre-planned elements. If the moment is missed, the glue will begin to set and the material will lose its plasticity. In this case, it is recommended to miss it again and hurry up with laying the elements. The glue is leveled with a toothpick. The elements are laid out with tweezers. Awl helps to form curls.

When the work is assembled, the moment of drying begins. Flat crafts are placed under a press for 6 hours, laying a board between them. Bulky things are left to dry on their own. The finished product should be carefully separated from the file.
Next, there is a painstaking work to get rid of the craft from the remnants of the glue. Here you may need a clerical knife, patience and accuracy. Large nodules are cut with a knife, and the glue is removed between the openwork elements using a heated knitting needle.

Acrylic varnish is applied to the finished product, which will improve its strength and appearance. If the work consisted of several parts, it's time to put them together using glue. Further, the product can be decorated with beads, pebbles, sparkling glass balls (marbles), bows and other materials. As an example, we will give several master classes for beginners, we will tell you about the method of creating the simplest objects.

Feather
Having prepared all the necessary tools and materials, we begin to work with a stencil. Draw a sketch of a pen on a piece of paper. If you don't have a talent for drawing, you can use a ready-made printout from the Internet. Place the picture in the file. Next, we lay the jute twine in the following sequence.
- We coat with glue a randomly curved feather rod in full length, lay out the jute, cut off the excess with scissors.
- Then, starting from the bottom of the feather (from the point), grease with glue and lay out the elements "cucumber", "walls", "grass". The sequence and quantity of each type of detail is determined by the taste of the craftswoman.
The elements must fit snugly together. In the center of the "cucumbers" you can create gaps for the effect of openwork knitting. Then, everything is as usual - drying under the press, removing the file and excess glue.

Butterfly
Create or print a butterfly stencil, place it in a file. Using glue and jute, lay out the outline of the upper wings according to the drawing. Then, carefully, step by step, according to the sketch, fill the left wing, then the right. Next, using twine and glue, we create the outline of the lower, smaller wings. And again we fill the left wing, then the right one. Place the antennae between the upper wings.

The body and head of a butterfly are formed from three elements, it is better to prepare them in advance.
- The smallest of them is a circle (upper element) filled with twine in the form of a tight spiral wrapping. It protrudes above the base of the wings in the upper part of the butterfly, as it is its head. The head is placed on a pre-glued antennae.
- Following the head, glue the upper body (middle element), which is an oval filled with jute in a spiral.
- The lower part of the body (lower element) is assembled in the same way, only it is noticeably larger than the previous part.
When the whole butterfly is composed, it is dried under the press and then varnished.

In conclusion, we can say that the technique of jute filigree is mastered quickly, the materials are inexpensive, and the final result is amazingly beautiful. All this suggests that it is worth trying your hand at such an unusual and attractive art.
Then watch a master class on making a box using the Jute Filigree technique.


