Options for making crafts "Butterfly"

Making crafts is considered both useful and interesting for children. The child develops his creative thinking, uses fine motor skills of his hands, and his artistic skills are formed. In addition, this way the kid can get acquainted with the world around him, creating figurines of animals, plants, and various objects from various materials.


Joint activities of parents and children are also important. After all, it is the elder who will be able to explain to the kid what he will not understand, direct him, advise him.
In kindergartens and elementary schools, thematic exhibitions are constantly held, to which it is mandatory to bring your work. We offer several master classes on creating DIY "Butterfly" crafts.


How to make from paper?
A butterfly figurine can be made from a wide variety of materials, their variety will surprise you.
For example, you can create such a craft from colored paper on a stick. To do this, you will need the following materials:
- thick double-sided colored paper;
- wooden skewer;
- awl;
- pencil;
- felt-tip pen;
- scissors;
- glue gun
- beads.


Step-by-step instruction:
- cut out two identical 10x10 cm squares from a sheet of colored paper;
- we add them as shown in the figure;
- we put the rolled blanks on a wooden skewer, making the necessary holes with an awl;
- draw two identical bodies of our butterfly on another sheet and cut them out;
- glue the bodies on both sides in the center;
- we make eyes from two black beads, which we fix with a glue gun, draw a mouth;
- decorate the body of the butterfly with beads at our discretion.


The beauty butterfly is ready!
This version of the product is perfect as a craft for the autumn exhibition.


Ideas from natural materials
There are many ideas for crafts for kindergarten or school on the theme of "Autumn". Children make beautiful figures with their own hands using various natural materials (cones, acorns, nuts, leaves and much more).
We offer step-by-step instructions for making an autumn butterfly from natural materials for children. So, for this you will need:
- a set of plasticine;
- different leaves;
- thin blades of grass and dried small flowers;
- PVA glue;
- 2 cones (pine and spruce);
- artificial eyes.


The work progress consists of several steps.
- We connect two cones with each other using a piece of plasticine to get the body and head of the future butterfly, as shown in the figure.
- We take two large maple leaves - wings. Cut out the middle of the leaf to create double wings.
- We decorate the wings with small leaves and flowers, trying to place the decor closer to the base so that the finished wings do not fall.
- Let's move on to decorating the body of the insect. We glue our eyes to plasticine. We form a round nose. We make the antennae from blades of grass, which we attach to the head with pieces of plasticine.
- Now we attach the wings to the body. To do this, we fix the wing petioles on a plasticine ball and stick it on the back of the insect.


A wonderful autumn craft of cones and leaves is ready! You can put her in a flower pot.
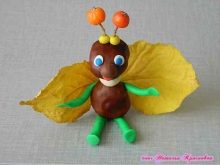
An interesting butterfly craft is obtained from chestnuts. It requires the following components:
- plasticine;
- chestnuts;
- rowan berries;
- leaves.


Let's analyze the course of work.
- We make two round eyes from white plasticine, and the middle from blue plasticine. Roll the nose in the shape of a brown ball. We sculpt a small mouth from red plasticine.
- To connect the head and body, we form a neck - a ball from a piece of white plasticine.
- For the antennae, roll up two small yellow balls. We insert into them two thin twigs with rowan berries. And we fix them on the top of the head.
- We connect the torso and head.
- We make the legs in an oblong shape from a green tone. Press the tips a little, forming the palms.
- We carry out the legs in the same way, only we bend the foot a little.
- We create the wings from two yellow leaves, the tails of which are inserted into a ball of yellow plasticine.


The colorful craft is ready!
Plasticine options
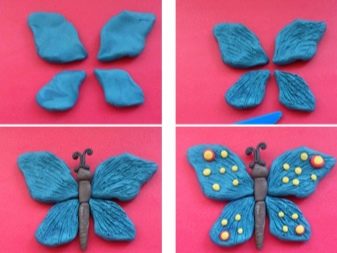
A butterfly made of plasticine looks no less interesting.
For modeling, you can use plasticine of any shade. In addition to the main material, you will need a sheet of cardboard, a toothpick, and stacks.


Let's list all the stages of work.
- For the body, we take dark plasticine. We form three blanks from it: a ball - a head, an oval - a body, an elongated oval - a tail.
- We connect the parts together using a toothpick. Draw transverse stripes in a stack along the entire tail.
- We sculpt eyes and twisted antennae from black plasticine.
- We make the wings paired. The upper ones should be slightly larger than the lower ones. They resemble flower petals in shape.
- We sculpt the wings onto cardboard and draw their relief using a stack, as shown in the figure.
- Glue the finished body in the center of the wings.
- We sculpt many small balls from yellow plasticine. We distribute them on the wings, applying a little pressure from above.


The autumn beauty is ready!
Another no less original version of a plasticine butterfly. To create crafts you need:
- a large set of plasticine;
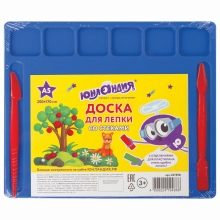
- modeling board;
- stacks;
- toothpick;
- rhinestones.


Let's see how this is done.
- From a small piece of light plasticine we form a sausage - the body of an insect. Draw transverse stripes with a stack all over the body.
- Take 4 shades of pink plasticine. For the upper wings, form two balls of each color in a different size. The color of the balls should go from dark to light, in order of decreasing size of the blanks. That is, the largest are dark, the smallest are light.You should have 8 balls in total.
- Press each ball a little to make a cake. Give them a droplet shape. We collect the upper wings, sticking the teardrop-shaped parts to each other - from largest to smallest.
- We also make the lower wings. They should be smaller and symmetrical to the top.
- On the finished wings, using a toothpick, draw stripes, put points along the contour of each layer, as shown in the figure.
- We combine all the details into one composition. We form twisted antennae and stick them to the head.
- We sculpt two small rhinestones in place of the eyes. And also for decorating the butterfly, we use two large rhinestones, which we stick to the base of the upper wings.


Delicate butterfly is ready!
Manufacturing from fabric
One of the more complex craft options is making a butterfly out of fabric. To do this, you will need:
- two types of fabric;
- scissors;
- iron;
- thread with a needle;
- tailor's pins.


We offer a detailed master class.
- Cut out two rectangles from different fabrics measuring 8 x 12 cm.
- We sew them on three sides with the wrong sides out. Cut off the corners, turn out the workpiece. Sew the fourth side carefully.
- Fold and sew as shown in the picture. Please note that the front side must be outside.
- Fold and sew following the instructions. First, we bend the lower right corner to the left and secure it with a pin, then turn it over and do the same. We sew everything together.
- Next, following the instructions in the picture, we fold our butterfly. We iron each passed stage with an iron. Use pins to secure. Sewing all the folds, make sure that the butterfly is symmetrical.


The finished butterfly can be glued to the hairpin.

How to make a butterfly from junk funds?
From a plastic bottle
Even junk products (plastic bottles, tea, coffee, shampoo bottles, etc.) can be used as materials for making crafts. They make very beautiful and original products.
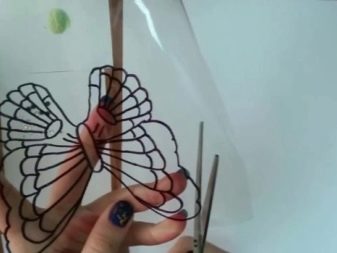
For example, you can create a butterfly from a regular plastic bottle. To do this, you will also need:
- printed drawing of a butterfly;
- black felt-tip pen;
- scissors;
- nail varnishes of different colors;
- dry sequins;
- rhinestones.

Let's list the stages of work.
- We take a plastic bottle, cut off the neck and bottom from it. Cut the middle across to make a rectangle.
- We attach the plastic blank to the butterfly drawing. We circle it with a felt-tip pen.
- Cut out the traced butterfly.
- We start painting our butterfly with nail polishes. Use bright shades of varnishes to make your craft colorful.
- We take a transparent varnish and apply it pointwise in the places where we will glue the rhinestones. We make the eyes from two small crystals.


A multi-colored butterfly from a plastic bottle is ready! You can make many such blanks and decorate the wall in the girl's bedroom with them. It will look very gentle and romantic.
From nylon
Delicate and graceful nylon butterflies can be made with your own hands. To do this, you will need unnecessary nylon tights (preferably a bright shade). In addition to them, you still need:
- wire;
- sleeve from under a wide adhesive tape;
- toilet paper sleeve;
- scissors;
- needle-nose pliers;
- threads;
- Super glue;
- glue gun;
- beads.


The work consists of several stages.
- We wind the wire on the sleeve from under the tape to make a circle. It is necessary to leave 4-5 cm of a piece of wire from the ring, cut off all excess.
- We take out the bushing and form a wing of the shape that we need from the circle. This can be done either with your hands or with needle-nose pliers. We intertwine the left pieces of wire.
- We make the second wing in the same way. To make them the same, we apply the second on top of the first, forming the same bends.
- To make the lower wings smaller in diameter, use a toilet paper sleeve. We do the same as with the upper wings.
- Give the desired shape to the lower wings.
- We make the second wing according to the same principle. We apply it to the first one to give it the same shape.
- Cut out a square piece of stocking, it should be twice the size of the wing. We wrap the wing with nylon, and collect the edges where the wire connects.
- We fix the collected ends of the material with a thread, then cut off the extra piece of nylon.
- We make the rest of the wings according to the same principle. It is important not to deform the shape of the wings when pulling the nylon.
- Cut off the wire ponytails with needle-nose pliers. We connect all the details into one composition, fasten them together with threads.
- We straighten our butterfly, straighten all the wings.
- Cut off 10-12 cm of wire, fold it in half and put two large beads on it. The lower one will be held by a loop of wire, and the upper one will be fixed with superglue.
- The loose tails of the folded wire will become the antennae of the craft. We wrap their ends around the bead, glue them using a glue gun. We connect the finished body with antennae and wings using a glue gun.


The graceful butterfly is ready! It can be decorated with rhinestones and beads.
For information on how you can make a butterfly out of jute thread with your own hands, see the next video.


