Making origami for Halloween

Our today's article is about making origami for Halloween. Master classes on making pumpkins from A4 paper, scary ghosts and spiders were considered step by step.


How to make a pumpkin?
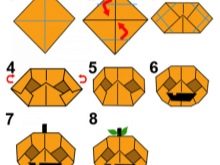
It is this fruit that is most often associated with this holiday, it has actually become its symbol. If there is no way to buy a ready-made pumpkin or tinker with similar berries, then it is quite a good option - making pumpkin origami for Halloween from A4 paper. The composition for the garland is best made from special kami paper. The technique is very simple and suitable even for children who have no experience in origami creation. One fruit can be created from a 150x150 mm square; some more yellow paper will be needed for the characteristic ponytail.
Sequence of work:
- unfold colored paper inside out;
- combine the top and bottom of the sheet;
- smooth the triangle created in this way;
- impose the right corner on the left one and smooth out the line that has now appeared;
- open the pocket on the left;
- press it down and flatten it;
- do the same with the pocket on the right;
- perform folds along the dotted line, carefully hiding the corners and protrusions inside the figure;
- fold the future pumpkin at the top;
- fold the top back a little;
- fold the figure below;
- remove all protrusions and irregularities to get a truly round pumpkin;
- they finish painting an ominous smile, corresponding to the style of the festival;
- a rope is brought under the upper valve;
- attach the resulting origami (it is better to make several pieces) on a garland and decorate one of the walls of the room with them.


Table pumpkin "Jack" can also be imitated in the spirit of origami. A paper sheet 150x150 mm is taken as a basis.Ideally, its obverse is orange or yellow, and the reverse is pure white; if the house has only white paper, paints will come to the rescue. One of the vertices of the square is turned towards itself. Having made a fold diagonally, they reveal the resulting figure; the next step is the same movements, but horizontally.
Then it will remain:
- reveal all the folds that appear;
- raise the lowest origami point to the center;
- take the top to the bottom of the composition;
- swap triangular valves - upper and lower;
- fold the right edge towards the center;
- fold the left edge towards the center;
- turn the workpiece over;
- bend the upper corners to the left and right;
- bend the lower corners in the same way, turn the workpiece over to the front side;
- bend the bottom edge of the figure;
- return the top to its original place, making sure that now everything is divided into 3 identical sections;
- lower the vertex again to create a third "tooth";
- dilute the lateral corners to the sides, creating "eyes";
- bend origami from the inside out, giving it volume;
- partially unfold the lower corners, achieving the stability of the figure.


Ghost creation
Crafts in the form of scary ghosts also quite harmoniously fit into the concept of an old holiday. And they are much easier to make than ignorant people usually think. Such figures are quite accessible even for children. All you need to create a phantom step by step is white paper and a black marker or felt-tip pen. Start by preparing the diagonal folds.
Further according to the scheme:
- unfolding the square, fold the side triangles to the middle;
- gently straighten the figure on the right;
- create a triangular outer tab;
- add the same tab on the left;
- turn the origami over and narrow the lower part, bending the sidewalls to the midline;
- turn the workpiece over to the other side;
- the corners obtained before are bred to the sides, and the top is folded back;
- add folds at the bottom of the ghost;
- add the eyes and mouth of the phantom (their expression is determined at their discretion).


Making a bat
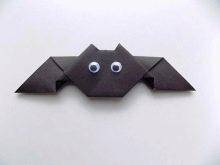
This origami is obtained by first turning a square sheet of paper into a triangle. Next, you need to fold the base of the resulting triangle. Formed "wings" - but so far it is too early to unfold them, but it is necessary to fold to the middle. Only then comes the time to unfold the wings and bend them a little.
The final stages of the work are trimming the top of the figure to get something like characteristic ears, and painting expressions on the faces of bats with watercolors.


More ideas
It is quite easy to make also spider... Its base can be of any color at the choice of the creators, but it is still more logical to make a black or gray creature. Having folded the sheet twice, bend it diagonally. When the same is done with the other three faces, you should get a rhombus. Its corners are folded and unfolded several times, achieving clear folds.
Further:
- apply the origami "petal" technique 4 times;
- cut the resulting legs in half (since the spider has 8 legs);
- fold the flaps from left to right;
- rotate the resulting shape 180 degrees;
- bend one of the corners down;
- spread the legs of the spider to the sides;
- finish the eyes.


Another characteristic attribute of Halloween is witch hat... For it, use large black paper. A sheet of 10x10 cm is folded diagonally in two different directions (in turn). Having expanded the workpiece, bend the bottom corner to its center. Further, the bottom is bent towards the center.
Later:
- turn over and bend the craft along the already formed bend;
- the right and left corners are bent to the midline;
- take the right and left lower edges up.


It is also a good idea to make Halloween claws. Having laid out a sheet of paper on a flat surface, take the upper right corner to the lower left, but do not bring it to the end. The left side is shifted to the opposite corner. In the resulting incomplete rectangle, the top is pulled down.
Later:
- make a triangle;
- bend the figure in half;
- move the left side of the triangle closer to the middle;
- repeat the same fold twice;
- carefully lead the lower ledge up;
- open a small triangle between the folds.


For information on how to make a paper bat using the origami technique, see the next video.


