DIY crafts for the garden from plastic bottles

Most modern drinks are offered for sale in plastic containers. This is a fairly simple container, almost weightless, but taking up a lot of space. Such voluminous garbage is often collected and taken out to the dacha, where it accumulates in huge heaps. But if you show your imagination, you will be able to turn plastic bottles from drinks into a useful thing or decoration of a garden plot.


How to make flowers?
It's no secret that modern people give a second life to some types of household waste. Glass bottle caps can be used to decorate the walls of various buildings. From paper cups it will turn out to make decorative containers for decorating the garden and home. Well, from plastic containers it will be possible to create a lot of interesting and useful products.
Plastic as a material has many undeniable advantages. First of all, this is its safety, and secondly, a long "life" period. Crafts made of the same metal or wood from the influence of external factors become unusable after a short period of time. And the plastic does not lose its shape and appearance.
This is a malleable material, you can make a lot of useful things from it with your own hands, especially if you need to decorate the garden.


Flowers are the main decoration of the suburban area. In summer, the garden is filled with a variety of blooming flower beds, and in winter they can be easily replaced by flowers from plastic bottles. To make such beauty as easy as shelling pears, and as an example, it is proposed to get acquainted with the process of creating a spring chamomile flower.
- A plastic bottle is taken and cut into two parts, where one part turns out to be straight, and the second has a narrowing towards the neck.
- Two more bottles are cut according to a similar scheme, only the neck of them must be cut off.
- Further, on all blanks, it is necessary to cut out the petals, taking into account that the neck itself will be the center. You should get about 6-7 petals. Their tips should be rounded and bent outward.
- Blanks with an empty center are put on the base with a neck, after which the cork, previously painted in yellow, is twisted.
- Wire of a suitable size will be acceptable as a stem. The leaves for him are made from a green plastic bottle. Well, the twine dyed in dark green beforehand will help to finish the stem. This thread wraps around the wire, hiding the anchor points of the leaves.


Making animals and birds
Decorative ornaments in the form of animals and birds made from plastic bottles will be no less original installation for a summer cottage with a garden plot. What is noteworthy, you can use containers of different volumes, ranging from 0.5 liters and ending with 5 liters.
By the way, bottles painted during production, for example, white, black and green, are suitable for work. From each option, it will be possible to make many crafts in the form of birds and animals. The main thing is to follow the step-by-step instructions of the master classes.


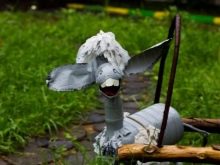
For example, it is proposed to learn how to make a donkey.
- Use a 5 liter container for the torso.
- Kefir bottles will look great as front and hind legs.
- For the head, use a plastic keg of kvass.
- The ears and tail are also cut from plastic waste.
- As soon as the details of the donkey are assembled into a single whole, the craft must be painted with a spray can of gray paint. After the coloring composition has dried, you will need to take a brush and start decorating the face and other prominent body elements.
- You can supplement the craft with a cart of the appropriate size for a donkey, and plant flowers inside it.


Having learned how to make an animal, you need to get acquainted with the method of making a plastic bird, or rather, a cockerel. For work, you will need a large bottle, wire, corrugation and small pipes made of metal-plastic.
- A hole for the neck must be made in a plastic container (5 l). A corrugation is inserted into the resulting hole.
- A wire is inserted inside the corrugation, thanks to which the bird's neck will be able to give the appropriate bend. In addition, the head is attached to the wire.
- The head of a rooster is made from a small pot-bellied plastic bottle. The beak can be made from any material, for example, piled from plaster or cut from polystyrene.
- Holes for the legs are made in the body, where metal-plastic pipes are inserted, with the other end being stuck into the ground.
- It remains only to decorate the craft with feathers. By the way, they can be fixed with a stapler.


Mouse
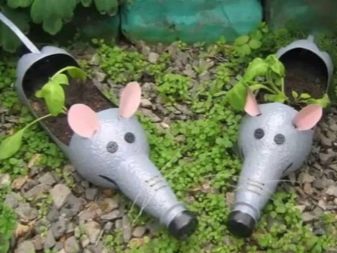
Even such a charming creature as a mouse can be made from a plastic bottle. To work, you will need the very minimum of materials: a plastic bottle, a knife, glue, colored cardboard, acrylic-based paints, a black marker and a rope.
- It is necessary to remove the stickers and labels from the bottle.
- The surface of the bottle must be painted with white acrylic paint, and the lid must be covered with black.
- Ears should be cut out of cardboard.
- Cuts are made in the bottle, where the cut ears are then inserted.
- Next, eyes are drawn on the face with a marker.
- Antennae is harvested from colored paper and glued to the nose.
- A rope is attached to the back. She will play the role of a ponytail.
In the upper part of the body, you can cut off the back, fill in the earth inside, and then plant flowers in the container.


Hedgehog
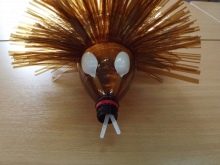
And what an extraordinary hedgehog turns out! And the work requires very few materials: 8 brown plastic bottles, transparent container, plastic spoons, scotch tape, black marker and a small bowl.
- One brown bottle is divided into three parts.The lower and upper thirds are connected with tape.
- The rest of the middle part is divided so that you get a rectangle. Next, the needles are cut.
- In a similar pattern, needles are made from the middle parts of the remaining brown bottles.
- After that, the needle tapes with the whole part must be bent so that a rim is obtained.
- The finished strips are attached to the hedgehog's body.
- Next, slots are made on the face, where spoons are inserted. Their ends should protrude through the neck.
- The protruding ends of the spoons must be cut off, and then the stopper must be tightened. On white eyes with a marker, you need to draw the pupils.
- A mushroom is made from a transparent plastic bottle, painted with paints and attached to the back of a hedgehog with double-sided tape.


Piglet
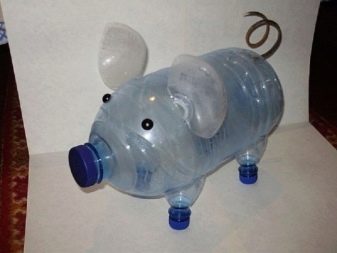
Making a piggy out of a plastic bottle is as easy as shelling pears. The 5-liter capacity itself outwardly bears many similarities with the structure of this animal. However, in addition to large containers, you will need a 1.5-liter bottle, 4 containers with a volume of 0.5 liters; in addition, you will need a knife, wire, twine, paint, black marker.
- First of all, you need to prepare some details, namely the legs, ears and tail. The legs are cut from 0.5 liter bottles, the cut should be at an angle. The ears are cut from a 1.5 liter plastic bottle. The ponytail is fitted with twine.
- Holes are made at the base of the body, where the ears and tail will be inserted.
- Legs are attached to the lower part of the body of the future piglet.
- Ears are inserted into the slots on the head, it is better to glue the tail from the back.
- It remains to paint the collected craft in pink, then draw the eyes, a patch.
- If you wish, you can cut off the back of the pig, fill the container with soil and plant flowers.


cat
As they say, life is not the same without a cat. That is why many country house owners decorate their gardens with crafts in the form of these adorable creatures. And most importantly, the creation process does not take long.
- The plastic bottle is divided into 3 parts. Parts with a bottom and a neck are connected to each other, you get a head.
- Slots for the ears are made on the head, eyes, mustaches and eyebrows are drawn on the muzzle. Prepared ears are inserted into the ready-made slots.
- The body is made from a larger plastic bottle. It is also divided into 3 parts and connected by two elements.
- The head is attached to the body.
- The paws are made from half a bottle with a neck.
- The tail is made of wire wrapped with twine.
- It remains only to decorate the craft.


Chick
To create it, you need a plastic bottle, glue, scissors, yellow paint and a red file folder. With such a minimal set of materials, it will be possible to create an adorable chicken.
- The plastic bottle is divided into 3 parts, the 1st and 3rd parts are interconnected.
- The middle part is used to make the wings and tail. They are attached to the base of the body with glue.
- The resulting base should be painted with yellow paint.
- The beak, comb and eyes should be cut out from the file folder, which are also attached to the body of the craft with glue.


Flamingo
It may seem that making a flamingo from a plastic container is very simple, but it is not.
For work, you will need a 10-liter bottle with a side cap, 8-9 5-liter bottles, PVC pipes, a corrugated pipe, polystyrene from which the head will be cut, screws for fastening and acrylic-based paint.
- Bottles must be cleaned of dirt and then degreased.
- A container for the body is taken, a hole is cut in it, corresponding to the diameter of the plastic pipe. Holes for the legs are made in the lower part.
- Next, the painstaking work of cutting feathers begins.
- Feathers must be dyed before attaching them to the body.
- Next, the neck is made. For this, a 60 cm plastic pipe is taken, bent and masked with a corrugation. One end is inserted into the neck of the container (body) and fastened with self-tapping screws. After that, the neck must be painted in the desired color.
- Next, the bird's head is cut out of the foam and attached to the other end of the neck. Then the finished part of the body is painted, the eyes are drawn.
- Now you need to go to the legs. For the stability of the craft, you can weld the leg pipes to the metal base. The PVC pipe itself should be shaped like a horseshoe to fit inside the body.
- Having assembled the frame, you can begin to design the plumage.


How to make flower pots?
The main criterion for the beauty of any suburban area is flowers. Not seedlings standing in the shade of the sun's rays in jars of yogurt, but flower beds of chamomiles, wild roses, peonies. Such flowers require special attention to themselves, and we are talking not only about care, but also about a container for growing them. And then imagination comes to the rescue, thanks to which the gardener will be able to make a beautiful flower pot at home. Moreover, the work requires a minimum of materials:
- it is necessary to draw a wavy line around the circle of the bottle, make a cut along it to get two bases;
- glue the side with the neck to the old disc;
- decorate the wavy edges of the pots with holes using a hole punch;
- a pot with a disc and a simple bottle bottom from the outside is painted with acrylic paint;
- as soon as the coloring composition is dry, the pots can be used for their intended purpose.


A simpler version of an outdoor pot involves cutting out the top of a plastic container. On the sides, the boat-pot is rolled with twine, after which the base is hung on the fence or the facade of the house. The earth is poured inside, small flowers are planted.
The description of such a pot is quite simple, but it is these containers that adorn the fences of most summer cottages.

More ideas
You can decorate the backyard territory with a variety of crafts. It is enough just to show imagination and skill. For example, a palm tree. The first thing to do is the leaves, the second is the trunk, and the third is the assembly of the parts.
- The bottom of the bottles must be cut off, and the upper part must be cut into strips, bending them in the opposite direction. The more such crown bases there are, the thicker the palm tree will be.
- Next, brown bottles are taken. Their bottom is cut off, and the side parts are divided into strips. A rope is threaded inside, due to which the structure will hold tightly to each other. The crown is also attached.


For beginner craftsmen, you should use simple master classes, for example, try to create a minion.
Everything is simple: you take a 1.5-liter bottle, the top is painted with yellow paint, the bottom is blue. Eyes are drawn on the yellow side. It is necessary to remove several strings from the lid, like hairs. On the sides, insert the twigs-arms, painted yellow.

For information on how to make a craft for a garden from plastic bottles, see the next video.


