Crafts from A4 paper

It is possible to make a huge number of original crafts from the simplest A4 paper. Among them there are both the simplest and quite difficult to implement. In this article, we will figure out what interesting crafts can be made from a sheet of A4 paper.
Making a crown
There is A4 paper in almost every home. Few people guess how much can be done from such material, which seems to be the simplest.
Such paper can be used not only for compiling documentation or printing various text files. It also produces chic crafts of various types.


Children love to make all sorts of things out of paper. Such material is very simple and malleable, so it is easy to work with it. Very often little girls make elegant crowns from A4 paper. Royal paper accessories are painted in different colors, decorated with various decorative elements. The result is very effective crafts.

To get an elegant crown, you will need to prepare several main components:
-
sheets of A4 paper of orange or yellow hue;
-
PVA glue;
-
ruler and pencil;
-
decorative rhinestones;
-
double sided tape;
-
scissors.

Let's get acquainted with a simple but understandable master class on making a beautiful paper crown.
-
The main part of this craft will be a paper square with a side of 10.5 cm.This component must be cut out in the first stages of work.

-
The resulting orange or yellow square must be folded in half.

-
Next, you should outline the middle of this component, which has taken the shape of a rectangle. The middle will be at the fold.

-
Starting from the intended middle, you should bend the sides of the rectangle towards the center. First, make a fold on the right.

-
Further, symmetric addition will need to be implemented on the left.

-
The result is a triangular piece, the lower part of which needs to be bent in the opposite direction by about 1 cm.To make a crown as a result, you will need to make several blanks of this type.

-
The exact number of required triangular elements can be calculated while trying on the crown blank.

-
The next step is to start gluing the individual components of the future paper crown. For these purposes, you should use a simple PVA glue. One workpiece will need to be inserted exactly halfway into the other. After that, gluing is done.

-
Thus, you will need to glue the rest of the components. The work will need to be continued, gradually bending the craft around the circle.

-
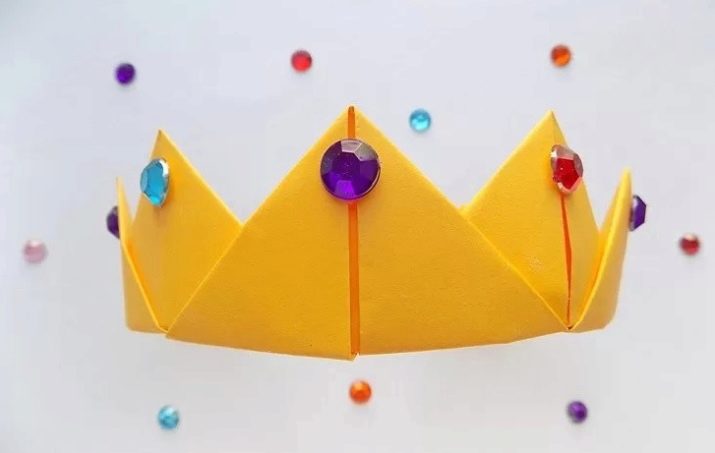
When the base of the crown, made up of triangular components, is done, you can proceed to decorate it. Decorative stones or rhinestones can be attached to the top of the royal accessory using double-sided tape.

The decorated crown from orange A4 sheets will be ready after decorating. If everything is done correctly, the craft will turn out to be very effective and bright.

How to make origami?
The origami technique is very popular. It can be easily mastered not only by adults, but also by children of different ages. Young craftsmen who have become acquainted with this technology of working with paper will certainly fall in love with it and try to study more and more new schemes.

From a sheet of white, yellow, orange, blue and any other A4 paper, you can make a great variety of very unusual, elegant and attractive crafts. Most often, children make a variety of birds, cats, chanterelles or bunnies according to a certain algorithm. If you stick to this technique, it is possible to make gorgeous multi-colored flowers.


In order to quickly make an aesthetic and neat craft out of A4 paper, you need to use ready-made schemes. They are especially useful if your child is new to origami techniques.

Consider the instructions for making a charming fish from A4 paper using the origami technique.
-
A square blank should be cut out of A4 paper.
-
The square piece will need to be carefully bent diagonally.
-
Next, you should take the paper blank by the corner and bend it to the top as shown in the diagram.
-
The result should be a triangular piece of paper. It will need to be bent up again.
-
In the next step, the bottom edge of the triangular element will need to be folded up to the fold line. The top is folded over as shown in the instructions.
- The result should be a simple, but very neat craft in the form of a fish. The finished product can be colored with paints, painted with pencils and felt-tip pens.


More ideas
The child can use other interesting instructions for making beautiful DIY paper crafts. Boys love to craft a variety of weapons, such as a submachine gun or a small pistol. Girls prefer to make more "peaceful" paper crafts - flowers, butterflies, mermaids and so on.


A4 paper makes excellent volumetric crafts. They are easy to implement, so children make them with great pleasure.

For example, to make a charming voluminous cat, you will need:
-
A4 sheet of paper;
-
scissors;
-
adhesive composition.

Let's figure it out with step-by-step instructions for creating a voluminous craft.
-
First, you should sketch or print a template for the future cat. For this, you can use both white and colored paper.
-
The finished template must be cut with scissors. Next, 4 cuts should be made on the workpiece along the marked solid lines.
-
The neck of the workpiece must be bent in the form of an accordion.This must be done strictly according to the markup. You will also need to twist the cat's tail.
-
The dotted lines must be bent. These will be the lines located on the legs. The prepared paper cat can be glued to the cardboard base.

From A4 paper, you can make not only a cute little animal, but also a more original craft. The child will be able to make an interesting and colorful character that will arouse interest in reading different books.

To create such a product, you will need:
-
1 sheet of colored A4 paper;
-
a sheet of A4 white paper;
-
scissors;
-
glue stick;
-
markers or felt-tip pens;
-
paints;
-
pencils.

Let's get acquainted with the step-by-step instructions for making original paper characters.
-
You should take the first A4 sheet of white color. One half of it will need to be bent in half. After that, the child should be allowed to independently draw on it absolutely any cover of his favorite book. It is best if the baby writes down her name and the name of the author here.
-
After that, you will need to carefully cut long strips of colored paper sheets. Their approximate width should be at least 2.5 cm. As a result, 4 main details should be obtained: 2 strips for the legs, 1 strip for a pair of hands, and a rectangular element for the torso of the figures.
-
Next, you need to take a couple of strips for the characters' legs. They will need to be neatly folded like an accordion. After that, the prepared components must be glued to the rectangular body.
-
The long strip that remains should be divided into 2 halves. You need to carefully draw fingers on them. When these components are ready, they can also be glued to the body.
-
At the next stage, the upper half of the figure will need to be bent towards the front side. After that, a bang is formed with scissors.
-
Round parts must be cut out of the remaining half of the white sheet. They should be glued to the figurine in such a way that they function as improvised glasses.
-
It is necessary to draw all the necessary details. We are talking about the eyes, mouth, nose and temples of glasses.
-
At the next stage, you will need to glue pre-made paper books designed by a child to the prepared figures. Finished paper products can be put on the table or hung on the walls in the children's room, for example, near a shelf with books.

For information on how to make a crane out of A4 paper, see the next video.


