Epoxy Resin Crafts

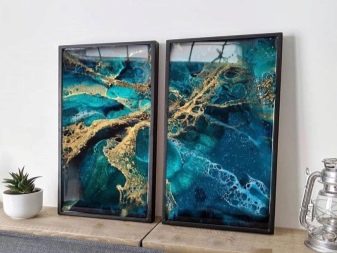
Epoxy resin has been used as an ornamental material relatively recently. It is possible to make unique designer jewelry, tables, stands from it.
The main thing is to know and be able to work with the material. If you have imagination, you can get truly incredible things for decoration.


Features of working with material
Epoxy resin crafts are gaining more and more popularity. There are several reasons for this:
-
it allows you to create beautiful things;
-
it's easy to work with her;
-
it is easy to handle.


Although the material described is called resin, it is not. This product has been completely synthetic in a human laboratory. Today it is actively used in many areas of life.
For creativity, you can purchase a special kit in the store, which includes liquid resin and a variety of forms.


Epoxy adhesive is a completely different product that contains epoxy resin. It has many different components, including:
-
plasticizers;
-
solvent;
-
fillers;
-
hardener.

In the list of ingredients of epoxy resin only:
-
resin;
-
hardener.


The density of the product depends on the amount of hardener. Thus, epoxy can be:
-
very thick;
-
liquid;
-
high density.


When working with the material, it is important to follow the manufacturer's recommendations regarding the proportions of the constituents.
There is no better material for creating jewelry. Any decorative elements can be placed inside.


The described material has the following properties:
-
high strength;
-
wear resistance;
-
high degree of transparency;
-
waterproofing at the highest level;
-
no toxicity.


The last point is very important, especially if the crafts are done with children.
When working with the material in question, it is very important to observe safety precautions:
-
use gloves;
-
put on a mask;
-
work in a well-ventilated area.
It is advisable to cover the table on which it is planned to work with foil.


To create a product that you can work with, you will need:
-
hardener;
-
resin;
-
syringe, you can use a small cup;
-
a kneading tool, it can be any wooden stick.
The components are mixed when the room is not more than +25 degrees Celsius.
To correctly calculate the proportion, experts advise using a syringe, which can then be thrown away.


The composition is diluted exactly as much as is required for the craft, since it is not stored.
The product is slowly mixed in a circle. It is important to do this carefully so that air bubbles do not form, as they often spoil the product.
If nothing came of it, and bubbles nevertheless appeared, then the mixture is left for a while, then warmed up a little. As the temperature rises, they rise to the surface. This is how you manage to remove them neatly.


Jewelry making
Using epoxy resin and a detailed master class, you can create not only jewelry, but also accessories, beads, figurines and much more.
The easiest way to make a beautiful jewelry yourself is to use a mold. This is the name of the special silicone molds that are actively used in needlework. It is simple and easy to work with them even for a child.

The blanks obtained in this way are subsequently turned into earrings, beads, bracelets.
But not every silicone can be made into a mold. Only platinum is used as the main material, since it is he who has the necessary resistance to the solution used.
Moldovans have many advantages:
-
it is easy to extract the resulting blanks from them;
-
they are sold everywhere;
-
no reaction with resin.
Any decor can be placed in molds, including leaves, shells, sparkles.

If vegetation is used for decoration, including foliage and flowers, then they must be pre-dried. If this is not done, then the inside of the decorative element may turn black over time.
When using shells, stones, crystals, they are pre-degreased. A simple solvent or alcohol is suitable.
You can use paint, small sparkles as a filler for future decoration.
Pouring resin is required correctly.
-
Knead the ornamental material, let it stand for 30 minutes. This is the only way the constituent components go through a full chemical cycle and react with each other properly.
-
Pre-prepared decorative elements are placed on the bottom of the mold.
-
Now you can pour in the epoxy. This is done necessarily in a thin trickle.

Once the resin hardens, you can remove the workpiece from the mold. Irregularities must be cleaned and polished.
What else can you do?
As mentioned earlier, epoxy is a versatile craft material. There are many interesting home ideas. With your own hands at home, you can easily make an attractive countertop, kitchen table, stand and much more.
Table top
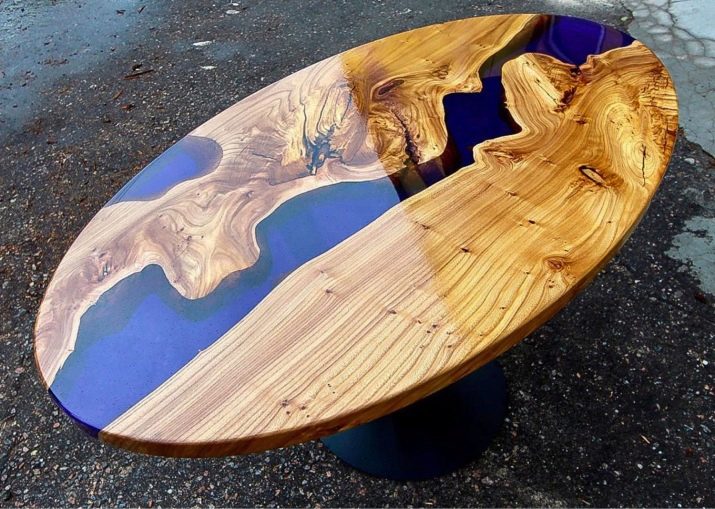
Epoxy-coated countertops exhibit amazing resistance to wear and tear. Recently, the table-river has been very popular. Such models are made from saw cut, they look modern and unusual.

This master class for beginners describes how to work properly with wood, shapes, fillers.
Before you start working with a craft, you need to choose the right resin. She must:
-
be transparent;
-
have a long shelf life.

If the material is chosen incorrectly, then in the process of work one has to face such a problem as "resin boiling". In this case, it takes a lot of time when pouring layer by layer.
The following types cannot be used:
-
constructional;
-
basic.
Products like ED-20 are not suitable. Their main drawback is density. If bubbles form, they cannot be removed. Moreover, this type of epoxy does not have a long service life, it is fragile and quickly deformed.
It is best to use EpoxyMaster 2.0. The advantage of the material is that it can be poured up to 5 cm of coating thickness at a time.

The viscosity of the described composition is low, the fluidity is good. This resin perfectly fills even hard-to-reach places, leaving no voids.
There is another feature of EpoxyMaster - moderate reactivity, self-leveling at the proper level. Of the main advantages, which are also worth mentioning: it does not exfoliate, does not crack, the coating does not bleach.
Anything can be used as a filler for a countertop. It all depends on the imagination of the author of the craft.

The phosphor or color scheme looks very interesting, while the necessary transparency is preserved.
The room where you plan to work must have good ventilation. Temperature - no higher than +22 degrees Celsius. Anyone who starts working with epoxy should remember that high humidity and dust will ruin the appearance of the product.

The casting formwork is assembled from:
-
plywood;
-
plexiglass;
-
aluminum sheets.
The surface of the formwork is lubricated with a release agent. Wax is best suited for home art, but if the master plans to make several countertops, then it is advised to use a semi-permanent composition.
The pouring process includes several stages.
-
Assembling the formwork and lubricating its walls.
-
Pre-drying of the wooden parts of the future countertop.
-
The wood needs to be primed, you can use polyurethane varnish.
-
The resin can be tinted before pouring. The coloring composition is added gradually, then stirred until the desired shade is obtained.
-
If the solidification period of the used product is about 7 hours, then there is no need to additionally heat it. All the bubbles will come out like that.
-
The mixture is thoroughly mixed before pouring.
-
The decor is laid out in a thin layer.
-
Pour the resin into one point, in a thin stream. It is allowed to use an inclined stick.
-
If the thickness of the countertop is not more than 5 cm, then the entire mixture is poured out in one go.
-
So that the corners do not remain empty, they are pre-moistened with epoxy resin.

When the filling is done in 2 or more layers, the drying time for each is about 2 days.
The table top is completely solidified, it's time to sand it.
To do this, use water, abrasive paper. Do not overheat the resin, otherwise it will melt at hand.

As the last stage of processing the countertop - coating its surface with varnish. It is best to use a polyurethane varnish as it has the necessary UV resistance.
Hot stand
Together with the children, you can make a hot stand. The technique in the form of geodes is popular. For manufacturing, you will need the following tools and materials:
-
cup holder;
-
stand;
-
brooch;
-
suspension;
-
cheese plate.

Technique advantages:
-
saving;
-
availability of a finished form;
-
low material consumption.
Disadvantages:
-
one form always;
-
there will be no transparency;
-
bulky filler must not be used.

You can use the ready-made form. It saves time. In this case, it becomes possible to make transparent products with a depth of 1 cm.
Using the form makes it possible to work in different techniques:
-
Petri;
-
filling objects.
In this case, the form is reused, which is important when serial products are manufactured.

But this method also has disadvantages.
For example:
-
high consumption of material;
-
non-unique outer contour;
-
no three-dimensional volume.
The hot plate is made according to the same principle as the countertop. The epoxy resin is diluted in the same way, the drying time is maintained, as well as the need for subsequent sanding.

Useful Tips
When the resin is completely cured, it may appear slightly cloudy. Such a product looks unattractive.
Grinding is a way to give a product the desired look. The elasticity of epoxy is the very property that allows the craftsman to perfect the craft.
Sandpaper acts as the main tool of the grinder. Some people use a router that is used to polish their nails.
During processing, a large amount of dust will be raised into the air. A respirator is a must-have lung protection.

The sandpaper is necessarily wetted with water, so the resin does not overheat, respectively, and does not deform.
See the video below for even more epoxy craft ideas.


