Foil Crafts

Foil is a versatile material suitable for a wide variety of crafts. Figures from it are beautiful and exquisite.

What kind of crafts can you make for children?
Even a small child can cope with the creation of simple figures from improvised material. For work, you should choose the simplest schemes.

Icicle
Beautiful foil icicles can be used to decorate a Christmas tree or trees in the country. The process of creating an icicle consists of simple steps:
-
to begin with, you need to cut out several trapezoids 10-15 cm long from foil;

-
the workpiece must be twisted between the palms and carefully rolled into a thin cone;


-
after that, the figure should be coated with glue and sprinkled with sparkles;


- a paper clip should be glued to the wide part of the icicle, to which you can easily tie a loop.

To decorate a house or plot, you can use several figures of different lengths. To make them seem more voluminous, sheets of foil should be wrapped around a base made of plasticine or any other suitable material.
At the same time, remember that such crafts are more difficult.
Garland
To create this simple DIY craft, your child will need foil and a long silver thread. You can make such decorations for your home in a couple of minutes. For this you need to roll balls of different sizes from foil. With the help of a thick needle or awl, neat holes are made in them.


All these balls are strung on a thread. Several strands of silvery rain can be placed between them. The garland turns out to be very beautiful.


But if the craft made from ordinary balls seems too boring, it can be supplemented with snowflakes, stars or some other figures.


They can also be made from leftover foil in just a couple of minutes.

Christmas toy
Another decoration that can be made for the New Year is a simple Christmas tree ball. To create such a craft, you need to prepare foil, scissors, tape, thin rope and glue. Work on a toy consists of a number of stages.
-
To begin with, you need to cut several equal strips from a roll of foil.
-
Each of them needs to be rolled up. The balls will turn out to be smooth and pretty.
-
You can use a foam or foil ball as a base for the toy. A thin string or tape is attached to it with glue. For her, the toy will be suspended from the branches.
-
Foil balls are glued to this frame in random order. It is important that they fit snugly together.
-
When the figurine is dry, a large silver bow should be attached to the base of the loop.


Such a simple toy looks no worse than a purchased one.
the Rose
You can make a beautiful rose from silver, gold or colored foil. For this, the foil must be cut into strips. The wider they are, the more voluminous the flower will turn out. After that, the tape must be rolled into a loose roll. You can twist it around the handle. The resulting detail must be lightly kneaded with your fingers. The upper edges of the petals need to be bent outward. The flower turns out to be very beautiful.
The stem of the rose can be rolled from a wide strip of foil. The attachment point is masked by leaves with sharp edges.

Easter egg
Even a small child 5-6 years old can make this simple craft from food foil. The egg must be wrapped in dense layers of foil. After that, the surface must be leveled with the handle of a spoon or knife. The egg turns out to be smooth, as if painted with silver paint.

The finished craft can be additionally decorated with bows, lace or colored threads.
Snail
Another great option for beginners is the foil snail. The step-by-step instructions for creating a three-dimensional figure are very simple.
-
Roll a tight ball of suitable size from the scraps of foil.
-
This blank is wrapped in a larger piece of foil. The "house" for the future snail is ready.
-
Another piece of foil should be folded to form a long strip. The edge of this part is slightly sharpened.
-
The round piece is attached to the back of the snail.
-
After that, the entire thick figure is wrapped with a large piece of foil.
-
You can attach neat wire horns to the top of the craft.

This light autumn handicraft may well be referred to kindergarten.
Mushroom
The same workflow can be used to create mushrooms. As a basis for the hat, not only a piece of foil is used, but also a large button or any other similar detail. It is located in the center of the foil and wrapped around it. The stem of the mushroom is formed from the remnants of the material. The bottom of this piece should be thicker. This will make the figurine more stable and more like a real mushroom. In addition to it, you can make a hedgehog or beautiful voluminous leaves.

Candlestick
This craft may seem too complicated for toddlers. But a child of 8-10 years old will cope with it. The process of its creation consists of the following stages:
-
the foil must be cut into wide strips, to form long bundles of them;
-
a rectangular frame is made of these parts, its edges are additionally attached to each other with glue;
-
the same thin flagella are twisted into simple spirals;
-
these blanks are attached first to the bottom of the basket, and then to its side walls;
-
When the candlestick is ready, you can attach a thin handle to it.


The finished craft can be used as a candlestick.
Ideas for adults
There are also more complex crafts, consisting of many parts. It will be interesting to make them even for an adult.
Butterflies
To create exquisite butterflies that sit on flowers, the foil must be cut into long strips.They are rolled into thin tubes. They should all be the same thickness.
One of the tubes must be made wider - this will be the body of the future butterfly. Graceful wings are formed from thin tubes. The patterns on them can be anything you like. To make the butterfly strong and beautiful, the wings should be fixed to the body with glue.
Lilies are made in the same way. When all the details are ready, the composition must be assembled by fastening all the blanks with glue.

Three-dimensional picture
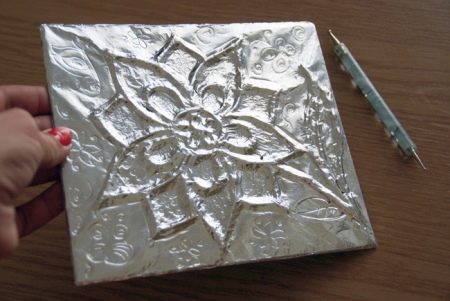
Thin silver foil can be used to make an excellent imitation of a chased picture. To work on this craft, you need to prepare:
-
cardboard;
-
glue;
-
cotton swab;
-
shoe cream black.


The painting process consists of several steps.
-
To begin with, any suitable drawing is depicted on a sheet of thick cardboard.

-
Each line must be circled with PVA glue.

-
When it dries, the entire sheet must be well coated with glue stick.

-
Foil is attached to the surface of the painting. Its surface is gently smoothed with the wide side of the nail.

-
With a cotton swab, you need to gently attach the foil to make the pattern clearer.

- Shoe cream is applied to the finished painting. This will help shade the raised elements.

The works in this technique are very beautiful and voluminous.

Helpful hints
In the process of creating foil crafts, you should adhere to certain rules.
-
You need to work with this material carefully, because the foil can have sharp edges. Therefore, a child in the process of creating a figurine may accidentally cut himself.
-
It is best to use special foil to create various crafts. It is sold in specialized stores. You can choose materials of different colors for doing creativity.
-
Twist thin foil cords very carefully. Any sudden movement will damage the sheet.
-
To create various engravings, you should use a special thick foil for embossing. It can be gold, silver or copper.

Foil works can be a great home decoration or a gift for a loved one. The main thing is to approach their creation with imagination, and not be afraid to experiment.
You will learn how to make a foil balloon in the video below.


