Crafts "Clock" from leaves

You can create a clock from leaves or branches on your own, or turn this interesting and exciting process into a teamwork. And the resulting craft can be used in the interior as a decor.


Preparation
For crafts, you need to collect and dry the leaves. There are several ways to do this.
-
Classical - under pressure, that is, leaves are laid between the pages of a book or newspaper. The paper absorbs moisture well and the material will be ready in a few days. It is not recommended to place more than 1-2 leaves on one spread, otherwise they will dry out crookedly or stick together.

- Iron... This is an express drying, when the material for work is needed tomorrow. To do this, the leaves are laid between two sheets of white paper, and ironed on top with an iron. If the ironing board is soft, it is recommended to place cardboard under the paper. In the process of work, the smell of rotten foliage appears, so it is better to do all the action in the kitchen, and then ventilate the room.

- Natural drying. The leaves are placed on a newspaper or wire rack and left to dry completely. They usually curl, and not always pretty. The method is suitable in cases where such a volume or scrap is needed.


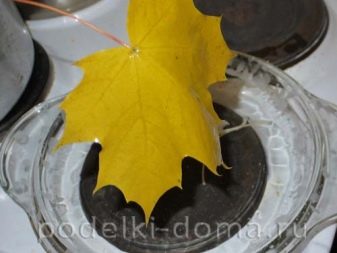
- Paraffin coating. In this case, the leaves are covered with a thin layer of paraffin, which makes them less fragile. Melt the candle on the stove or microwave, but so that the paraffin does not boil, remaining liquid, otherwise there will be a thick layer with ugly smudges. Dip the sheet into it, first with one side, then with the other. Leave to dry on newspaper.


- Drying with sand or semolina. More suitable for flowers, but leaves can also be dried. Fine sand is poured into a cardboard box by 2 cm, then laid out with a layer of plants, sprinkled with sand on top to completely cover them.Do not do several layers, otherwise you can crush. After a couple of weeks, make holes in the bottom of the box to pour the sand. Gently shake off the dried plants themselves from its excess. The method is good because it preserves the color and shape of the buds.

- Canned in glycerin... Put the leaves in a jar and pour glycerin and water (1: 2). Leave it on for a few days. The leaves are soft, but with a greasy sheen.

If the leaves are too brittle, you can dip them into PVA glue diluted with water (1: 4). Then dry it on the newspaper.
For crafts, you will also need twigs for arrows, you can take one curved one. The dial can be made of seeds, rowan berries, small leaves, acorns and their caps or other small gifts of the autumn forest.
Classic version
Craft "Clock" made of leaves is suitable for an exhibition in a kindergarten. It is simple enough for a child, but an adult's help is needed when gluing and cutting cardboard. In addition to natural material, work will require:
-
2 sheets of cardboard;
-
glue, better than PVA;
-
scissors.

Two identical circles must be cut out of cardboard. The size is for future watches. Glue the leaves by the legs to the first circle around the perimeter to make a frame of leaves. Once the glue is dry, glue the second one to the circle, which will be the dial.
If you want to make the frame more lush, then the leaves can be glued in several rows, and the dial itself can be made smaller, but so that the diameter is slightly larger than the remaining free space.


If desired, the area of the circle can also be decorated using the applique technique with leaves of a lighter, but contrasting shade in relation to the frame. Or leave it as it is. As soon as the glue dries, arrange the dial divisions. You can use dried rowan berries, seeds, acorns, even combine different items. Glue the arrow sticks with the final touch. Autumn hours are ready. If you attach a loop on the back, the craft can be hung on a wall or stand.


How to do with branches?
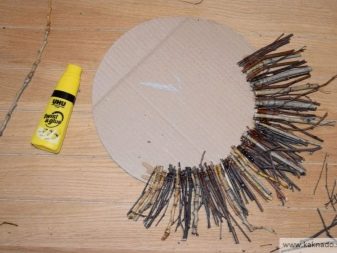
Twigs can be used instead of leaves. They should be collected in advance in order to dry them a little. Choose smooth, approximately the same thickness. Then cut into a length of 10-15 cm, depending on the size of the future hours.
For work you will need:
-
cardboard;
-
glue;
-
decor from natural materials;
-
scissors.

Cut a circle out of cardboard. If you plan to decorate the dial with leaves, paint or glue colored paper for the background, then in this case it is necessary to start with this.
Next, glue the sticks around the perimeter of the circle so that they are at least a third on the cardboard. Otherwise they may break off if touched.
It is recommended to choose a glue that is stronger than PVA, for example, carpentry or "Kristall".


As soon as the glue dries, you can start decorating the dial, glue the time divisions, and then the hands. It is important to reflect here that the craft is on the theme of "Autumn", since the preparation can be done for any season of the year. For this, materials of the autumn theme are used, for example, yellow and crimson leaves on twigs, dried rowan berries on divisions, and more.

If artificial snow is applied to the branches, or smears of white paint are made, then the clock will turn into winter, and if you stick green leaves and flowers, then into summer. Thus, the craft is universal. If you wish, you can attach a real clock mechanism, then the clock will turn into a real one and become an original design decor.
To learn how to make the "Clock" craft out of leaves, see the video.


