Making a caterpillar from apples

In the kindergartens and elementary grades of the school, exhibitions of handicrafts on seasonal themes - autumn, winter and spring - are held. For many parents, this is a real test of creativity. Homemade fall-themed products are most often made from readily available fall materials: leaves, cones, acorns, vegetables and fruits. In this article we will describe how to make a cute caterpillar from apples together with the children.


Preparation
An apple caterpillar is a great craft option for a kindergarten or elementary school (grades 1 and 2).
This type of creativity develops fine motor skills of hands, attentiveness and accuracy, so it is not necessary to wait for an exhibition - invite your child to make a figurine to give to someone from relatives or to play with it.

To create a toy, you will need to prepare a small list of tools and materials.
- Apples. The fruit should be of the same medium to large size, with a smooth surface and no damage. The color does not matter, the fruits can be red, green and yellow, the main requirement is a solid skin. To make a craft, 5-6 identical apples are enough.
- Carrot. The vegetable will be used for making small parts of the body, it should be of medium thickness, long and approximately the same along its entire length. For a caterpillar, one long or two short carrots are enough.
- Grape. You will need 1 large green variety and 6 dark grapes - this is the future nose and antennae of the caterpillar, respectively. To make the antennae look more interesting, choose berries of different sizes from a bunch of dark grapes: two small, two medium and two large.
- Cranberries or other round berries. If your caterpillar is a girl, you can make beads from small berries for her.
- Threads and a needle. Necessary tools for fastening beads.
- Eyes. These can be purchased toy eyes or homemade ones - from packaging from small tablets, cardboard and beads.
- Glue. It is necessary to attach the eyes to the face, all other parts will be held together with toothpicks.
- Toothpicks. The material needed to hold the parts of the craft together. If there are no toothpicks, you can use matches, but the creation process will be more difficult and the craft will turn out to be fragile.
- Knife and kitchen board. To form some of the pieces of the craft, you will need to cut them. At the stage of using the knife, help the kid if he does not know how to use it.
- Finishing elements. To make your craft look beautiful, add decorations to it - it can be dried leaves, grass, a bow, flowers, ribbons, or any other cute details.

Wash and dry all used fruits, vegetables and berries thoroughly before starting work so that the finished craft looks aesthetically pleasing and neat.


How to do it step by step?
An autumn craft is a great chance for young children to show their creativity and imagination.


In addition, such an activity is a good way to spend time with your child in an interesting and informative way.
Making the craft is divided into four stages: fastening the frame, attaching the legs, forming the antennae and creating the face. Let's consider step by step the process of making an apple caterpillar on your own.


Fastening the frame
To create the body of the caterpillar, you will need apples and toothpicks. For convenience, we will describe a 5-fruit caterpillar, but you can use more.


Remove the leaves and stems from the fruit, if any, and buff the skin with a towel.


Before work, choose one of the most beautiful apples and put it aside - it will be the head. Consider step by step the technique of fastening the torso.
- Select three apples and place them in front of you with the side of the stalk.
- On the sides of the groove of the stalk, at a distance of 2-3 cm from each other, stick two toothpicks vertically.
- Holding the toothpicks so that they can pierce the skin, join 3 fruits together. Attach the fourth apple so that it is turned by the indentation of the stalk to the previous apple.


At this stage, you do not need to attach the caterpillar head, until you put the fifth fruit aside, we will work with it a little later.

Attaching the legs
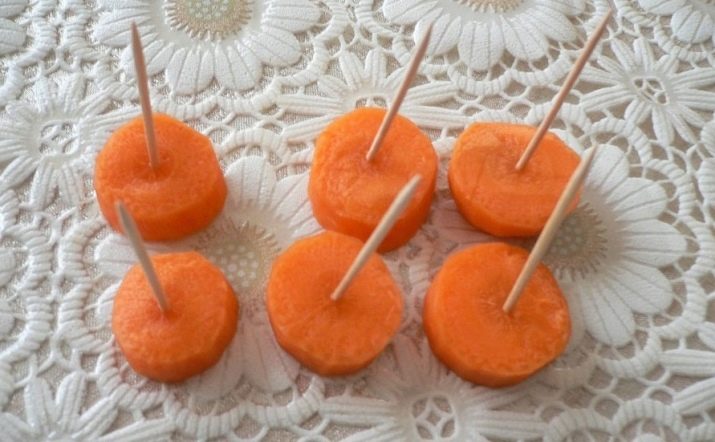
To make caterpillar legs, you need to cut the carrots into thick slices.

If your child is only 3-4 years old and does not know how to use a knife, it is better to do it yourself. In the event that the child is already attending school, he can complete this task himself. Let's take a closer look at the method of making the legs.
- Cut the washed carrots into slices 1-1.5 cm thick, try to cut pieces of the same thickness. To make the parts the same, use a ruler - place it next to it and make basting on the vegetable with a knife. Then remove the ruler and carefully slice the carrots on the board. For a caterpillar with a body of four apples, 8 circles are enough - 2 parts for each segment of the body.


- If the carrot is slightly different in thickness, sort the circles by size: the small ones will be at the beginning of the body, and the large ones will be at the end.

- Insert one toothpick vertically into the middle of each circle. Insert toothpicks at least half the thickness of the carrots so that the future leg does not fall apart.

- Now insert two legs into each apple segment of the body using the second side of a toothpick. Attach the parts parallel to each other, the distance between them should be 3-4 centimeters.

- Adjust the height of the toothpicks so that they all touch the floor when the caterpillar is on its feet.

If you still have carrots, you can cut another circle out of it and cut it in half - the half of the carrot is very similar to a joyful smile, we will use it later to create the face.

Antennae
To make the antennae for a caterpillar, you need to take a dark grape, two toothpicks and an apple head.


Consider the manufacture of antennae step by step.
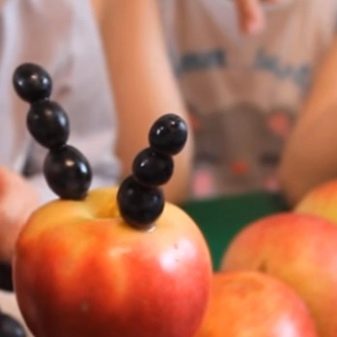
- Put clean grapes without damage on toothpicks in the following order: first large, then medium and finally small.
- Pierce the first two parts with a toothpick through and through, and plant the last berry so that the sharp edge of the toothpick remains inside - it should not be visible on the finished craft. Then place all the grapes tightly together.
- In the event that your grapes are not too large and about the same size, plant 5-6 identical berries on a toothpick - such antennae will also look very interesting.
- Now take the caterpillar's head and place it in front of you with the stalk deepening downward. Next to the top indentation, insert the other side of the toothpicks so that there is no visible piece of wood. Antennae can be positioned in different ways: exactly on the sides or on one side of the recess. You can also adjust the tilt - vertically or slightly to the sides. The distance between the antennae should be about 2 centimeters.
To make this part curly, use dense wire instead of toothpicks.

The grapes strung on a wire can be bent, then the antennae of the caterpillar will turn out to be semicircular or winding.


Eyes and face
Before attaching the head with antennae to the body, you must first attach the eyes, nose and mouth to it. For the nose, we have prepared a large light grape - let's take a closer look at how to attach it to the face:
- first, using a half of a toothpick with the sharp side, make a hole in the middle of the apple where the nose will be located;
- then plant the grape on the sharp side of the toothpick so that the tip remains inside it;
- Insert the blunt end of a toothpick into the hole you made earlier and push your nose tightly to your face.


If you bought eyes in a store to create a craft, you just need to glue them just above the nose at a distance of 1-2 centimeters from each other.


In the event that you do not have special parts, you can make them yourself from packaging from tablets, cardboard and glue. Let's take a closer look at the method of self-manufacturing of eyes.
- Take the pill pack and carefully cut two transparent segments from it. If the clear plastic is dented, flatten it with your finger. Cut off the excess part of the packaging, leaving 1-2 mm of "margin" around the plastic.
- Cut out two circles of the same size from the white cardboard as the parts cut from the package.
- Place a black bead or bead in a pill container.
- Grease the loose ends of the package with glue and cover with a circle of cardboard on top.
- When the glue is dry, glue the finished eyes to the caterpillar's face.

If this option does not suit you either, you can make blackcurrant eyes by attaching them to your face with pieces of toothpicks. You can also use plasticine and make colored eyes for the caterpillar: a white eyeball, a blue iris, and a black pupil.


Make the caterpillar cheerful by attaching a carrot mouth just below its nose.
You can also make a smile from another material or skip this step altogether - the craft will still look great.


Let's perform one more action before attaching the head to the body - create beads for the caterpillar. To do this, you will need a needle, thread, and cranberries. Let's take a look at how to make this jewelry step by step.
- Thread the needle through a thread about 25-30 centimeters long so that later it will be convenient to tie the ends of the necklace.
- String the berries on a string, leaving at first 7-10 centimeters of free thread. The number of berries depends on their size and the size of the apple.While stringing, try on the beads on the torso - the diameter of the necklace should be slightly less than the diameter of the apple.
- When you've strung around enough cranberries, tie a string and cut off the loose ends.

The smart beads are ready, now you need to put them on correctly. First, insert the toothpick into the last segment of the body vertically upwards - the head will be attached to it. Now put the beads on the makeshift neck and only then proceed to attaching the head.

If you reattach the head first, the necklace will not be able to be put on, and you will have to remove the head again or redo the beads.


When the necklace is in place, attach the caterpillar's head to the body so that the toothpick hits the recess in the apple-head stem. At this stage, you can stop - the craft "apple caterpillar" is ready. But you can also add decorative elements, we suggest considering several options.
- Leaves. Attach dry tree leaves to your head - then it will feel as if a caterpillar has just crawled out from under fallen leaves. Use glue or plasticine for fastening. Also, a few small leaves can be glued to the body of the caterpillar, but not too many.
- Dried flowers. Instead of leaves, you can use flowers - then your craft will look very elegant and festive. It is better to use dried flowers - they keep their shape well and support the autumn theme, and fresh flowers will wither quickly.
- Bow. The caterpillar girl already has cute beads; a neat bow attached between the antennae will add more charm to her. In combination with small flowers, the bow will look even more spectacular.


If during the creative process you have your own ideas for improving or decorating the craft, feel free to bring them to life.


Elegant craft with a hat
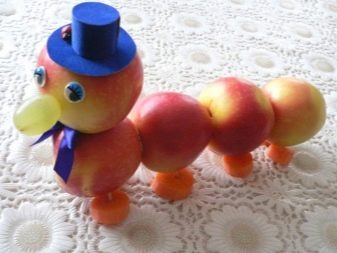
Above we described making a cute caterpillar girl, now we propose to consider making a boy. To make the caterpillar look like a guy, add two interesting pieces of clothing to it - a hat and a bow on the neck.
To make the boy even more different from the girl, choose larger apples for making him.
The very process of making a caterpillar-boy does not differ from the method described above, it is necessary to perform all the same manipulations, except for decorating with beads and other decorative elements. The head of our craft will be decorated with a hat, so we will consider the step-by-step making of a hat from cardboard.
- Choose colored cardboard (for a boy it is better to use blue or green) and cut out several parts from it: a circle with a diameter of 4 cm, a circle with a diameter of 2 cm and a rectangle 6x2 cm.The large circle is the brim of the hat, the small one is the bottom, and the rectangle is the walls headdress (crown).
- Fold the rectangle along the long side so that the diameter of the hole is equal to the diameter of the small circle. Lubricate the free entry with glue and connect with a crown.
- When the crown is dry, glue the bottom to it, and then glue the finished top of the hat to the brim.
- You can decorate the finished hat with a satin ribbon to match or tie a floss thread with a bow around the crown.


You just have to fix the headgear on the top of the caterpillar.
This is the easiest way to make a stylish hat, but not the only one. The hat can also be created using the origami technique, knitted or glued using the papier-mâché method from floss threads.


Another detail that can be used to decorate the craft is to attach a bow or tie to the neck. The bow can be purchased at the store or made yourself from a satin ribbon. Choose a purchased bow as simple as possible so that it does not turn the boy into a girl, and then just glue it just below the caterpillar's neck. If you want to decorate the craft with a tie, cut a diamond out of the carrot and attach it just below the neck with a toothpick.
You can make a bow yourself from a satin ribbon directly on the caterpillar, the main thing is to choose a color to match the hat. Put the ribbon around the neck of the crafts and tie a neat bow in the same way as you tie your shoelaces, only leaving slightly longer ends.


You can also decorate the boy caterpillar by attaching hair to it. This piece can be made from a variety of materials: dry grass, straw, or hair from an old doll. Glue the hair from the selected material to the crown of the craft so that it is neatly distributed between the antennae and on the back of the head. A hat can be glued over the hair to cover up any errors.
If the hair looks nice on the head of the caterpillar, you don't need to stick the hat on.


How to make a caterpillar from apples with your own hands, you will see in the next video.


