Crafts from sushi sticks

If you periodically order sushi home, then you probably have a box filled with bamboo sticks (in Japan they are called "hasi") somewhere in the kitchen. It's a pity to throw them away, but to say when ordering not to add them, everyone regularly forgets. But upon closer examination, this "treasure" is not so useless. This is a real find for DIY. Here are just a few simple examples of what you can make of them.


Frame making
Hasi will help you decorate your workplace with an interesting photo frame. And not just one. Prepare yourself a place, collect all the necessary materials and - off you go!
Box 1
A beautiful frame filled with autumn mood can be made quite simply.
Materials:
- from 8 sticks for sushi;
- "Grid" for flowers;
- dry flowers;
- beads;
- scissors;
- glue gun.
Let's analyze the course of work.
- Heat the glue gun. Be careful! Hot glue is very easy to burn.
- Lay out a square out of 4 sticks. The tips should protrude slightly.
- Hot glue the parts together.
- From the grid, cut a square to fit our frame, and glue it to the blank from the sticks.
- Clip the selected image onto the grid.
- Lay out the rest of the details, shifting to the center of the square. Stick them on.
- Arrange dry flowers on the frame. Can be completed with mesh ribbons and beads. Don't overdo it with decor!
- Once you decide on the location of the "bouquets" - glue them.
- Cut off excess threads.
- You can make a "leg" for the frame from thick cardboard, but with proper assembly, this is not required. Ready!
The only drawback of such a frame is the inability to replace the photo in it over time. Therefore, consider your choice of image carefully.


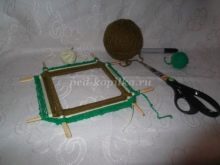
Box 2
This master class is perfect for working with children.As a result, we will get a bright, multi-colored frame, which is not at all difficult to make with our own hands.
Materials:
- 4 Chinese sticks;
- knitting threads - you need 3-4 colors, choose in advance an interesting combination of colors that the child will like first of all;
- scissors;
- pencil.
Let's see how this is done.
- Lay out the details on the table. Make a mark on them about 5-7 cm from the edge.
- Take 2 sticks so that their ends point in different directions.
- Start to wind the thread of the first color, focusing on the mark.
- After 3-4 turns, wind the cross at the intersection.
- Wrap the part with the mark to the next anchorage point selected.
- Add a third detail. A sort of letter "P" with protruding tips should come out.
- Continue winding the thread.
- Form a square by adding the last stick.
- Wrap this part too. At this stage, it is already inconvenient to work with a ball, measure the length of the thread you need and cut it.
- Now we wind the thread around the outside of our frame. The thread should lie on the stick, go around it from below and go to the next stick.
- After making about 5 rows, change the thread. Continue alternating colors until 1 cm is left to the edge of the sticks.
- Cut off the excess and tie a knot.
- May be completed with a net of threads in the center. Then, with the help of clothespins, it can be used for notes. Ready!
What is important is that working with a child on such a frame contributes to the development of fine motor skills.


Box 3
The easiest option, but no less cute.
Materials:
- 8 to 12 sticks;
- thick cardboard;
- glue gun;
- Thick plastic protection for photography - something suitable can be found in the scrapbooking section of a creative store;
- paint (optional).
Work progress:
- make a blank for the frame from cardboard;
- glue the hasi back to back, paint them if desired;
- put a photo on the cardboard, cover it with plastic on top;
- fasten the sticks and the base so that the photo does not fall out.
All is ready.


How to make an original jewelry stand?
Another home decor element that can be easily made from hasi is a jewelry stand. Here are just a couple of examples.
Stand 1
The simplest version of the stand is made in eco-style.
Materials:
- at least 7 hasi;
- twine;
- glue gun.
Progress:
- measure the distance between the sticks, it should be such that the jewelry does not touch each other;
- glue the "ladder" out of sticks;
- attach the legs at an angle - the structure should be stable;
- mask the gluing points with twine;
- glue the ends of the rope so that they are not visible;
- place decorations and enjoy!


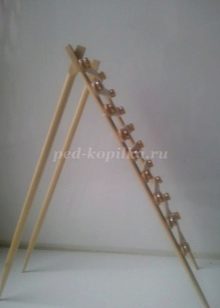
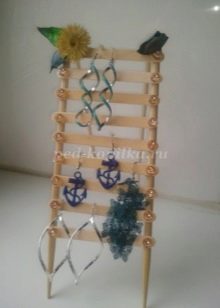
Stand 2
The second version of the stand is not so minimalistic, but just as simple to perform.
Materials:
- 2 sets of sushi chopsticks;
- about 10 popsicle sticks;
- 20 flat beads;
- wire;
- glue gun.
The workflow is pretty straightforward.
- Choose 10 ice cream sticks of the same size.
- Place two sushi sticks vertically.
- Glue the "steps" to them from popsicle sticks.
- Stick the beads on the "steps".
- From the two remaining sticks, make a support for our stand. It should be slightly tilted.
- Additionally secure the fasteners with wire.
If you want, mask these areas with beads or other decorative elements. The stand can be used!


More ideas
The range of hasi crafts does not end with photo frames and jewelry stands. If you wish, you can build almost anything from them.
Mirror-sun
Mirrors framed by wooden beams can now be seen in almost any home improvement store. True, they cost a lot. But nothing prevents you from decorating the mirror in this way on your own.
Materials:
- mirror;
- a lot of sushi chopsticks;
- glue gun;
- spray can of gold paint.
Let's see how to do this.
- We color our future "rays".
- We put them on the mirror.They should protrude from the edges at different distances.
- Glue the first layer of sticks directly to the mirror. Attach the next ones to other sticks.
- The beams can be trimmed as needed.
- We are waiting for everything to dry. We hang the mirror on the wall and enjoy the view!

Here are some more ideas for home art.
- From sticks glued together in the manner of a log house, you can make a box for small things.
- You can please children - make a dollhouse and furniture for it from sticks. This activity will help you and the children pass more than one evening.
- Boys will love planes and stick boats. You can knit a simple raft or glue the plane out of paper and 4 sticks.
- Our "heroes" will help to add plasticine crafts. Thanks to them, the hedgehog can get needles.
- In the spring, you can easily make a birdhouse.
- For yourself, you can arrange a pencil holder by pasting the glass with chopsticks, supplementing the product with jute twine.
And this is just a short list of crafts. Having shown imagination, in a similar way, you can design or make from scratch a lot of household trifles. So the "pieces of wood" stored in the kitchen drawer will find a second life without any problems and will delight you for more than one year.


For information on how to make a craft from sushi sticks, see the next video.


