Crafts from plastic spoons

Unlike other similar compositions from scrap materials, crafts made from plastic spoons have a rather original and creative look. They can become a full-fledged decoration of almost any interior or a unique element of landscape design. The main thing is to follow the manufacturing instructions exactly and take into account the recommendations of specialists.


Simple crafts for children
When choosing crafts for children, especially preschool children, you need to pay attention not only to the complexity of manufacturing, but also to the appearance of the future composition. Kids will be more interested in bright and colorful products, then they are more willing to join the work and take an active part in the creation process. Among the crafts made from disposable plastic spoons for little needleworkers, the "Ladybug" option is often chosen. In the course of manufacturing, a child can do a significant part of the work with his own hands without the help of adults, which is very important for his mental and physical development. To create the "Ladybug" composition you will need the following materials and tools:
- large stationery knife;
- scissors;
- Super glue;
- red, white and black paints;
- thin brush;
- white buttons;
- caps from plastic bottles.


Let's describe the step-by-step instructions for making the "Ladybug" craft.
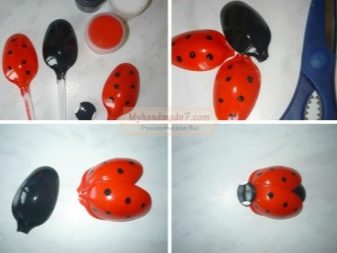
- Take three disposable small plastic spoons (teaspoons) and carefully cut off their handles at the very base of the blade, leaving about 5 millimeters of the neck of the cutting. In this case, it is necessary that the edge of the cut is slightly rounded.
- Paint the outer surface of one spoon in black, the other two in red.
- When the paint dries slightly, use a thin paintbrush to make even small dots on the red spoons.
- Using superglue, fix the red spoons on the black ones - you need to apply the glue only to small areas at the cutoff points of the handle, so that the "wings" themselves are slightly raised.
- At the junction of the spoons, fix the cap from the plastic bottle - the head of the "ladybug".
- On the head-cover of white buttons, make eyes of crafts - glue with superglue.
- Also, instead of bottle caps, you can use a large black button in the form of a head, only in this case it is better not to glue the eyes, but paint with white paint.


When making crafts for kindergarten or school, you can leave it as it is or attach it to a piece of paper. If the composition is created for home decoration, then one of the most successful options for its use is to fix it on a long knitting needle or even piece of wire and install it in a flower pot.
It will be an excellent decoration for indoor vegetation and will help to visually recreate the natural environment.


Making flowers
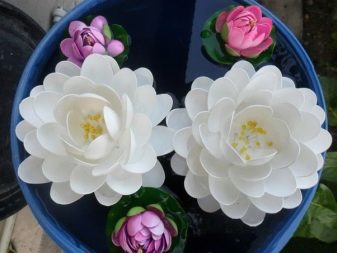
Disposable plastic spoons make excellent flower arrangements and bouquets. The shape of the blade of the cutlery is very similar to the petals of many plants, so you can make many different crafts from spoons, similar to natural flowers. One of the best options is a lotus or water lily. In nature, the petals of these flowers are white, and you don't even have to paint the spoons - you just need to assemble a beautiful composition from them.


A step-by-step master class for beginners on making a lotus from disposable plastic spoons is given below.
- Cut a piece of dense foam about 10 by 10 centimeters in size, preferably at least 5 centimeters thick.
- Use a large utility knife to cut and clean the sharp edges, making a circle.
- Cut off half of the cutting from plastic spoons; the cut points should be as sharp as possible in order to better fit into the foam.
- In a circle, repeating the structure of a living lotus flower, insert the spoons into the foam with the blade upwards, while the notch of the spoon should be inside. Spoons should be placed in rows, but do not try to make them too even and symmetrical. It is better to try to depict the natural chaotic arrangement of petals, as in a real flower.
- As each row approaches the center of the craft, the blades of the spoons need to be raised a little higher so that the central rows rise slightly above the outer ones. To do this, you can leave longer cuttings on some blanks or not cut them at all, but pierce the foam through and through with them, if then the craft is not planned to be glued on a flat surface.


Such compositions are very popular in landscape design (for decorating personal plots and summer cottages). Plastic spoon lotuses are placed in a wide container of water, such as a low barrel. The foam prevents the craft from sinking, holds it on the surface and allows it to balance in the wind, making it more like a living lotus flower. Being in the same composition with real flowers, such a lotus made from plastic spoons is very similar to a real plant and is practically indistinguishable from the outside.


As additional decorations next to the lotus, you can mark out similar products from smaller spoons, but in different (bright) colors. This will add realism and allow you to more clearly depict a natural reservoir with its various vegetation. The work is carried out in the same way as in the case of the large lotus: cuttings are cut off the spoons, and then their blades are inserted into small pieces of foam.
The only difference is that as they approach the center, the blades are adjacent to each other, and the outermost row is placed almost horizontally and completely tilted green.


How to make a lamp?
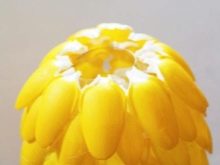
To make a lamp from plastic spoons, you need a base of the appropriate shape, which will play the role of a frame. Most often, a cut plastic bottle with a volume of 2 or 5 liters is used for these purposes. Prepared elements from plastic spoons and other materials are attached to the bottle, and then the original lampshade is put on a lighting fixture or used as a chandelier under the ceiling.
It is important to consider that an ordinary incandescent lamp heats up, it can melt a plastic bottle and cause a fire. Only special LED bulbs should be used with these homemade lampshades.


Step-by-step instructions for making a lamp from plastic spoons:
- the bottom of the plastic container is cut off;
- cuttings are removed from the spoons together with the necks so that only rounded blades remain;
- the blades are painted in the desired color with acrylic paint;
- when the paint dries, the blades are staggered to the container in rows, it is recommended to start from the bottom - from the place where the bottom was.


The original head of the lamp can be made of colored cardboard. For example, if you decide to make a lampshade in the shape of a pineapple, then first you need to cut out a "sun" with sharp edges from green cardboard, fix it on top (on the neck of the bottle), and then glue the sharp pieces in the form of fruit leaves. When making a shade for a ceiling chandelier, the neck of the bottle can be disguised differently: glue a washer-type ring element from spoon blades and fix it in the upper part of the craft using superglue.


More ideas
From plastic spoons, you can make both independent compositions and various decorations for decorating household items. One of the most successful products of this plan is considered to be an original frame for a mirror, wall clock or photographs. To make it, you will need to cut a round or square base out of thick cardboard, mark the center and draw a circle there: its diameter must be calculated so that it corresponds to the object that is planned to be placed in the frame. Outside the line defining the central part, glue the spoon blades to the cardboard base in rows in a circle.


You can place spoons in any way: both with a bulge inward and outward (depending on personal preference). It is better to shave off the plastic blades before gluing: this will allow the paint to be applied more evenly, without gaps and gaps.
Additionally, the composition can be decorated with rhinestones or beads, fixing them with superglue in the center of the spoons.


Puppet show
A puppet theater made of plastic spoons will help diversify leisure activities and attract a child to useful creative activities. The craft is made quite simply, the parents will only need to organize the process and a little help when working with sharp tools.


To make the theater, you will need the following materials:
- a set of colored paper;
- glue;
- felt-tip pens or colored pencils;
- small black and white buttons;
- beads;
- rhinestones;
- cotton wool;
- scissors;
- liquid PVA glue and superglue.


The essence of making crafts is to create fairy-tale characters from plastic spoons. Various elements of colored paper and other materials are fixed on the blades, which reflect the faces of the characters, houses, trees and other related props necessary to recreate the fairy tale. The manufacturing process will depend on the chosen work or plot, but in any case, in order to simplify the work, you need to adhere to certain recommendations:
- it is convenient to make the hair of the heroes from bundles of threads or cotton wool;
- beads or multi-colored rhinestones are great to imitate eyes;
- houses and other additional props are best made of colored paper;
- it is recommended to attach individual elements to the blade of the spoon using super glue.


In an extreme case, in order to simplify the procedure as much as possible, you can not make individual elements of faces or clothes, but only draw them on the blades of spoons, while simply painting over the cuttings. This option is suitable if there is too little time left for the creation of the craft, or if the theater is planned to be made together with a small child, who will still find it difficult to cut and prepare all the props from paper and other materials.


For theatrical characters to be conveniently controlled during the performance, it is better to place the spoon cuttings in plastic glasses turned upside down.
The figures fixed in the glass will become stable, they will not need to be constantly held in your hands, but can be easily moved across the table and other flat surface. To do this, you just need to make a slot in the bottom of a disposable plastic cup with a knife and insert a spoon into it along the entire length of the cutting.
The advantage of this method is also that it is much more convenient to attach clothes or other elements to the glass, and the characters themselves turn out to be more realistic, in contrast to thin figures from one handle.

Decorations for the interior
Crafts made from plastic spoons can not only be used to decorate a room, but also be useful at the same time, acting as a separate piece of furniture, for example, a flower vase. For self-production of the latter you will need:
- large disposable plastic spoons;
- two-liter plastic bottle;
- Super glue;
- acrylic paints or gouache;
- multi-colored beads;
- large stationery knife.
Disposable plastic spoons will need about 50 pieces, it is better to take with a margin - 55. About 10 large plastic spoons are placed in one row on a two-liter bottle, and about 5 rows go out in height. It is recommended to choose only large cutlery. If it is decided to use small teaspoons, then it is better to attach them to a smaller bottle.


The process of making a vase from plastic spoons includes five stages.
- Cut off the top of a plastic bottle at the point where the neck begins to narrow to form a smooth cylindrical vessel.
- Using a large utility knife, cut off the handles of the plastic spoons, leaving about 5 millimeters of the neck of the stem. It is advisable to make the cut rounded so that the smooth edges do not spoil the look of the craft.
- Divide the spoons into 5 parts (10 pieces each) and paint them in five different colors. Colors can be selected according to personal preference, based, for example, on the overall style of the interior.
- When the paint is dry, you can start gluing the spoons - they should be attached to the bottle in a circle in an upright position, it is better to start from the bottom. The first three rows are installed with a blade recess inward, the last two are recommended to be fixed on the contrary - so that the blades of the spoons diverge in different directions, like flower petals.
- At the end of the work, a bead or rhinestone is glued to each spoon.

For information on how to make tulips from plastic spoons, see the next video.


