How to mold Toothless from plasticine?

A huge number of cartoon characters give children a lot of room for imagination when creating plasticine crafts. Among them, Toothless from the painting "How to Train Your Dragon" has recently become increasingly popular. This is largely due to the interesting and original storyline and colorful characters. The boy's friendship with the dragon simply cannot but cause delight. However, to make a figurine of a dragon from plasticine, you need to work hard.


Tools and materials
Of course, at first glance, Toothless is a rather complex sculpture, but today there are many different techniques. They allow children of various age groups to make a fantastic hero. For the smallest craftsmen, you should choose the simplest options as possible.
To bring the Toothless figure to life, you can use the simplest plasticine that is sold in any stationery store.


An airy plastic mass is also suitable. She is good because she is able to freeze, and this prolongs the life of the sculpture.
Before sculpting, you will need to prepare the following components:
-
plasticine bars: black, yellow (green), gray;
-
plastic stacks;
-
toothpicks;
-
oilcloth to protect the working surface;
-
a plastic stand on which you can then leave the toy.


Modeling options
Blinding Toothless from plasticine is not at all difficult if you use the instructions, where everything is signed step by step. There are several options for sculpting this funny character. The simplest of them contains the following actions.
-
First, the plasticine must be well wrinkled with your hands so that it becomes soft and pliable. After that, it will be very easy to form any parts of the dragon from it.In this case, crushing two blocks of black plasticine, they are connected to each other.
-
After that, the black plasticine mass is divided into 4 parts. Moreover, they are made different in size. So, to create the torso, you need the largest piece. It is given the shape of an elongated oval, which tapers slightly upward.
-
The second part is smaller and the head is made from it.
-
The resulting parts are interconnected with a toothpick.
-
The third part is used to make paws. The back ones must be made in the form of a drop. At the same time, their wider edge is slightly pressed down. The front legs are thinner and longer. Their underside should also be pressed a little.
-
The base of the dragon is ready, and now we should proceed to detailing it. Small indentations are made under the eyes. Balls of yellow and black plasticine are attached to them, and then flattened a little. The result is eyes with pupils. The eyes can be supplemented with two white dots-highlights.
-
At the site of the nose, it is enough to push two holes.
-
The smallest part of the plasticine is spent on 4 ears. Of these, two are made larger, and two are slightly smaller. They try to give them the shape of a drop, and then slightly flatten and sharpen the ends. Small spikes are made from the middle of the head and all over the body of the dragon from the back.
-
Depressions are made at the ends of all paws using a stack or a toothpick. White claws of arbitrary shape are glued there.
-
The wings are made of two pieces of equal size in the shape of a drop. Their edges must be cut in several places, and then, smoothing, spread the pointed parts in different directions.
-
All the remaining plasticine is spent on a long tail, at the end of which a fin is made.


To make the dragon more interesting, it can be supplemented with a piece of fish. It is easy to make from gray plasticine.
With your own hands, you can make a slightly different version of Toothless, with which older children of kindergarten and first grade students will perfectly cope.
-
As always, at the first stage, plasticine is softened and divided into parts. The figurine will need one large piece (torso) and four smaller pieces. From the latter, the head, tail and paws will be obtained. You should also set aside a small part from which the ears and spikes will be made.
-
The body of the dragon is made in the form of a cylinder, and the head is in the form of a ball.
-
The resulting parts are connected and slightly adjusted their shape.
-
The front paws are made elongated, and their ends are supplemented with claws.
-
The tail is made long, and an arrow-shaped point is created at its end.
-
The hind legs are made in the same way as the front legs, but only shorter.
-
Spikes should be attached along the entire figure in the middle. They should start at the head and end at the tail.
-
On the muzzle, the eyes are made from flat pieces of yellow, black and white plasticine. Each subsequent layer on the eyes should be of a smaller diameter.
-
The wings are drop-shaped and large. Stack lines are applied to them for relief. They are then attached to the back of the night fury.


There is also a more beautiful version of the winged hero from the cartoon "How to Train Your Dragon?", But it requires more detail. It can be mastered by children from only 8 years of age and older. Creating a miniature dragon figurine in stages is as follows.
-
Knead black plasticine and create the main part of the body from it. It will be elongated with a pointed end. Moreover, on the one hand, the body should expand and round up.
-
On the pointed end of the tail, 3 parts are attached in the form of a drop on each side. Small spikes are also made along the back.
-
All legs are thickened towards the bottom and slightly curved at the ends.
-
When collecting the figure, the body is bent up, the front and hind legs are attached to it. As for the tip of the tail, then twist it a little.
-
The head is made in the form of a small ball, sharpened on one side, and attached to the body.Depressions are pressed on it, in which there will be eyes.
-
The latter are made of green plasticine in the form of round plates. Smaller black plates are attached to them. White highlights are made in the form of small dots.
-
Paired teardrop-shaped ears and spikes are attached to the head. The mouth is drawn using a stack.
-
The wings should be uniform in shape and size. You can make jagged edges on one of their edges. After that, they are fixed on the back.


Useful Tips
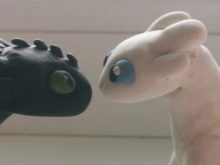
If you wish, to make a dragon a real souvenir, you can use sculptural plasticine to make it. The day fury is capable of complementing the figure of the night fury. It can be made according to the same instructions, replacing the black plasticine with white.

When working with plasticine, soapy water can help. It is convenient when a bowl with such a solution is on the table next to the work surface. In it, you can moisten your hands so that the plasticine does not stick strongly to your fingers and does not leave marks on them. It is advisable to put on an apron and oversleeves on the child before modeling.

It is very comfortable when the space for work is conventionally divided into two zones. In one of them, the sculpting process will take place directly, and in the other, plasticine and tools will be located.
How to mold the dragon Toothless from plasticine, see the video.


The last one is so cute ...)