We sculpt flowers from plasticine
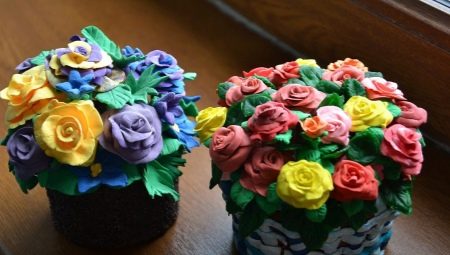
The beauty of a flower can be conveyed in different ways - on paper, by forging, wood carving. We will use plasticine, a material that is available to children and adults. Everyone can try their hand at making crafts of any complexity. If you try, even from plasticine, the flower will look like a real one.


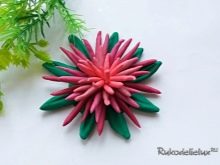
How to make chrysanthemum on cardboard?
Despite the splendor and magnificent appearance, making a chrysanthemum from plasticine is not at all difficult. Adults can connect even small children to this activity. So, we will tell you in stages how to make a beautiful volumetric flower with your own hands.
- For work, we need green and pink plasticine of different shades, as well as a stack and a sheet of cardboard for the base.
- Cut a circle out of green cardboard to form the base for the sepals and petals.
- From a piece of green plasticine, mold elongated rounded blanks of leaves - 9-10 pieces. Fasten them in a circle on the cardboard, with one side towards the center and the other outward. Use a stack to make a groove on each piece.
- Now let's take care of the chrysanthemum petals. Take 4 different shades of reddish color and start rolling out elongated rounded parts with sharp ends on both sides. Each subsequent color should be slightly shorter than the previous one. Start with the darkest tones.
- When all the elements are sculpted, proceed to collect the chrysanthemum. Take the longest and darkest petals, place them between the green leaves, the center of the circle should remain free.
- Forming the flower, gradually move towards its middle, laying out row after row of shorter and lighter parts. Finish with the shortest, lightest petals.The flower is ready.
If you wish, you can attach a wire or pencil leg and put the craft in a vase.


How to mold an orchid?
The orchid competes with the rose because of its sophistication and incredible beauty. The flower looks great, even sculpted from plasticine. Leaves and petals are easy to mold, you can connect both toddlers and older children to work. Let's make a compact orchid twig with three flowers and buds.
- For work, prepare plasticine in white, pink, brown and green colors. We also need a stack, pieces of hard wire and a skewer.
- Start your workflow by preparing the wire. Choose a stiff, non-bending option and cut with wire cutters. The cuts should be the same size as your twig. Wrap the wire in brown plasticine and roll it well between your palms. Try to keep the stems thin and smooth.
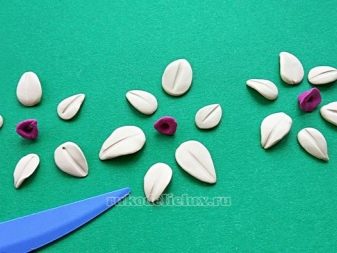
- Go to the blanks for flowers. For 3 sets, you will need 18 white parts and 3 pink ones.
- Sculpt 6 white petals for each flower - 3 small and 3 slightly larger. In the center of each element, draw a longitudinal line with a stack, giving texture to the petals. From pink plasticine, form 3 cores in the form of a funnel, make a hole in the center with a pencil.
- Collect all items into 3 flowers. Please note: the lower petals should be smaller than the upper ones.
- Form elongated leaves from green plasticine, draw a longitudinal line in the center of each part. Prepare small round leaves for the buds, as well as the drop-shaped buds themselves.
- Assemble a beautiful twig from the finished parts, as shown in the picture.



Other crafts
Besides the orchid and chrysanthemum, there are many other beautiful flowers. You can prepare complex floristic figures and make up an autumn composition or a field bouquet for mom, grandmother, girlfriend. A colorful flower bed made of light airy plasticine will be a good gift.
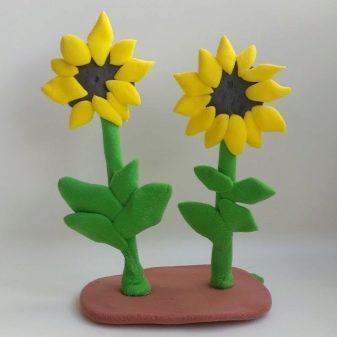


So, we propose to learn how to sculpt different types of spectacular flowers, let's start with the queen of the flower bed - roses.
the Rose
We will perform a rose that is within the power of even beginners. To make it, you will need a sheet of cardboard, a toothpick, green and red plasticine.
- Form a flagellum out of soft green plasticine and twist it into a long spiral-shaped column. The stem for the rose is ready. Stick it onto a piece of cardboard.
- Let's move on to making a flower. Cut 5 identical pieces from a bar of red plasticine in a stack, roll them into balls and flatten them, forming round cakes of the same size. They will become the lower petals of the bud.
- Make another piece from the red material. Roll a thick filament with a thinned end on one side and flatten it. The result is an elongated tape with a narrowed edge.
- Glue 5 petals in a circle on the cardboard above the stem.
- Twist the ribbon-like piece to form a bud. Start twisting from the pointed side. Fix the bud in the center of the red petals.
- Make two elongated leaves from green plasticine, draw a longitudinal line in the center of each of them with a toothpick. Glue the leaves on opposite sides of the stem at a 45-degree angle. As you can see, the most beautiful flower turned out to be quite easy to execute.


Hibiscus
A large expressive and at the same time delicate flower does not have a uniform tonality of petals, but an amazing play of shades that are not easy to convey in plasticine. But we will try to do it.
- To create hibiscus, we need white, pink, yellow and green plasticine, as well as a piece of rigid rigid wire and thin wire blanks.
- Combine a piece of white and pink plasticine, mix vigorously to get an intermediate color.
- Roll three strands of white, intermediate and pink material, place them side by side and flatten them, creating a flat three-color wide ribbon.
- Cut the workpiece into equal pieces.
- From the resulting details, form thin and delicate petals with tapered ends on the dark pink side.
- Use a stack to depict the veins on the petals.
- Prepare leaves from green plasticine and also draw veins on them. Wrap the wire with green material, actively roll it between your palms, turning the workpiece into a thin stem.
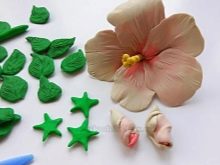
- Combine 5 petals to create a beautiful flower. Make a yellow pistil and decorate with tiny balls representing stamens. Place the pistil in the center of the flower.
- Sculpt a couple of small buds. Place a flower, leaves and buds on pieces of thin wire, as shown in the picture.
Using the free ends of the wire, secure the pieces to the stem, forming a beautiful twig.




Iris
Iris, like hibiscus, has a heterogeneous petal color. With the help of a special technique, we will achieve mixing of colors, bringing the color gamut closer to the natural one.
- Prepare blue, cyan, white, yellow and green plasticine. You will need a stiff wire, a match and a stack.
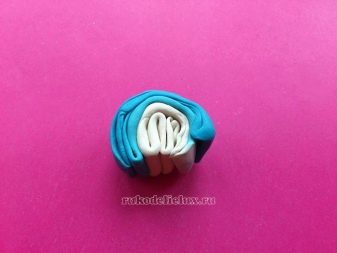
- Make thick flagella out of blue, light blue, and white plasticine. Connect them to each other in descending order of color. Flatten the harness or roll it out with a rolling pin to make a three-color wide ribbon.
- Roll the ribbon as shown in the picture or in any other way, it is only important to keep the color consistency.
- Cut the workpiece into small pieces and mold them into petals.
- On each petal, draw many longitudinal lines with a match, creating a textured shape.
- Connect the 3 petals, gluing the sides and bottom, leaving the top open, like a box. The corrugated surface should be on the outside.
- Attach 3 more petals to the box from below, bending the edges down.
- Roll up small flagella from the green material and make long leaves out of them. Wrap the stiff wire with plasticine, creating a stem.
- Connect the flower and stem. Apply some yellow plasticine to the center of the iris petals. Attach the leaves to the stem. A beautiful and delicate flower is ready.



chamomile
Chamomile is a simple but surprisingly charming and beloved flower. It's a pleasure to sculpt it out of plasticine.
- Prepare white, yellow, green material, stacks and skewer. Cut 18 or 20 small pieces of plasticine from the white bar. Shape each element into a drop shape, then flatten it to form a petal.
- Draw longitudinal stripes on the resulting details with a stack or skewer, creating an texture.
- Roll two balls out of yellow plasticine. Flatten one slightly, it will be the core.
- Pull the second with a sausage and roll it into a flat tape. Press a lot of longitudinal strokes on one side of the tape in a stack, trying to create a ragged edge on the workpiece.
- Wrap the tape around the core so that the torn edges are visible.
- Attach the bottom row of petals to the core.
- Then install the top row.
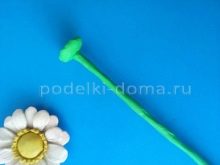
- Roll out the green plasticine and wrap it around the skewer, leaving one end free.
- Sculpt the receptacle in the form of a tiny bowl, place the piece on the free end of the skewer.
- Connect the flower to the receptacle.
- Make an elongated green leaf. With the help of a stack, draw veins and make small cuts along the outline of the leaf. Connect to the stem.
A sweet and cute chamomile is ready.



Lily
When creating delicate graceful lily petals, we use several different techniques. Prepare plasticine for work in green, yellow, gray shades. For the petals, choose white, pink, crimson (or red). We still need a stack, a hard and soft wire.
- Separate a part from a bar of white plasticine, warm it up well in your hands and divide into 5 equal parts. Roll them into balls, flatten them and stretch them into thin flat cakes.
- Smear pink plasticine in the center of each petal, and a little green at the base.
- Next, in a stack on each workpiece, draw a lot of longitudinal lilies, creating relief.
- Roll up tiny crimson balls, scatter them over the field of petals in the form of dots.
- Let's make a pistil and stamens. Roll a yellow ball, push a cross on the surface with a stack, highlighting 4 parts. Connect with thin wire. Make oblong stamens out of gray plasticine and put each of them on a wire.
- Collect all prepared petals into a single inflorescence.
- Glue a green receptacle on the back of the flower. Insert stiff wire into it to create a stem. Place the pistil and stamens in the center of the inflorescence.
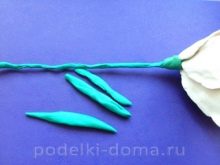
- Cover the stem with green plasticine and make several narrow long leaves. Secure them to the stem. A beautiful lily can be presented to someone or put in a vase.



Lilac
Lilac brushes consist of many small flowers. Making them is not difficult, but long and painstaking. Kids will not be able to cope with the sculpting of tiny elements, and they will not have enough perseverance. Involve older children in the work. As a result, you will get a beautiful inflorescence, similar to a natural lilac brush.


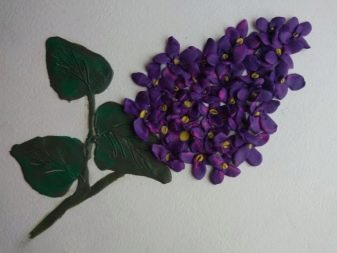

We need plasticine in lilac, dark lilac, yellow and green colors. A dark lilac hue can be achieved by adding blue. Also prepare a stack, a skewer and a piece of wire.
- Let's start making flowers. Roll a large number of identical balls from light and dark lilac plasticine.
- Using a stack, push each ball to create a cross-shaped depression that divides the surface into 4 parts. Turn them to the sides, forming 4 petals. Roll each petal with a skewer; its wooden texture will help create a natural relief.
- In this way, all workpieces should be processed. Leave just a few details undiscovered for the buds that complete the lilac brush.
- Let's move on to making the frame. Plasticine of lilac, pink or purple colors is suitable for him. Blind a piece that looks like a thick carrot.
- Add three small balls to the wide part, spreading them evenly around the circle. The balls will help the future lilac brush to give a natural shape.
- Using a skewer on the thick side of the workpiece, begin to set flowers, gradually filling the entire frame with them. Place unblown buds in the lowest narrow part.
- Take a piece of sturdy wire and cover 2/3 with brown plasticine, forming a twig. Use a stack to give it a natural relief.
- Connect the twig with the end free of plasticine with a lilac brush.
- Prepare a lot of tiny yellow balls and fill the middle of the flowers with them, imitating the stamens.
- From the green material, make 2 leaves in the shape of a heart, draw veins with a stack and attach them to the branch.
The result is a beautiful and realistic lilac brush.


Tulips
Plasticine tulips are easy to make, you can connect children of any age to work. You will need a piece of thick wire, a stack, green and black plasticine. For the petals, choose red or any other color.
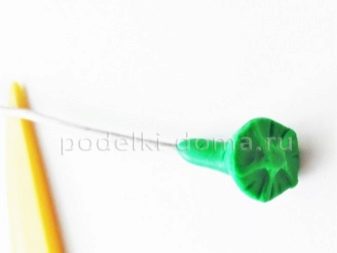
- Let's start the workflow with the inner bud. Make a cylindrical part from green plasticine. Make the end narrow on one side and spherical on the other. Secure the workpiece to the wire.
- Flatten the ball and use a stack to give it a textured shape, as shown in the figure.
- Roll 5 oblong stamens from black plasticine, in each of which draw a longitudinal strip.
- Secure the stamens around the pistil bud.
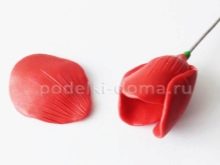
- Blind 6 drop-shaped flat leaves from red plasticine. Draw veins on each of them.
- Glue 3 petals to the bud, wrapping them in a kind of box.
- Attach 3 more petals to them, surrounding the box on all sides.
- Wrap the tulip stem in green plasticine. Make some long leaves, draw veins on them and attach to the stem. You can make a whole bunch of such tulips.



Wisteria
Let's make a sprig of wisteria in a delicate lilac color. We need purple, white and green plasticine in several shades. A light lilac color is obtained by mixing purple and white materials. Prepare a stack and stiff wire as a base.


It will be easier to work if you prepare the necessary parts in advance. Therefore, mold the blanks shown in the picture:
- small purple petals;
- slightly larger - lilac elements;
- green leaves with pointed edges;
- wire covered with light green plasticine.
Collect flowers in the following order:
- in the center - purple petals;
- outside - lilac;
- at the base of the inflorescence - light green receptacles.
Form a beautiful twig from the finished elements. Add veins to the green leaves.


Modeling a bouquet
We have already learned how to make individual flowers from plasticine, now let's start making a bouquet.
For the craft, we will choose the queen of flowers - a rose. As a result of fairly simple actions, we get a nice multi-colored bouquet. The work is not difficult, invite the kids to participate.
We need plasticine of different shades, stacks, large skewer sticks, ribbon and a vase for flowers.


Roll up the flagellum and flatten it into a thin tape. Twist the workpiece with a spiral - you get a small rose. A preschooler can easily cope with this simple task.
- Secure the bud to the skewer stick.
- Roll two green plasticine balls.
- Flatten them into equal, even cakes.
- Squeeze the cake from one edge first, sharpening the piece at the base of the leaf.
- Then sharpen the second edge.
- With a stack, make a longitudinal groove on each leaf, mark the veins.
- Connect the leaves to the stem.
In this way, make roses of different colors. Combine them into a bouquet and secure with tape. Place the bouquet in the vase. A simple but beautiful composition can be put on the table or given to mom.


Telling the whole workflow step by step, we made ten beautiful flowers and one pretty bunch of roses. They can decorate a room or donate to someone.


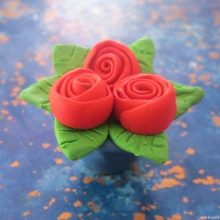
To learn how to mold a delicate brooch from airy plasticine with your own hands, see the next video.


