Methods for sculpting trees from plasticine

Plasticine sculpting is useful for children of any age, because it develops hand motor skills, thinking, imagination. Kids see trees every day and try to repeat them in plasticine figures. Sculpting each leaf, they develop perseverance, perseverance and zeal, which they will definitely come in handy in life.

Autumn tree in plasticinography technique
Plasticine is an unusual technique for drawing with plasticine on a dense surface.... Here you will need all the skills of working with sticky material: the ability to smear it, roll it out, flatten it, pull it out, pinch it, stick it on. The finished pictures are beautiful, embossed, and children acquire a lot of useful skills. We propose to work in this technique on the theme "Autumn tree", we will tell you in stages how it can be done.
For work we need a sheet of black cardboard, stacks and plasticine. If you have the usual version, you need to hold it in warm water to soften it before sculpting. Together with the child, it should be remembered what color the leaves are in the fall, offer him to choose plasticine on his own. Then remind the baby that at this time of the year, some of the leaves fall to the ground and cover it with a solid carpet.

Start sculpting the picture from the ground covered with bright leaves. To do this, take the material in red, yellow and orange colors, roll it into thin elongated plates and lay it in the bottom of the cardboard without creating gaps. You will get a beautiful autumn carpet of leaves. Go to work with the tree trunk. In nature, it has a heterogeneous color.To bring the picture closer to reality, take three plasticine colors: black, brown and red. Having rolled out the balls of each shade and stretching them out with "sausages", combine them into a single barrel.

Now divide the blank of a beautiful heterogeneous color into the intended branches in the upper part, and stretch it a little in the lower part to create the illusion of growing roots. Place the future tree on fallen leaves in the lower left corner of the cardboard. When gluing the trunk to the surface, pay special attention to the branches. If necessary, add more plasticine for them. Use a stack to texture the bark of the tree.


To work with leaves, in addition to plasticine, which covered the ground, you will need a few more shades of green, then the picture will turn out to be more colorful.
Explain to the child that the leaves change color gradually, and in the fall there are days when you can see the summer and winter shades of the crown on the tree at the same time... Roll small balls of plasticine of different colors and flatten them in the form of cakes. For children, they will resemble chocolates covered with colored caramel.


Stick green leaves on the lower part of the crown, gradually introduce yellow and dilute the picture with pink and orange blanks.
Some of the yellowed and reddened leaves should fall off, depict this in the picture. The result is a bright and colorful autumn tree, as if crumbling with candy leaves. If the panel was planned for an exhibition or will be used as a decor, the picture can be coated with colorless varnish and inserted into a frame.


Green tree on cardboard
Now we will offer a master class on making a beautiful plasticine application of a green tree on cardboard or paper. The sculpting of the picture can be offered to school-age children, since painstaking work on each leaf will have to be done, which will allow the plant to be sculpted textured and realistic. It is better to work with light wax-based plasticine: it is softer and more pliable.
Prepare two colored briquettes: brown and green, as well as a sheet of cardboard and stacks.

Knead and roll the brown material into a ball, pull it out slightly and glue it to the bottom of the cardboard. Try to keep the clay in the center of the bottom line of the sheet. Leaving the base of the workpiece thick, pull the other half up and branch along the sheet of cardboard, creating massive branches.


Take a stack and draw bark on the tree trunk. It should have a vertical pattern with the presence of roughness.

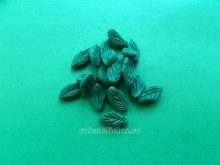
To make the leaves, separate a piece of plasticine from the green briquette, split it into many small elements and roll it into balls. Gently stretch the balls, making them look like flat pumpkin seeds. On each blank, on one side, draw a picture with a stack that resembles the veins of tree leaves. Try to make the drawing look realistic.


When all the leaves are ready, start installing them from the tops of the branches. Then each subsequent row will slightly rise above the previous one, creating a three-dimensional picture. Leaves should not be too flat. To make them look natural, you can turn them slightly to the sides and superimpose one piece on top of another. A beautiful powerful tree will surely become pride for the one who made it.


Other craft options
Millions of trees grow on the street, and if you look closely at them, then plasticine crafts will turn out to be diverse, especially with elements of natural material. See how delicious an oak with dry autumn leaves or a handmade pumpkin seed craft can be.
We offer several more master classes in which we will tell you step by step how you can make a voluminous tree, a fabulous plant, and also teach you the technology of twisting plasticine parts.


Volumetric
To make a beautiful volumetric wood, take two brown briquettes of different shades. Shape them into identical walnut-sized balls. Roll the balls into tubes and cut into slices. Form a thin flagellum from each piece. Gather the harnesses together and twist: you get a thick trunk with beautiful stains. Form two large branches at the top of the blank.
For the leaves, take 3 colors of plasticine, divide into fragments, roll up small balls and make cakes out of them. By connecting the edges of each cake together, we get beautiful leaves that look like roses. Glue the leaves to the branches. Draw the trunk with a toothpick to represent the bark of the tree.


With twisting
In the previous example, we showed how you can twist the trunk of a tree, and now we will talk about the technique of twisting the leaves. Take a piece of cardboard and draw the outline of the trunk of the future tree on it. Roll long flagella from brown plasticine of different shades. Fill the space in the barrel with them without leaving any gaps. Add twigs at the top above the trunk.
Now roll out the multi-colored flagella for the leaves. Twist each one into a neat spiral. Fill the tree with the resulting leaves, beautifully alternating shades. Cut the green long rope into pieces, each of which fold in half in the form of a tick. Place the grass at the base of the trunk. Place a small number of spiral leaves in the grass, and also depict as falling from the tree.


Look at examples of how else you can make plasticine plants with curling.
Fabulous
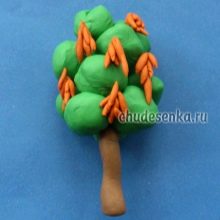
We offer another plasticine craft - a magic carrot tree... Roll the crown filling balls out of the green material and fasten them together. Form the trunk of the tree from the brown piece. Use a match to connect the trunk and crown. Roll many small carrots out of orange plasticine. Combine them in bunches (6 pieces). Glue the carrots to the tree.


We suggest that you familiarize yourself with works on the Pushkin theme by children of senior school age as examples of fairy-tale trees.


For information on how to mold a tree from plasticine, see the video.


