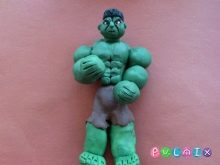
How to make a Hulk from plasticine?

Children love modern popular culture in general and cartoons in particular. That is why the plasticine Hulk will be quite a pleasant thing for them, but it is also important for the parents themselves to know how to make the Hulk in stages in order to teach their children... In addition to step-by-step instructions and a list of what you need to dazzle him, you need to pay attention to general advice.

What is necessary?
The simplicity and brevity of the hero's figure is deceiving. The smallest children will hardly be able to sculpt it. But already at 10-12 years old it is quite possible to do it. To avoid mistakes, it is advisable not only to study the image of the Hulk, but also to place it on the desktop: a printed photograph or a tablet with a photo on the screen is very important. Basically, for the work itself, you will need a large amount of dark green plasticine, but the white mass will definitely not be superfluous (for the formation of individual parts and mixing in order to vary the shades of the mutant parts).
In the absence of a ready-made dark green mass, you need to mix a simple green product with the substance:
- gray;
- black;
- brown (until the desired shade is obtained).

Step-by-step instruction
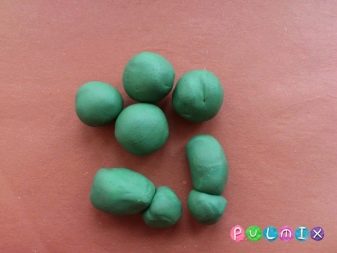
To make the Hulk from plasticine, you first need to separate a small piece of the substance. A ball is rolled from it, which will then become a head. You do not need to make a large ball, because the body and limbs will take the main attention. The surface of the workpiece is slightly deformed. Next, take a stack to make grooves on the forehead and squeeze out the indentations under the eyes.


Continuing to work in stages, then you should consolidate:
- eyes;
- eyebrows (while the face should be frowned);
- nose.
The Hulk's ears are disproportionately small. The head is covered with black hair. The nasolabial region of the mutant is formed with characteristic wrinkles.


The torso is sculpted from a green bar. In the area of the shoulders of a mighty monster, it should expand.
Balls of different sizes will create powerful muscles. All transitions at the joints of parts must be carefully smoothed.


Next, you need to mold a truncated brown cone, which will then become the hero's shorts. The remaining dark green plasticine will create powerful legs. The muscles, feet and calves must be clearly traced.


Later:
- attach calves to the torn bottom of trousers or shorts;
- the body and the lower part are joined;
- put their head on a match or a toothpick;
- coat this match or toothpick with plasticine;
- freeze the figure in the freezer for 60 minutes and admire the result.


Useful Tips
It is very important to immediately divide the sculpting mass into 4 pieces. The head should be directed upwards to get the pear-shaped shape typical for this superhero. Teeth can be made from regular white plasticine. But the lips, according to the cartoon canon, should be green.


The torso must have trapezoidal contours, while it is advisable to perform all work with two hands in order to sculpt faster and better.

Having made the Hulk, you can proceed to sculpting other fantastic heroes. But no matter what you do, you need to use stacks. They are used to meticulously prepare small parts and cut off excess material. While working, it is worth stopping from time to time and examining the resulting figure from all sides in order to assess the result. If you have to stop work for a while, it is better to cover the Hulk with a damp cloth, and wrap it up with polyethylene on top: this will preserve its plasticity for several hours.

For information on how to make a Hulk from plasticine, see the video.


