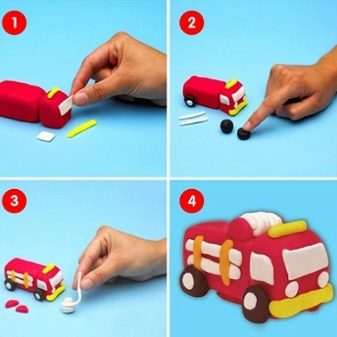
Plasticine fire truck

Many children, especially boys, are addicted to cars. With keen interest, they look at large vehicles: firefighters, ambulances and more. In this article, we will tell you what is needed in order to mold a real fire truck with your child and how to do it, as well as share some tips for working with plasticine.


What is required?
To sculpt a fire engine with a child, you will need two large blocks of red and black plasticine - these colors for this figure are the main ones, you will need them the most. You will also need yellow, blue, white and gray plasticine, but these shades will be used to create small details, and therefore very few of them are required.
In addition, you will need a stack for cutting through individual parts, napkins so that you can periodically wipe your hands from plasticine without looking up from the sculpting, as well as a special board on which the main work process will take place.
If there is none, you can use an ordinary oilcloth or a sheet of cardboard instead.


How to blind?
Making a fire engine with your own hands step by step is an easy task for both adults and children. First of all, two balls of different sizes must be rolled out of red plasticine. One of them, the largest, will be intended for the car body, and the second for the driver's cab.
After that, using your fingers, you need to form rectangular parallelepipeds from the balls. In the smaller of them, using a stack, you need to cut out the engine compartment. We fasten these parts together and attach a plate of black plasticine from below.


Now we form four wheels of approximately the same size from black plasticine and with the help of a stack we make a ribbed pattern on them, which is characteristic of rubber, after which we place a small yellow plasticine cake in the very middle of them. We attach the resulting wheels to the body and the driver's cab.
After that, we take gray plasticine and form several elongated sausages from it. From the parts obtained, we make a ladder, which we attach to the roof of the body. For better stability of the ladder, you can take two toothpicks or matches as a basis for this part, which will need to be shortened to the desired size and covered with plasticine. We form three windows from white plasticine and attach them in front and on the sides of the body.


Almost ready. It remains to finish small details:
- we sculpt headlights from yellow plasticine;
- black - bumper;
- roll another long sausage from gray plasticine and form a hose, which we attach to the body;
- then we sculpt a siren, white stripes and numbers "01".
We cut all the necessary small details with a stack to make the figurine realistic.


Material tips
Before starting work, the plasticine must be properly warmed up and kneaded so that it is more pliable. To do this, you can hold it in your palms for a while, put it on a battery or hold it under warm water. Particular attention must be paid to the choice of plasticine for work. So, if you plan to make a figurine of a fire engine with your child, we recommend taking fresh plasticine. It is more pliable and elastic. It is more difficult and not so pleasant to work with stale material, besides, it is quite difficult to knead it.
To prevent the resulting figure from falling apart during the game, some of its parts can be fastened with toothpicks or matches. It is worth considering the fact that you cannot immediately play with the resulting plasticine figure. At the end of the work, the figurine must be placed in the refrigerator or on a cold balcony so that it hardens properly there.
For information on how to mold a fire engine from plasticine, see the next video.


