Plasticine sculptures

Plasticine modeling is one of the favorite and useful activities for children. The ability to embody your ideas in the form of volumetric figures takes the baby for a long time and helps to develop fine motor skills and spatial vision. Modern plasticine masses provide great opportunities for creativity. Among them, not the last place is occupied by sculptural plasticine.

Tools and materials
Sculptural plasticine belongs to the category of professional materials. There are two types of sculptural clay: soft and hard. Soft plasticine kneads easily in the hands, and for a hard variety, additional heating is required with hot water or another heat source.
In addition to plasticine, you must additionally have:
- sculpting boards;
- various stacks;
- wire for creating the frame of the figure (any wire, except copper);
- various molds.

When working with plasticine, you should pay attention to several nuances.
- To begin with, think over an idea and create a sketch of future work, which will help you not to lose your thought in the future.
- For large figurines, use a wire frame around which the figurine will form. The frame will protect the product from sagging under its own weight.
- Secondary heating of plasticine leads to the loss of useful properties. Therefore, you should not soften the whole briquette at once, but rather cut it off and soften it in small pieces.
- For miniature works requiring jewelry precision, it is better to use hard types of plasticine.
- If there is no plasticine of a suitable color, then the finished craft can be painted.
- After finishing work, the figure needs to dry out for 24 hours.
How to make a cat?
What kind of plasticine sculpture to mold depends on the imagination of the author.These can be interior crafts or figurines-toys for children.

There are different ways to create crafts, below will be given a master class on making a cat figurine in stages in one of the simplest ways.
- Take plasticine of any suitable color and separate several pieces of different sizes: for the body, head, tail and legs. The hind legs can be made from separate parts of the thigh and lower leg, or whole pieces.
- Roll up a short "sausage" with rounded ends from the largest piece.
- Another small piece will go to make the head of the cat. Let's fix the ears by attaching them well to the head. The finished head can be attached to the body with a toothpick, or you can form a collar from a small plasticine cake by placing it between the body and the head.
- We will form the front and hind legs by attaching the blanks to the body of the animal by smoothing them. It should be remembered that the thigh of the hind leg is thickened.
- Lastly, we will attach the tail from a plasticine rope.
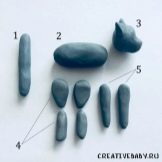


You can shape a cat into a moving animal by changing the curvature of the body, the position of the paws, head and tail.

What else can you dazzle?
Sculptural plasticine modeling is an exciting activity not only for children. With the help of parents, children's pens can sculpt crafts in the animalistic genre, figures of people or various techniques.
Dog
Children often ask to blind the dog. An animal figurine is easy to make with your own hands, even for a novice sculptor. For this you need:
- cut off with a knife from the total mass of plasticine a piece of the selected color, suitable in size for the future body of the dog, soften well and shape the body with the neck by stretching;
- make the head of an animal from the next smaller piece and fit it to the neck, smoothing the joints well;
- extend and form four legs and a future tail from the body;
- make ears and attach them to the head;
- using a pencil or toothpick, apply strokes to the finished figurine that imitate wool.
The dog is ready.


Tank
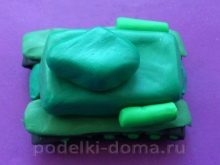
Plasticine can be used to mold a tank with which a little fighter can play.
For crafts you need:
- green (two shades) and black plasticine;
- muzzle tube;
- knife.

Let's consider making a tank step by step.
- Roll up a long rope from dark green plasticine, which we will cut into 10 equal parts. Let's prepare 4 more cylinders of the same smaller diameter. These are the future wheels of the tank. In the center of each wheel we will make a point of light green plasticine.
- From black plasticine, we will form two ribbons with a width of wheel cylinders, and a length such that it was enough to wrap the wheels, laid according to the scheme: 1 narrow cylinder, 5 wide, 1 narrow. Apply transverse notches to the finished caterpillar along the entire length.
- Having made two light green plates with the length and width of a tank track, we place them on top of the wheelset.
- We will make a rectangular tank hull from dark green plasticine, to which we will attach a narrow axle bar and caterpillar structures from below.
- Let's sculpt a diamond-shaped turret by attaching it to the front of the tank.
- Let's attach a tube-muzzle covered with plasticine, wrapping the junction with a light green plasticine flagellum.
- We will make two round flat cakes from light plasticine - tower hatches.
- We will fit the cylinders of the gas tanks on the sides.
- We will form a machine gun at the barrel.
- Form 2 stars out of red plasticine and stick them on the sides of the tank.
The craft is ready.



Human
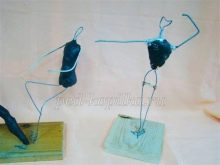
The human figurine is based on a wire frame that will support the shape of the sculpture. It is important that the frame is firmly attached to the stand, having 2-3 fixing points.
Then the body and limbs are formed around the frame from plasticine. To lighten the weight of the figurine, the torso and head can be formed from foam, lumps of foil or paper, fixing the shape with tape and covering with plasticine.


On the head, using a stack and a toothpick, draw the eyes and lips. We will mold a nose from a small piece of plasticine and glue it in place.On the finished head, glue a plasticine hat of hair color and apply strokes depicting the strands of the hairstyle. We will decorate the finished human figurine at our discretion, using the materials at hand.


The Dragon
In order for a fabulous dragon to settle in a house, you need:
- plasticine in two colors;
- sculpting board and stacks.
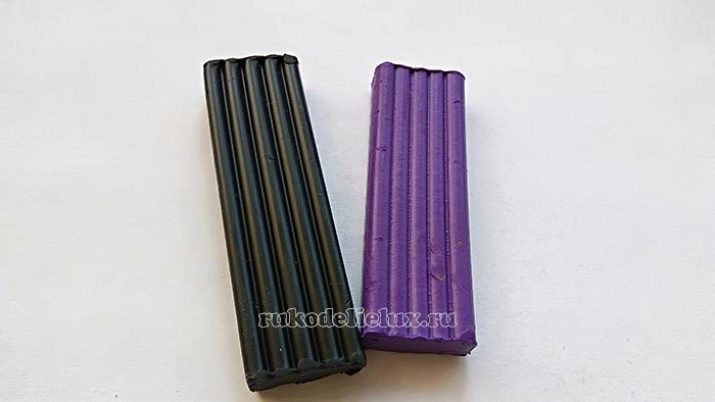
Let's take a closer look at the manufacturing process.
- From the mass of the main color, we will form a head with eyes. Decorate with a pair of double horns and a comb. We will make one pair of horns and a comb from plasticine of a different color.
- Let's make a torso with a tail, decorated at the base with colored scales.
- We attach the head to the body and continue to form the ridge along the ridge to the tail.
- Decorate the dragon's breast with colored scales.
- We will attach the legs and wings by adding colored feathers.
- We will mold the tip of the tail from two colors of plasticine and attach it in place.
- We will decorate the head with a pair of large ears - and the beautiful animal is ready.


Bird
Among all the variety of birds, it is easy for a beginner to blind a stork. To make it, you need white, black and red plasticine.
- The body, neck, head and wings are sculpted from the white sculptural mass.
- Black goes on the wheel arch liners and just a little on the stripes on the sides of the head, in the place where the eyes are located. For the eyelet, it is better to use black beads.
- A beak and legs should be fashioned out of red.
- Matches are used for the legs of the bird. The places where matches are attached to the body are closed with a white ring. The family keeper is ready.


Doll
A plasticine doll will delight a little girl.
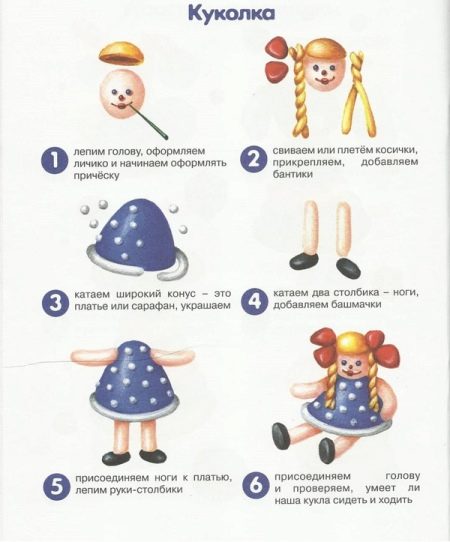
- From colored plasticine we blind a cone with a wide base. This will be the doll's dress. Create waves along the edge of the cone using plucking. Let's decorate the dress with polka dots and trim in a different color.
- Separate a piece from the beige bar and form the doll's head. Let's draw a face with a toothpick.
- From the mass of yellow we will make hair in the form of a hat and two braids.
- We will make the legs and handles of beige plasticine, and instead of the feet we will make colored boots.
- Let's assemble the doll by gluing the parts together. The toy is ready.
Fruits
Making fruit with your own hands will be easy even for young children. To do this, use plasticine that is suitable in color: purple - for plums and grapes, red - for apples, orange - for oranges, and so on. Green is used for leaflets.
Almost all fruits are based on the ability to roll balls - large and small. And then, depending on the color, the required fruit is formed.


Owl
The little plasticine owl will become not only an interesting craft, but also a nice souvenir.
For an owl, you need to prepare:
- foil ball according to the size of the craft;
- a sculptural mass of gray and white colors;
- stacks;
- eyes.


To make an owl you need:
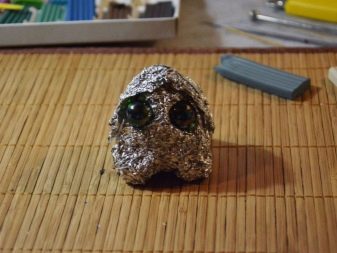
- form the body of an owlet from foil and make two indentations in it, where to insert the beads of the eyes;
- mix small pieces of gray and white plasticine, cover the body of the owl with the resulting mass;
- form superciliary arches and paws with a toothpick;
- roll a beak ball out of the gray mass and stick it;
- form wings and attach to the body of an owl;
- sculpt paws from brown material;
- decorate the figurine with plasticine feathers, for which to form many tiny pieces of gray in the form of droplets.


Fox
For a red cheat, you need a mass for sculpting orange, white and black colors. To make a fox, you must:
- sculpt the body, head and tail from the orange mass;
- use black plasticine for paws, nose, eye and ear tips;
- white is needed for the muzzle, the tip of the tail, the breast and the inner side of the ears.


Horse
A playful horse can be molded from brown plasticine. The procedure is as follows:
- we blind the head of two balls of different sizes, attach the ears with a triangle and eyes to the larger ball, outline the nostrils on the smaller ball with a match;
- roll the horse's body from a large piece;
- to form the neck, we use a match stuck into the body;
- attach the head;
- we blind four legs, decorating with black hooves, and attach them to the body;
- form the tail and mane from the yellow mass and glue it to the horse.
The figurine is ready.


A master class on making sculptures from plasticine, see below.


