How to make a plasticine tank?

Many children and even adults will be very interested in learning how to make an abstract stylized tank out of plasticine and mold T-34, Tiger, T-44 and KV-2.
Tools and materials
Even such a material, seemingly familiar from childhood, as plasticine, has undergone significant changes. The paraffin mass remains the classic of the genre. In addition to the main component, it contains chalk. Such a product has a very affordable price.
Floating plasticine is twice as light as usual, and crafts made from it remain afloat.
It is theoretically possible to mold a tank as well:
-
from sculptural plasticine (it is suitable for professional work and art schools, but not for small children);
-
from wax a product (which is soft and just suitable for various crafts);
-
from solidifying mass (she sets in 24 hours);
-
from air plasticine, which is light and durable (comparable in weight to ordinary foam), devoid of unpleasant foreign odors;
-
from ballpoint a mass that allows you to activate the development of children's fingers;
-
from fluorescent or plant-based plasticine, which is significantly softer than traditional molding mass;
-
from pearlescent plasticine, suitable for creating figures that glow with a unique shine.


However, it is not only the molded masses themselves that are important - you need to pay attention to the tools with which you can work.
It will almost never be possible to do without a special compact knife of moderate sharpness. You will also need a so-called stack - it is not without reason that it is present in almost any kits for working with plasticine from the very beginning.For children, you should take stacks of minimal sharpness, which do not pose a particular danger. Additionally, when sculpting, the following can be useful:
-
coins;
-
toothpicks;
-
culinary skewers;
-
buttons;
-
caps from pens or felt-tip pens;
-
scissors for working with plasticine;
-
molds;
-
molds;
-
kitchen rolling pins for rolling out the mass;
-
boards to which plasticine does not stick (they are sometimes replaced with ordinary plywood or cling film);
-
a ruler (you can even without divisions - it will allow you to make straight lines).


How to blind?
Simple
A plasticine tank for children aged 3-4 years is easy to perform. It is not worth taking any specific role model for now, where it is more correct to perform a stylized figure. This tank is made by:
-
from brown;
-
green;
-
black plasticine.

These colors are great when imitating a nondescript, discreet coloring of a combat vehicle. The sequence of sculpting a child model is as follows:
-
a central block is made;
-
press the narrow edge with your finger;
-
prepare a piece of plasticine for the upper part and for the side tracks;
-
form small black pill-like wheels;
-
press the wheels to the sidewall of the body;
-
push the middle of each wheel with a rod;
-
stick on gray tapes;
-
cut structures (where necessary) with a stack;
-
check the symmetry of the arrangement of the chassis in relation to the body;
-
correct mistakes if necessary;
-
camouflage the wheels from above using prepared wings;
-
round off all the details as they see fit;
-
work on the tower and small details;
-
equip the tank with an oblong cannon barrel;
-
assemble a structure from all previously created parts.


But a stylized tank also needs a “brave crew”. You can designate it if you make a soldier figurine. The main role in the work will be played by gray plasticine. The sequence is as follows:
-
a body and an overcoat are formed from a large piece;
-
work out the sleeves;
-
red-brown plasticine is used to sculpt a belt plaque;
-
a collar is made from gray stucco mass, stretched into a strip;
-
make black boots and brownish shoulder straps with yellow stars;
-
use beige plasticine to create hands;
-
flesh-colored plasticine is used to make a head;
-
prepare a gray hat with earflaps (first in the form of an oval, which is then flattened);
-
form a cockade;
-
complement the head with eyes and other details as they see fit.


T-34
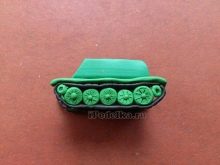
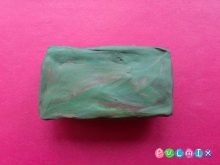
Gradually, children develop, and they already need to sculpt more accurate models. A good option for children 5-6 years old is modeling the famous "thirty-four" from light plasticine. It is necessary to use a simple green mass. Both the hull and the turret are molded without first kneading the working mass. Smooth smooth bars are ideal for creating a simple, angular tank.
Continuing the review of the work, it should be pointed out that plasticine is useful to freeze in the refrigerator... Then, when slicing, the substance will not reach behind the stack. The bottom of the body is formed as a rectangular bar. One edge is sharpened.


The modeling step by step looks like this:
-
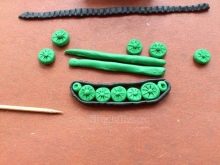
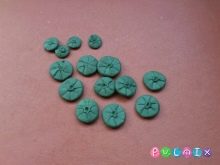
the formation of tracks from black belts, 5 large and 2 small wheels;
-
pressing the cakes with the backs of the pencils;
-
drawing axes with the tip of a skewer or a toothpick;
-
assembly of the wheel structure;
-
covering it with tracks;
-
gluing a green tape covering the tracks from above;
-
gluing the caterpillar;
-
creation of the upper part of the car body;
-
gluing this part (with bevelling stack in front);
-
trimming the bar on the sides with the formation of a tower;
-
making a "muzzle" from a match wrapped in soft green plasticine;
-
rounding of corners on the tower;
-
fixing the muzzle;
-
attachment of other parts corresponding to the design of the tank;
-
formation of a double hatch, antenna;
-
cutting a star with a stack;
-
freezing the model in the refrigerator.


T-44
This model of the tank was somewhat overshadowed by other combat vehicles of the Second World War. However, sculpting T-44 crafts with your own hands can be no less exciting. The work will require the use of a large amount of plasticine. Usually, the green and black masses are immediately mixed, in order to then simplify things for themselves. The mixture should look uniform.
Step by step everything goes like this:
-
roll up the ball;
-
stretch it in the manner of a tower and round off the edges;
-
sculpt a body from the remainder;
-
sharpen the corners of this body;
-
connect the main part and the tower;
-
prepare 10 large and 4 small running wheels;
-
crush the balls on the board and form an "axis" on them with a stack;
-
stretch the belts that will become caterpillars;
-
put these tracks one by one and cover them with a casing;
-
form a very thin (compared to the proportions of a tank) cannon muzzle;
-
add a white cake - this is a running lamp;
-
form a bumper;
-
add hatch covers, side bolsters and a pair of massive gray hooks to the tank;
-
complement the tower with an antenna;
-
finalize the relief of crafts with the help of stacks where necessary.


KV-2
Such a tank is better known. And even older preschoolers are quite capable of making its small layout in stages. For work, you will have to use again a dark green mass. A rectangular bar is formed from it.
Further:
-
a non-thick rectangular plate is attached above the machine body (this part is created by sticking plasticine onto cardboard);
-
a very high, visually powerful square tower with an offset to the bow is being prepared;
-
moderately large wheels are created (there will be 12 of them - with an even distribution on the sides);
-
as usual, the wheels are wrapped in a tape that winds up;
-
a thin cannon muzzle is created, connected to a rectangular plaque on the body;
-
the top of the tank is equipped with several small parts and a hatch cover;
-
fuel tanks are attached to the edges of the combat vehicle;
-
a cable and electric lights are added to the front plane.


"Tiger"
But those who are keen on military affairs and military history, of course, will want to see not only domestic tanks in their stucco collection. It is impossible to imagine children's games, if you do not indicate the opposite side. One of the best options is the design of the famous Tiger model. She was not only a formidable enemy on the battlefield, but also influenced the development of post-war tank building.
"Tiger" is molded from a large amount of dark plasticine - not only black, but also gray and brown bars.

Initial stages:
-
the formation of a wide bar;
-
pressing it down to a solid plane with the selection of corners;
-
bottom design with a less wide bar;
-
bevel of the armor to the frontal plane;
-
smooth bevel of the sides and raising of the body - the real "Tiger" was very high.


The instruction prescribes the creation of powerful, impressive tracks.
They contain 10 or 12 brown wheels - it doesn't matter. The balls themselves must be cylindrical in shape. In their middle, axes are created using a rod. The tracks should be fairly thin; longitudinal cuts are made on them.
Caterpillars cover with wings. The tower is rounded and slightly beveled. The cover (hatch) is placed on top. You need a thin and long gun. An emphatically careless pattern is applied to the surface of the model - spots of beige mass.


The T-72 tank, which is still in service, can also be fashioned. The structure is painted in a khaki color. It is not necessary to achieve complete homogeneity of it. It is necessary to push in the wheels in the middle of the core - first with the pads of the fingers, and then with the heads of matches. There will be 12 wheels in total, 4 of which are small.
Other important nuances of work:
-
sculpting symmetrical sides of the body;
-
forming the upper part of the body from a round cake;
-
strict proportionality of all parts;
-
imitation of active protection using squares;
-
addition of a box with a machine gun barrel.


Helpful hints
When choosing a specific type of plasticine, attention must be paid not only for its convenience, but also for its safety. This is especially important for children. Working out small details when working with military equipment is very important. When creating models of a real combat vehicle, you must carefully study the videos and photographs. Camouflage coloring is obtained by mixing different shades of plasticine.
It should be borne in mind that tanks have different colors depending on the conditions. In autumn, they move along the roads in brown-green camouflage. In summer, less green and brown paints are needed, but a small amount of yellow mass is added. In winter, you can stick to both options. Or, if you wish, you can make a pure white tank.

Neat transitions (overflows) of different colors are very important. To obtain them, plasticine is twisted into thin strips, and then kneaded into one lump. Very hard and unyielding material is heated with a fan or hair dryer. Too viscous mass should be placed in the refrigerator for a few minutes. You will have to work consistently; A molded tank is a serious matter, and, performing it in stages, they only win, in fact, rather than when they are in a hurry and try to do everything at once.
The outer boundaries of the military machine must be clear, with clearly visible contours. Sharpness of cutting corners is ensured by a plastic knife. It is not required to sculpt the pendant, because it will not be visible from the outside in any case. For more authenticity, you can fashion a machine gun, exhaust pipes. On the thirty-four it is worth placing the handrails used by the infantry; other models have their own individual nuances, and they should be taken into account.
How to make a plasticine tank, see the video.


