Crafts from ranetki

With the onset of autumn, many fruits and vegetables ripen. Eating them in food, you get a lot of useful vitamins. And also interesting crafts are made of them. So, using ranetki, you can create unique compositions. Ripe juicy apples will be an excellent craft material for school or kindergarten.


How to make a caterpillar?
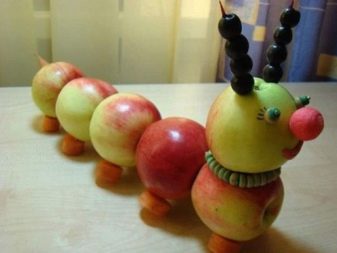
Ranetki are apples whose diameter is less than 5 cm. They are often used to create simple crafts and complex compositions. Small apples can make an unusual caterpillar. It's easy to do, and the caterpillar itself turns out to be cute and funny.
Its base consists of several apples of the same size. For a craft, 5-6 pieces are usually enough, but you can take more depending on the length of the craft. The color of apples can be different, but it is preferable to stay on fruits of the same shade.


In addition to these fruits, to create crafts you need to take:
- carrots;
- toothpicks;
- cranberries;
- grapes;
- plasticine;
- threads.
To make a caterpillar, you need to follow a series of steps.
- Choose an apple, make a head for a caterpillar out of it.
- Prepare your legs for the future product. To do this, cut out circles from the carrots, taking into account that for each subsequent apple you need to take 2 circles. Their width should be about 1.5 cm.
- You need to stick a toothpick into each piece of carrot, then attach 2 toothpicks to the fruits, placing them on the sides.
- Using toothpicks, fasten all parts of the caterpillar. The tail on the last apple will protrude into the back of the craft.
At this stage, the torso is ready. It remains to finish the head for the figure. Caterpillar eyes can be cut out of colored paper or made from pieces of plasticine. For the nose, grape is used, which is also attached with a toothpick.It remains only to put your head on the body and decorate the craft. Cranberry beads, tree leaves, a hat or other decor are used as decorations. Just a few touches, and the caterpillar turns from a mischievous woman into a noble lady or a chic gentleman in a tie and top hat.
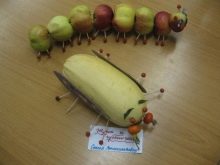
Using apples and zucchini for crafts, you can make a whole duet of a caterpillar and a fat beetle.


Making wood
You can make an original decorative tree from ranetki. A topiary made from these mini-apples will look very unusual, such a craft will become the main decoration of any room or class at school.
Making a topiary is not as easy as making a caterpillar, in which case the children will most likely need the help of their parents.
To create a topiary, you need to prepare:
- capacity;
- sushi sticks;
- twine;
- toothpicks;
- glue gun;
- gypsum or alabaster;
- foam blank in the form of a ball;
- decorative elements.
All the materials you need can be purchased at a hardware store or handicraft department.
To make topiary from ranetki, you need to follow the instructions.
- Take a container for a tree. In this case, a flower pot or a large vase is more suitable. To prevent the container from falling under the weight, it must be filled with plaster or alabaster mortar. Previously, 2-3 sticks for sushi or wire should be inserted into it.
- After the solution has dried, they begin to shape the stem. To do this, the sushi sticks are tightly wrapped with twine.
- It remains to form the crown. To do this, use a foam blank in the shape of a ball, which is attached to the prepared stem. Ranetki are attached to the base with the help of toothpicks.
It remains to decorate the topiary. To do this, use burlap, tree leaves, climbing plants.


More ideas
You can make a lot of interesting crafts from small apples with your own hands. Original compositions from small ranetki can decorate a classroom or a room in a preschool institution. The most interesting handicrafts from the ranetki can be put on public display.
You can send autumn compositions, crafts using various additional materials and interesting decor to the exhibition.
Small fruits can be used to make a cockerel, swan, owl, frog or ladybug.


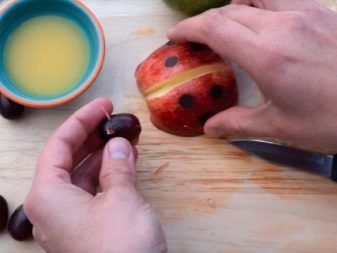
Even a preschool child can easily make a ladybug. Let's list the stages of work.
- It is necessary to prepare the required material. For such a craft, use a deep red apple, a small dark plum, a handful of blueberries or mountain ash.
- The red apple must be cut in half. One half will be used to create the selected figure, it must be cut in the middle, dividing it into two parts.
- The head of a ladybug is made from plum, after cutting off the top from the fruit.
- The head should be connected to the body of the insect.
- The craft can be considered finished. It remains to decorate it with rowan or blueberry berries, cutting them in half.
If you do not use glue or toothpicks during work, such a craft is suitable for decorating a festive table.


You can decorate the table, for example, for Valentine's Day, birthday or March 8, using a small composition of fruits of different colors. Hearts of different colors will stand out favorably on juicy fruits.

This figurine of a swan made from apples can be used as decoration and for table setting. To recreate the silhouette of this graceful bird, you need to prepare a beautiful ripe apple.
The algorithm of actions includes a number of steps.
- You need to take a fruit, cut off part of it at an angle. Most are used to create the body of a swan.
- Then the apple is lowered so that the cut flesh is on the bottom.
- The fruit is visually divided into 3 halves.
- Using a sharp knife, cuts are made in the wings. The incisions are made at a distance of 0.5 mm from the previous incision, bringing them to the middle. The other wing is cut in the same way.
- A head with a long neck is cut out of the rest of the fruit and fixed on the body.
You should take care of the lemon juice in advance and use it on the cut edges so that the slices do not darken.


Schoolchildren can do complex work, for example, make an autumn composition in the form of a bouquet.
For work, you will need the following materials:
- skewers;
- toothpicks;
- gift paper for packaging;
- scissors;
- Scotch;
- cling film.
The main components will be fruits, vegetables and berries. And you can also use natural materials in the form of tree leaves, needles, cones, branches. Such a set of products can be very diverse.
To make the bouquet more colorful, it is better to use fruits and berries of different colors.


Before starting work, the components are dried. After that, they begin to form the fruit bouquet. Small tangerines, lemon, grapes will look good in an autumn bouquet.
Bouquet creation:
- prepared fruits are strung on skewers (the number of skewers will depend on the size of the bouquet);
- so that the skewers hold well, they are fixed with tape, wrapped with cling film;
- the finished bouquet is wrapped in wrapping paper and placed in a vase.
The autumn composition can be supplemented with tree branches, rowan bunches, autumn leaves.


A Christmas bouquet is formed in a similar way, using fir branches, cones, New Year's tinsel, sisal for decoration.
Such compositions will become a festive addition to any room.


For information on how to make an apple caterpillar, see the next video.


