How to make an owl from cones?

Generous autumn gives many ideas for creating crafts from natural materials. How to make a beautiful owl from cones for school or kindergarten, you will learn from this article.
Preparation
Colorful autumn landscapes inspire creativity. A walk in the park with a child will give you many interesting finds that will certainly come in handy for making beautiful crafts.
Look around carefully. Priceless treasures lie at your feet.
-
Pine and spruce cones.
-
Acorns.
-
Whimsical twigs and twigs.
-
Variegated leaves.
-
Flower petals.
-
Chestnuts.
-
Nuts.
-
Feathers.
-
Pieces of bark.
-
Pebbles.
-
Shells.
-
Alder, ash, maple earrings.

Don't forget about the squash, pumpkin, sunflower seeds, corn leaves, and physalis pods that you find on your backyard. They can become a striking detail in children's work, make it original, unlike others.
Before creating autumn masterpieces with children, prepare the collected material for work.
-
Rinse the finds with running water or briefly soak in soapy water to remove dust and insects from the workpieces.
-
Spread cones, twigs, bark, chestnuts evenly on a cotton cloth to collect excess moisture. Dry the material in the oven at a temperature of at least 150 degrees, and then treat the finds with a solution of PVA glue from a spray bottle in proportions 1: 1, and leave it again for a while in a dry, warm place. Your finds will acquire a beautiful shine, be less brittle and fragile.
-
Carefully iron the leaves of the trees with a warm iron, and fold between the pages in a thick book.
-
Save the birch bark by placing it under a press.When soaked, it can be given any desired shape.
-
Dry pure rosehips and rowan berries away from strong sources of heat so that the fruits do not lose their beautiful color. Sprinkle them with regular hairspray before using to give them a nice shine.
The more blanks for autumn crafts you collect, the more fun the process of work for children will be. Don't forget to strategically stock up on kids' creative stationery kits.

You will need:
-
colored paper and cardboard;
-
plasticine;
-
sisal;
-
jute cord;
-
felt and foamiran;
-
decorative eyes;
-
Moment glue, PVA and glue gun;
-
awl;
-
scissors.
To give free rein to imagination, be sure to consider colorful pictures of an owl with your child. Talk about the nature of the bird, what its eyes, beak, and wings should be. Get started with inspiration.


Classic version
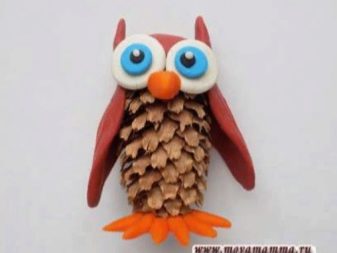
The most affordable option for creating an owl for a child is to make a pine cone bird using plasticine. A step-by-step master class will help even kids to easily cope with this task.
You will need:
-
a set of plasticine and a stack;
-
modeling board;
-
large pine or spruce cone;
-
a piece of cardboard.
The work consists of several steps.
Wings.
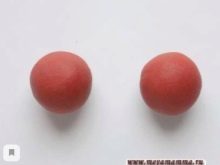
- Roll two identical brown plasticine balls. Laying on a modeling board, gently flatten the pieces with your fingers and stack them into droplets. Attach the droplet wings to the owl's body symmetrically at the sides.


Head.
-
Cut a wide strip of plasticine in the same color as the wings.
-
Clip the piece along the owl's forehead. Give the ends of the strip an elongated, pointed shape in the form of triangular ears.
-
The bird's head is ready.

Eyes.
-
Make two large balls of white plasticine and flatten them with your fingers. This is the basis for the owl's peephole.
-
Roll two smaller pupil circles out of blue, green or yellow plasticine.
-
Stick the blanks for the eyes to the bump just below the ears. Glue a colored pupil in the middle of each white circle.
-
Give a small sausage made of red or orange plasticine the shape of an owl's beak and place it between the bird's eyes.


Legs.
-
Let's make two balls of bright red or orange plasticine for the feet. Using the stacks on the board, form three fingers on each owl's leg.
-
We fix the paws at the bottom of the cone, and we put the owl on the cardboard.
A wonderful autumn guest is ready.


Craft from cones and felt
There are many interesting options for making an owl out of a pine cone using decorative felt. The work on the craft does not take the guys much time, and the process goes with pleasure. Felt is a soft, beautiful and pleasant material for the touch of children's fingers. It cuts well and adheres easily to other parts.
Tools and materials
To create an owl, you need:
-
colored thin felt in sheets with a thickness of 1.5 mm for details;
-
a piece of brown felt for the base 3-5 mm thick;
-
scissors;
-
cardboard;
-
marker or pencil;
-
glue "Moment" or glue gun.

Manufacturing technique
From a piece of thick felt we make a stand and owl legs.
-
Draw a circle on the back of the material slightly larger than the base of the cone and the bird's foot. Carefully cut out the parts with scissors. Preheat the glue gun and use a drop of glue to secure the felt support to the bottom of the bump. This will make it more stable.
-
Hold the felt circle with your fingers so that it adheres securely, and then glue the owl's feet on top.
-
The base of the craft is ready.


Create the eyes.
-
From a piece of thin white or blue felt, cut out two large circles under the base of the eyes. The larger the eyes, the more interesting the bird will be. From green material we make circles for the iris.
-
Cut out small pupils from black felt.
-
We fix the parts together with glue, and then attach them to the bump.


We make a muzzle.
-
To liven up the craft, you need to make an owl beak and ears.
-
Cut out a drop-beak from thin yellow felt, and from white - a small triangle with sharp elongated corners. These are the ears and eyebrows of a bird. We glue them high above the eyes.


Cooking the wings.
-
Cut out two drop-shaped white felt bases along the height of the owl's body.
-
We make the decor for the wings out of contrasting blue felt and fix it with light details.
-
We glue the wings to the back of the bird.
Bright cute owl is ready.


How to make with acrylics?
The use of various techniques in working with natural materials allows you to embody the most daring fantasies. Not only volumetric details in the form of leaves, twigs, feathers, but also color help to give the craft a special character.
With the help of paints, you can make a real harsh predator of the forest thickets, or you can create a fantasy and bright good-natured owl. It is enough to decide on the idea, choose the right materials and the right palette of colors.

It is better to make a colored owl with water-based acrylic paints. They are safe for children, comfortable to work with and do not get dirty like gouache or watercolors. To make the craft neat and beautiful, use the following tips.
-
Apply acrylic paint to a clean, dry surface of the fruit.
-
Chestnuts, cones, acorn caps, twigs that you need, rinse and dry beforehand.
-
In order for the acrylic layer to lay on the surface smoothly and beautifully, treat all natural materials with PVA glue using a wide brush or sponge.
-
Let the glue dry, and start an interesting activity with inspiration.


Colored owlet
Let's use acrylic paints to create a funny bug-eyed owlet for kindergarten.
You will need:
-
a well-opened pine cone;
-
caps from two acorns;
-
glue gun and rods to it;
-
colored decorative feathers;
-
paint and brush.

Progress
Body of an owlet
-
Decide on the color scheme of the craft. You can make a yellow, brown or white chick.
-
Take a suitable paint, and gently paint over the bump with a brush on top and inside between the scales from top to bottom.
-
Do not take a lot of water on the brush, let the paint be of medium density.
-
Let the belly of the owlet dry well.

Muzzle
-
Put the acorn caps with the convex part up and paint in white. These are the whites of the eyes. Once the light coat is dry, paint bold black pupil dots in the center of each eye.
-
Fix dried caps with hot glue on the cone.
-
The scale in the center, just below the eyes, is transformed with the help of orange paint into a bird's beak.

Decorating the torso
-
We decorate the craft with decorative bright feathers on the sides and back.
-
A fluffy multi-colored owlet is ready.

More ideas
You can make a fabulous autumn owl with your own hands on the basis of a large pine or cedar cone, acorn caps and autumn leaves. Detailed instructions will make the work pleasant and easy.
To make crafts you will need:
-
big bump;
-
acorn caps;
-
toy plastic eyes or matching buttons;
-
thermal gun and glue sticks to it;
-
scissors;
-
a piece of yellow or orange felt;
-
Maple leaves.


Progress.
-
Draw on a piece of felt two legs with three fingers, resembling a princess's crown and an elongated triangle - the future sharp owl's beak.
-
Carefully cut out the blanks.
-
Heat the glue gun, and glue the paws to the lower wide side of the bump.
-
Fix the plastic eyes for the bird in the prepared acorn caps on droplets of hot glue.
-
Fix the finished eyes to the top of the cone slightly obliquely, as if a curious owl tilted its head to one side.
-
Glue the beak just below eye level.
-
We glue two maple wing-leaves on the sides, and the third on the back, on the owl's back. This will be the ponytail.
You will get such a wonderful owl.

Another interesting idea is to make a large voluminous owl out of pine and spruce cones.
Prepare:
-
pine cones - 15-20 pieces of different sizes;
-
ate cones - 2 pieces;
-
small twigs of shrubs;
-
rowan berries;
-
0.5 liter cardboard cup;
-
pastel crayons;
-
glue gun;
-
marker;
-
white and black felt;
-
foamiran brown, yellow and orange;
-
scissors;
-
leaves and dried flowers of various plants;
-
chestnuts;
-
thick cardboard.

The stages of work are as follows.
The torso.
-
Place the cup upside down.

-
Starting from the bottom edge, fix the large pine cones with the back to the container in a circle, gradually rising.

-
Fill in the spaces between the big buds with the small ones.

-
When you reach the top of the glass, determine where the front of the craft will be. Glue the eyes of the owl from the cones in the center in this place with the back to you.

-
On the bottom of the glass, above the eyes, fix two bumps obliquely so that they resemble the ears of an owl.

-
Below the eyes, in the middle, make a protruding beak from a small stick.

-
Glue the prepared spruce cones on the sides of the glass instead of the wings. Cut 2 pairs of eye circles out of felt: large white and smaller black ones. We glue the blanks together and fix them on the craft with glue.
The owl is ready.

To make the work look finished, we will make a beautiful stand for it in the form of a picturesque meadow.
-
We circle the prepared leaves with a marker on foamiran and cut out with scissors.

-
With the help of oil pastels, we give the leaves beautiful autumn shades.


-
Cut out an oval from a piece of cardboard and glue it with foamiran.

-
We fix the leaves with an overlap with hot glue, leaving the edges free.

-
We decorate the stand with thuja twigs, twigs, rowan, chestnuts.

-
We put the owl in a clearing, and fix it with hot glue.

-
Pine and birch twigs will add to the picturesque composition.
A wonderful piece on the theme "Autumn" is ready.

Polar guest
Among the autumn red foliage, a fluffy snowy owl made of spruce cones and cotton wool will look unusual.
For work, prepare:
-
a sheet of white and cream felt;
-
cotton wool;
-
pine cone;
-
plastic eyes for dolls or buttons;
-
lemon skin;
-
glue gun;
-
skewer;
-
scissors;
-
gel pen.

Stages of work.
-
Divide the cotton wool into small fluffy lumps. Apply hot glue to the inside of the cone and gently, using a skewer, glue the cotton wool to the scales. The larger and more voluminous the layer of cotton wool, the fluffier the snowy owl will become.

-
Cut out two droplet wings from light felt. Using a gel pen, draw the contours of the owl's feathers on them. Using a glue gun, fix the wings to the craft.


-
Cut out two circles from yellow felt - the basis for the eyes. We fix decorative blanks or buttons on them with hot glue.

-
Use black felt to create legs and a nose.

-
We glue the finished parts to the owl's body. The fluffy white owl is ready.


Owl family
An owl family looks very cute sitting on a branch. To create a cute family, you need:
-
glue gun;
-
scissors;
-
linen yarn or tow;
-
decorative eyes;
-
thin twigs of linden or willow;
-
fir cones;
-
cardboard.


Progress.
-
We make circles of cardboard to the size of the owl's eyes.
-
We cut tow or yarn into uniform bundles and glue it in a circle onto a cardboard blank. On top of the fluffy fringe layer, we fix the plastic eyes.
-
Gently glue the pre-prepared twigs into the scales of the cones - the eyebrows of the bird.
-
Just below the eyebrows, closing the place of fixation of the branches, we glue the eyes.
-
We coat the wing twigs with hot glue and fix the cones in the sides.
-
To make paws, we make several skeins of light yarn on a small stick in the form of owl's claws and glue it to the bird's belly.
-
We insert thin branches into the lower part of the craft to make an elastic tail.
-
Wonderful birds are ready.
You can put an owl family in a nest made of grass, or fasten a wire in the backs of the birds and hang them by strings from a branch, like a tree.

For another interesting master class, see below.


