Variants of making crafts "Well"

"Well" is a craft that can be made from a huge number of different materials. Attractive designs come from both paper and natural ingredients of natural origin.


How to make from paper?
You will need:
- newspaper;
- cardboard;
- knitting needle;
- glue;
- Super glue;
- skewer;
- wire;
- pliers;
- paper tape;
- acrylic paints of sand, brown and steel shades;
- pencil;
- glue brush;
- ruler;
- scissors;
- colored paper;
- stationery knife;
- thick cotton thread.


Consider a detailed master class on modeling a paper well.
- At the first stage, you will need to prepare the base for the well. For these purposes, a drawing of his mine should be drawn on a cardboard sheet. It is best to make a structure with a side length of 10 cm.On each side, you must leave a small margin for gluing.
- The template must be carefully cut. For a more reliable fixation when gluing, it is necessary to additionally glue the bases with paper tape. The result should be a neat cube without a top. This will be the base of the mine.
- Next, a roof layout is made. It is prepared on a piece of thick cardboard. It is necessary to draw a diagram of the planned roof here. The part is cut, folded and glued, making ramps. To glue the parts together more reliably, use paper tape.
- At the next stage of work, it is necessary to build pipes for assembling the log house and the slope of the well. The tubes can be formed from newspaper sheets. These items may vary in size. It is more convenient to form the tubes with a skewer. Elements for the roofing component should be made with a knitting needle.The number of tubes will depend on the size of the structure.
- From ready-made newspaper tubes, you can model the frame of a well. Before assembly, all unnecessary elements from paper parts must be cut off.
- To make a blockhouse, you will need log tubes with different lengths in a couple of options. This is necessary in order to fill in the protrusions, creating an attractive log masonry. The structure must be glued with alternating long and short components.
- Next, make the roof of the well. The pediment of this base is pasted over with tubes. All excess is carefully trimmed with a knife. Then the slopes are glued with tubes. In the places of the cuts, a "ridge" of the roof is formed by gluing additional tubes.
- Support parts are fastened, a rotating drum is made. For these purposes, use paper tubes of suitable length. They are placed on opposite sides of the well symmetrically.
- Then they make the formwork from a cardboard sheet. A frame is cut out of it with a suitable width of the edges, making holes there for the support components. Supports are inserted into them and the formwork is glued to the top of the structure.
- A rotating drum is made from strong wire and twisted paper components. You can connect these parts together with a cotton thread.
- Then a bucket is made into a chain. The roof is attached to the installed supports.
At the last stage, an attractive homemade product will need to be painted in any suitable color.


Making from matches
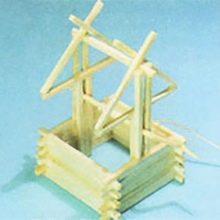
Let's consider step by step how you can make a well from ordinary matches.
- Only straight and even matches should be taken from the box. Sulfur is cut off from them, polished. The foundation is glued from 4 elements.
- On top of the foundation made for the future well, another row of matches is glued. The lower joints will definitely need to be covered. At this stage, you should not rush, as it will take a lot of time to dry.
- Make 9 more rows up. You will get a log house of crafts. All the edges on the sides will need to be properly sanded.
- Further, from 3 rods, a stand part is glued together for additional strengthening of the gate. One match should be shortened. The procedure should be repeated.
- One of the racks of the timber is glued on the inside exactly in the middle of the well.
- The remaining post should be glued to the second wall on the back of the log house.
- A couple of matches are glued outside. They will be needed to install the roof.
- A collar is made from a toothpick. The part is broken at two points and bent in the form of a handle. Glue is applied in the center of the knob, the part is wound with a thread.
- The gate is installed between the roof fixing rods. The part is lowered onto the racks.
- Using glue, they connect the racks inside, as well as the transverse beams of the rods set aside for the roof.
- Insert the crossbeam between the fastener rods to strengthen the roof. This part is glued at the height of the cuts from above.
- 4 beams are glued at an angle to the edges of all supports and to the top of the crossbeam.
- Between the sloped beams, a whole match is attached on top, and only a piece from the rod is attached below.
At the end, the roof slopes are glued.


Crafts ideas from natural materials
A very beautiful autumn "Well" made of jute, sticks, branches and other natural components can be made with your own hands for a kindergarten or school exhibition.
Procedure.
- Part of a plastic bottle can be used as a base for the well. All excess from the container should be cut off with scissors. A height of 8 cm will suffice.
- Next, the plastic blank will need to be fixed on a base made of thick cardboard. To do this, you can use a glue gun, but you should work with it carefully. If it is a thermal device, the plastic may start to melt, so it is important to keep the glue moderately hot.
- As soon as the base and bottle are glued, all excess should be cut off from the cardboard part.
- Next, you need to take a pair of sticks of approximately equal height (about 18 cm).They are glued on the sides of the plastic container exactly opposite each other.
- Now you need to prepare many branches of approximately the same thickness and height. You can trim these components with large scissors. The height must match the height of the main workpiece.
- Prepared branches will need to be glued around the entire perimeter of the plastic base container. For this, the Moment Crystal glue is suitable.
- In the next step, you will need to install a branch-crossbar of a suitable length. It is attached to two pre-glued posts. You can fix this part with threads or jute. It is necessary to adhere to the crosswise position.
- Next, you need to prepare the roof of the future well. As a basis, you can take thick cardboard from the box. Cut out a rectangular piece. Insert one branch into it on each side. Then you need to make holes for the upright posts.
- The cardboard roof is fixed in the correct position. With hot glue, the roof and twigs are attached to the sides.
- The finished structure can be painted or decorated in other attractive ways. For example, foliage can be spread and fixed on the roof. A home-made "Well" will look very beautiful, on the sides of which there are small flowers, for example, clover.
- The bucket can be made from a plastic lid. First, a wire handle is attached to it. The cover itself must be wrapped with threads from the outside. The thread will need to be glued in several places.
A string or string is tied to the bucket. The second end is fixed on a wooden bar.


For information on how to make the "Well" craft, see the next video.


