The second life of light bulbs: a variety of crafts

In the modern world, it is impossible to imagine life without lighting devices. As soon as it gets dark, light bulbs are turned on in every house. It would seem that products that are out of order can only be thrown away. But giving free rein to fantasy and imagination, you can find many ideas to give a second life to such a useless thing at first glance.


DIY Christmas toys
Christmas tree decorations are one of the simplest and most common ideas.
A toy made from a light bulb, unlike a factory glass ball, is a very budget option.
In addition, an original and unique product is obtained.


snowman
On the eve of the New Year, you can have fun and usefully spend time with your family, creating toys for the Christmas tree. Variants of ideas for such work do not have any restrictions, an old lamp can be pasted over with beads, rhinestones, colored paper, threads. You can paint a glass surface with patterns and drawings, or build small figures. One such solution is a snowman figurine.

For work, you will need old lamps, fabric, paints, glue, scissors, polymer clay, decor (ribbons, braid, rope).
The order of work includes several steps.
- The first step is to cover the lamp with white paint. It is advisable to use acrylic paints for glass and ceramics. And for applying a complex pattern, contour paints are suitable. As a result, different thicknesses of materials do not allow different colors to mix.
- While the paint is drying, you can start creating caps. To do this, triangles are cut out of the fabric, sewn in such a way that a cap is obtained.
- Further, the snowman's headdress is decorated with fringes, ribbons, beads.
- Creation of a carrot nose.It is molded from polymer clay, and after drying it turns orange.
- While all the details of the toy are drying, the snowman needs to draw a face.
- All elements are connected with glue.
- At the end of the work, a loop of rope is sewn to the cap, for which it will be hung on the tree.


Christmas tree
A Christmas tree is another simple version of a Christmas tree decoration made from a light bulb. Materials needed for work: an old light bulb, green woolen threads, glue, beads and a star. The last attribute can be made with your own hands, for example, from cardboard, or you can pick up a ready-made small plastic star.
Let's list the stages of work.
- To begin with, the light bulb is tightly wrapped with green thread - this is the base of the tree. To prevent the material from slipping, the glass base is coated with glue.
- After the glue is completely dry, the green base is decorated with beads and beads (like Christmas balls), and a star is fixed on the crown of the head.
- The last step is a rope loop is glued to the star. Such a craft can also be installed on a stand, for example, glued to thick cardboard, then the toy can be used as a decorative item.

How to make vases?
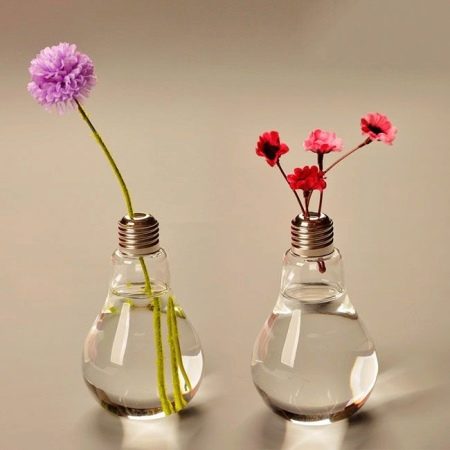
To make a unique and interesting vase from an old light bulb, you don't need to work hard or look for unusual materials. An empty light bulb is already a kind of vase.
The only step in creating a vase, which requires the utmost care and accuracy, is to remove excess parts from the light bulb. To do this, using pliers, you need to remove the contact from the top of the base. After that, you will need any sharp metal object (nail, needle, knitting needle). There is a special glass insulator around the contact, it must be carefully broken with a sharp object. Now you can take out all the contents from the light bulb using tongs or tweezers.
Important! The glass from which the bulbs are made is rather thin and fragile, therefore, in order to avoid injury (cuts, scratches), the preparation of the bulb should be carried out with gloves. In addition, work should take place on a box or some kind of spread material (film, cloth, newspaper): in case the glass base breaks, it will be easier to remove all the fragments.


After the material is prepared, the vase needs to be made stable, for this you can use several ideas.
-
The vase can be hung on a rope, tape, cord, which are attached to the base. And you can also make a composition of several objects by hanging them at different heights. A combination of several colors and textures will create an unusual atmosphere and good mood for those around you.


- A stand is the easiest way to stabilize a vase. Almost any material is suitable for an element, be it a textured breed, a wooden plank, a bottle cap or wire. For the latter option, you need to wrap a piece of wire around a cylindrical object (which is larger than the bulb), moving from bottom to top. Then fasten the free end around the base. The lamp is glued to the rest of the materials with hot melt glue.


- Candlestick or stand for a hanging candlestick.


- One of the most difficult and unusual options - make the bottom of the flask flat with a gas burner. The high flame temperature will soften the glass and can be shaped to the desired shape. The only negative is that you need to accurately calculate the heating time.

Original lamp
Another unusual master class on creating a lamp from old light bulbs. The product can be made both suspended and floor-standing. Necessary materials for work: old light bulbs (at least 15 pieces), felt-tip pen or marker, glue or double-sided tape, cord holder with a working lamp.
Here is a step-by-step guide to assembling your lampshade.
- First you need to decide on the shape of the lamp, it all depends on the number of materials and their sizes (it can be a cube, star, ball, snowflake, and more).
- After that, the first row of bulbs is laid out.
- A marker or felt-tip pen on the bulbs marks the points at which they touch.
- Using hot glue or double-sided tape, the first row of bulbs is connected (at the marked points).
- Further, according to the same algorithm, the rest of the tiers are collected.
- The lampshade is ready, now a working cartridge is fixed in its middle.

A lamp shade for a lamp can be assembled in an easier way. To do this, it is enough to tie ropes or ribbons to the base of the lamps and collect them in a bunch.

A garland for a garden can be arranged on a long cord by placing the lamps at an equal distance and painting them with fluorescent paint.


More ideas
The idea that a burned-out light bulb is considered useless and inconspicuous is considered familiar. But even such an unaesthetic thing can be changed beyond recognition, giving it a second life. Consider a few more DIY ideas for DIY light bulbs.
Snowball
An option that can be used both as a gift and as an interior decoration. To work, you need to prepare an old empty light bulb, water, sparkles, glycerin, wire or other details for decoration, a cap to fit the base, stand, tape or rope, scissors, glue.


Here's how to do it.
- The first step is to prepare the interior wire decor. Any form can be - an abstract figure, outlines of plants, the first letter of a name, and much more.
- Next, the figure is fixed on the lid.
- A solution of glycerin and water is poured into an empty flask. The proportion is 3 to 7.
- Sparkles are poured into the same container.
- The next stage - the lamp is closed with a lid with decor and coated with glue.
- Next, you need to tighten the base and install the craft on the stand.
- At the end of the work, you need to decorate the place of attachment of the stand and the base with a rope or tape.
In the water with glycerin, you can put not only sparkles and any decor, but fresh flowers are also suitable for work. The buds of the first spring or bright autumn flowers are placed in the solution. The flask is also closed with a lid and hot melt glue. This is perhaps the most unusual and delicate decoration made from an old light bulb.
Important! It is not recommended to use master classes on working with old light bulbs for children or in lessons at school. A light bulb is a rather fragile item, carelessness can lead to injury. But if, nevertheless, one cannot do without this, the whole process should take place under the careful guidance of parents or a teacher.


A few more ideas that are perfect for decorating a house or apartment.
Candles
Melted paraffin wax or wax is poured into an empty glass base. It is important to install a wick in the lamp before doing this. After solidification, the flask breaks and all debris is removed. As a result, candles of an unusual shape are obtained.

Fruits
The craft that will decorate the dining table is a pear from a light bulb. The flask is wrapped with twine, here, just like with the "Christmas tree" craft, so that the material does not slip, the glass base is coated with glue. The top of the pear is decorated with a green sheet of paper or fabric. The work is ready.

Florarium
Mosses and succulents are mini-plants that can be placed inside a florarium from an old light bulb. First, you need to pour soil and sand, some small pebbles and tree bark into the glass base. After that, you can plant plants, it is convenient to do this with tweezers. Pour with a syringe, so dirty splashes do not form on the inside.


By turning on your imagination, with a little effort, you can find use for seemingly completely unnecessary and old things. By introducing family and friends to handicrafts, you can get even more positive mood, and teamwork will become even more productive.


Interesting craft ideas from old light bulbs can be seen in the following video.


