Making light crafts

The task of bringing the craft to school or kindergarten often scares both the children themselves and their parents. However, a large number of creative ideas do not require much investment in terms of time or materials.


What crafts to make out of paper?
The simplest crafts are made from plain paper, sometimes even white. For any holiday, from New Year to September 1, a child will be able to create a picture using different drawing techniques. For beginner creators, finger painting or stamps, previously cut by adults from potatoes or wine corks, are suitable. Older guys will already be able to handle wax crayons, crayons or paints.


Very easy master classes teach you how to create products from colored paper.
Despite the huge number of ideas suitable for implementation, preference is most often given to postcards, applications, garlands for the house, or figurines of animals and insects. In almost 5 minutes, using a template from an album sheet, it is possible to get a gift box, which is then decorated with scrap materials. It is very easy to create a funny turtle from a disposable plate and colorful paper. The round base is painted with paints and covered with sequins, after which the green head, legs and tail are glued to it.
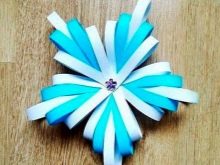
Without the use of glue, it is possible to create a nice wicker rug. Colored paper of two shades is cut into strips of the same length and width, which are then interwoven in a checkerboard pattern. Also, the minimum amount of materials is used to cut graceful snowflakes.


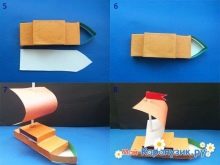
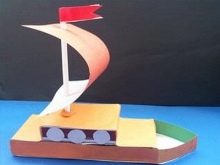
Quite simply, a boat is constructed from colored paper. For creativity in this case, you need empty matchboxes, colored paper of different densities, scissors, glue and a tube, for example, from a lollipop.
- The process begins with the fact that two matchboxes are placed next to each other, and the third is strictly centered on top of them. A good solution is to immediately wrap the structure in colored paper to hide the advertising inscriptions.
- The stern for the ship is "built" from cardboard: first the base is cut out, and then two short stripes indicate the bow of the ship.
- A sail made of a rectangular piece of colored paper and a small red flag are attached to a tube fixed in the upper matchbox.
- At the final stage, the sides of the boat are formed.


A child of any age will find the idea of creating a Russian stove, which appears in many folk tales, no less fascinating. For work, you will need cardboard packaging from under the toothpaste, white, orange and black paper, a small amount of cotton wool, a black felt-tip pen, scissors and glue.
- First of all, the box is cut into two parts so that one is slightly larger than the other. The long piece is set vertically, and the short piece is applied horizontally to it. They are fixed between themselves with glue.
- When the frame is dry, it can be pasted over with white paper that imitates whitewash.
- The stove tube, placed vertically on the base, is obtained from folded cardboard tape.
- Separately, a black firebox and its orange frame are glued onto a small rectangular piece of white paper. The finished composition is mounted on the stove.
- At the end, the pipe is wrapped in orange paper and filled with a small piece of cotton wool, and the masonry is drawn on the surface of the structure with a black felt-tip pen.


What to make from plasticine?
The process of interacting with plasticine, polymer clay or salt dough is always exciting for children. From this material, you can quickly mold an original figure with your own hands, or you can "draw" a semi-volumetric picture.
In the work, plasticine is usually combined with natural materials: moss, cones, twigs, seeds and acorns.


A fascinating, but not at all difficult task will be sculpting Pokémon Pikachu, which resembles a squirrel in its appearance. The main material for creating the figurine will be yellow plasticine - you will need a large block.
In addition, smaller pieces of black, red and white mass will come in handy.
- The yellow material is well crumbled, having previously been divided into several fragments. The largest piece will become the torso, the medium sized piece will become the legs, tail and head, and the smallest pair will become the ears.
- The largest workpiece is cone-shaped. Further, its lower part is notched, and two legs are designated with a stack.
- The head simply rolls into a ball and connects to the body with a match. After it you have to squeeze slightly on the sides with two fingers and "reward" with two pits for the eyes. The Pokemon's face is immediately adorned with pink cheeks and a black nose bead. The eyes are collected from balls of black color and white highlights.
- Long pointed ears of yellow color with black tips are fixed on the head.
- Cutting a hole for the mouth and adding a piece of pink plasticine inside will make Pikachu smile.
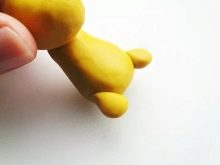
- The creature's four legs are small tubes with notches at the ends. After they, together with a zigzag long tail, are fixed on the body, the craft will be ready.


It is even easier to create a lion from plasticine. For the master class, you will have to prepare plasticine of yellow, black, white and brown shades, a stack, and a toothpick.
- Modeling begins from the head: an oval is formed from a yellow piece, which bends slightly for greater naturalness.It is important that the cone-shaped body of the same color is slightly narrower in the upper part than in the lower one.
- By connecting the head to the body, you can tackle the hind drop-shaped legs. The forelimbs roll into sausages, the lower part of which is slightly flattened and bent upward.
- Having collected the main details of the figure, it should be decorated with a brown plasticine mane. "Combing" with a toothpick will allow you to mark the hairs on it.
- A similarly worked triangle is fixed on the lion's chest.
- A plastic or wooden stack will make it possible to mark the claws on the feet.
- To create a ponytail, you need to connect a yellow flagellum with a drop-shaped piece of brown plasticine. It is also better to draw the hairs on the brush.
- The animal's eyes are formed from white circles, on top of which two black beads are fixed.
A voluminous black triangle with lateral recesses plays the role of a lion's nose, and a pair of flattened yellow “droplets” become ears.


Crafts from cotton pads
Various simple crafts are obtained on the basis of cotton pads - a soft material with which it is very easy to interact. For example, adding fluffy pom-poms from yarn leftovers to them allows you to get beautiful flowers. A funny snowman with a "disk" body can become the center of a winter application, and funny chickens made of the same material can become an important part of autumn work.
These blanks are also ideal for creating voluminous angels on sticks.


Beautiful figurines made of stones
Interesting products are obtained on the basis of stones, mainly pebbles, collected during the summer holidays. I must say that such master classes are suitable for older children - from 10 years old. For example, together with their parents, they can create not only a beautiful, but also a useful craft for the home - a wall clock with a stone dial. To do this, a flat pebble is glued around the perimeter or circumference of the workpiece with the hour dial, on which the numbers are written. Old candlesticks or glass jars pasted over with shells, pebbles or other natural materials will surely add coziness to the room.


Making crafts from natural materials
For creativity at home, it is customary to use the most available materials, including natural gifts collected with the children for a walk.
Cones
It is very convenient to make various fabulous animals from cones, since samples of different sizes are suitable for both the calf, and for the paws and muzzle. For example, you can get not only a classic hedgehog, but also a hare, penguin, deer or an owl. Additional elements are fixed on the base using plasticine.
By the way, you can decorate a wooden photo frame with small unopened cones, simply by fixing the natural material with reliable glue.


Older children will find it more interesting to collect a beautiful wreath of cones in stages. It is more convenient to use a spruce branch bent in the form of a circle of the required size as a basis. The finished work is usually decorated with artificial snow, glitter or tinsel. Also, winter berries and flat wooden figures will harmonize well with cones.


From vegetables
Perhaps the most fascinating variety of simple crafts are those made with food. For example, a ripe zucchini will make an excellent ship: a boat from a small fruit or a full-fledged yacht from a giant vegetable.
- After the zucchini is washed and dried, it is necessary to remove the upper part from it, about one third. The knife should go along the fruit, and the skin should remain intact. The workpiece is immediately freed from pulp and seeds.
- The steering wheel, flags, anchor and other ship details are cut from pieces of sweet pepper and carrots.
- Cabbage leaves are ideal for shaping sails, although a suitable fabric can be an alternative.
- It is more convenient to fix small elements with toothpicks, but the sails will have to be planted on barbecue skewers.

Following the instructions step by step, you will be able to create beautiful figures from other vegetables. A rounded potato will become the basis for a wonderful pig, which will only have to attach carrot legs, ears, eyes and a tail. A funny horse is also obtained from the same root vegetable: its head and limbs are also formed from chopped carrots planted on toothpicks.
It is possible to collect a cunning fox from several carrots: the largest fruit will become the body, a little smaller - the muzzle with a long nose, the tips - the ears, and the thin slices - the legs. Mice are also made from cucumbers in an elementary way: in fact, carrot ears and a pair of eyes are only attached to the vegetable.


For how to make simple crafts, see the next video.


