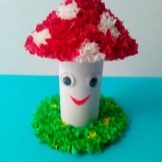
Making a craft "Fly agaric"

Making crafts allows you to develop the child's eyes and fine motor skills. There are many ideas for their creation, they can be suitable for children of different ages. Today we will talk about how to make a product in the form of an amanita mushroom.


How to make from paper?
To begin with, let's consider how to create a piggy bank product in the form of such a mushroom with our own hands. To do this, you will need the following materials:
-
sheets of plain paper;
-
glue;
-
scissors;
-
knitting needle;
-
dye;
-
brush;
-
clear nail polish.


2 rings are cut out of a sheet of plain paper. In order for them to be durable, it is better to glue them together. The cut circle is tightly inserted into the lower element. The made bottom is pasted over with another dense paper base.
After filling the piggy bank, a circle inserted in the center can be squeezed out, and the money can be pulled out. At the same time, a large number of thin, even tubes are rolled out of the paper material. To make them neat, you should use knitting needles as a support.


At the edges of the circle at the bottom of the piggy bank, tubes are glued with a distance of 1-1.5 centimeters. From below, we begin to weave them, as in the manufacture of a basket from twigs. In this way, the whole base is woven. From the top, you should start to weave the mushroom cap. In this case, you will need to make a small hole so that you can throw money inside. The hat should grow to the required size.


To give the piggy bank stability, a ring is cut out of the cardboard base separately. It is pasted over and attached to the bottom of the finished "fly agaric". This option might work for a school.
Various simpler crafts in the form of fly agarics can also be made from paper.Let's see how to create such a product using the origami technique. To do this, a square is cut out of red paper, its corners are bent to the central part, as a result, a blank is obtained in the form of a small envelope.
After that, the resulting rectangle is bent in half, while combining the short parts. The part is turned over, and then the corners are bent to the middle. The upper inner corners are lowered to the inflection line.


A small corner of the mushroom cap and the corner of the leg are also bent. At the final stage of manufacturing, you need to take a white sheet of paper. Small even circles are cut out of it. They are glued on PVA to a red hat.
You can also make an accordion-shaped mushroom like this. For this, red and green material, a cardboard base, an adhesive composition and scissors are prepared. A rectangle is cut out of the red material. It can be of any size. Then a small "accordion" is made from the wide side, while alternately bending it 5-6 millimeters wide down and up.


The resulting workpiece is bent in half. The edges of the element are glued together. The result is a fly agaric hat in the form of a bright fan. If you just want to make an applique, then you should cut a leg out of the material and glue the individual elements onto cardboard. At the end, small white circles are cut out, they are glued to the cap.
To complete this application, you can make grass from a green base. It is also glued to the cardboard base next to the "fly agaric".


Products from natural materials
Such voluminous crafts made from various natural materials will look interesting. This will require a small, thin twig. It is painted white. Separately, you should prepare walnut shells. They should be repainted red.
Small white dots will need to be applied to the red caps. This can be done with cotton swabs. The resulting parts are connected to each other with plasticine mass. The finished craft should be placed in a paper cup, if desired, it can also be decorated. This fall option is perfect for kindergarten.


Mushrooms from improvised means
Crafts in the form of such mushrooms are often created from small disposable glasses. In this case, the side of the cups is cut off from above, after which, with the help of scissors, longitudinal strips with a width of 1 centimeter are cut immediately along a whole circle, without reaching about 1.5 centimeters to the bottom.
Each of the strips will need to be bent to the outside and wound around the pencil.
At the same time, another glass is taken, the neck should also be cut off and slots should be formed along it.


The made segments are folded into the inside with a pencil. After that, green paper is taken, from which blanks are cut in the form of long triangles with different sizes. They will be needed to simulate grass. The resulting parts are attached using a glue stick along the edge of the neck of the third disposable cup.
To make the connection between different cups more reliable and elastic, you need to form "accordions" of two paper strips, while they are bent crosswise with each other. There will be two such elements in total.


The end of the "accordion" is attached to the bottom of the glass with green elements and the glass, in which one of the parts is bent inward, putting it on top. Through the next "accordion" you need to attach the workpiece with stripes outward.
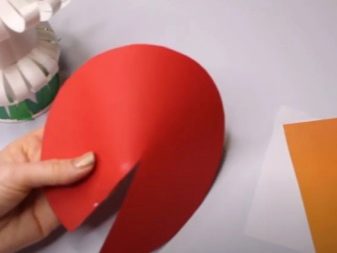
You can start making the "fly agaric" hat. To do this, put a plate on a sheet of red paper, circle it with a simple pencil, and then cut out the resulting figure. A small area is cut out from this part to give the mushroom head a tapered appearance. It is better to glue the edges of this segment.


Then a small piece of plain paper is taken. Small circles are cut out of it, they are glued to the hat.The bottom of the upper glass should be well coated with adhesive, and later glue the finished cone-shaped hat there.
It will be necessary to cut a leaf out of green or yellow paper, and attach it to the hat. In front of the "fly agaric", you can draw a mouth and eyes with dark paint or a pencil.


Craft "Amanita" from plastic cups in the video below.


