Space crafts

Crafts on a space theme are in demand most often in April, which is logical. But if a child is fond of space and the mysteries of the Universe, he will like to design rockets and make aliens from scrap materials at any time.


DIY paper products
There seems to be no material more readily available and widespread than cardboard and paper. And constructing space technology from them is the most realistic option, because it does not require preliminary preparation.
Such crafts on the topic of space are perfect as crafts for kindergarten, but in general they are designed for both preschoolers and younger students.


Rockets made of cardboard and / or thick paper.
- As a material, you can take a toilet paper sleeve, which will become the basis of the rocket. If there is none, the cardboard must be rolled into a tube. Then the tube can be wrapped with thick paper, increasing the height.
- On one side, you need to make cuts that will help form the narrow part of the rocket. They need to be folded so that one incision is on the other, you get a tapered part. It will require glue fixing so that the cone does not disintegrate.
- The rocket will fall predictably if no support is made for it. The stand is formed from two rectangular blanks of cardboard, in which slots are made in the middle to be able to connect the parts. It turns out a cruciform element.
- And again in the tube-rocket, only on the other side, they make cuts. This is necessary so that the stand fits freely into the body.
- Further, purely improvisation - you can paint the rocket with gouache, make patterns. You can paint over only the base, and cut out the portholes from colored paper and glue them. You can make inscriptions - the name of the rocket, the country of release, etc.


This option is not difficult, and if you need to bring a voluminous craft, it is ideal. For those who don't have cardboard or just don't want to mess with it, template crafts are good options. You just need to print the diagram and do everything according to the instructions.
Among such samples:
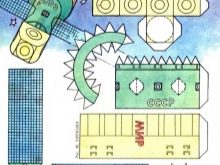
- a rocket with a Soviet cosmonaut - a simple algorithm will not allow even a junior pupil to make mistakes;
- orbital station "Mir" - a little more complicated, but if there is an adult nearby, it will take about 30 minutes to make a craft.
You can't write about paper crafts without remembering origami. And here the space theme also occurs. For example, according to this scheme, even a preschool child can make his own rocket. Colors and sizes can be chosen at your discretion.


Making from plasticine
Another popular and affordable material is plasticine. The most simple option will be application or, in this case, plasticineography. To make such a work, you will need A-4 cardboard (base), a set of plasticine (the more colors, the more interesting), a modeling board, cloths or napkins for wiping your hands, a drawing template.
How to make a plasticine painting on a space theme?
- On cardboard, you need to draw a diagram of the picture in advance, that is, the Sun, rocket, Earth and Saturn. With plasticine, the child will fill in the planned.
- First, you need to make the Sun from thin plasticine flagella. At the very top (in the corner of the cardboard) it is white, then pink, orange and finally yellow are used.
- Then you can move on to the rocket. In the picture, the parts of the aircraft are circled in black marker, each part can have its own color. For example, pink nose, yellow body, blue wings and red tail. Portholes are usually made of blue plasticine.
- Planet Earth is made of green and blue, respectively, denoting land and water. These parts must also be drawn in advance.
- Saturn is brown, burgundy and white plasticine, mixed as in the photo.
- Stars are made of yellow plasticine - small dots, their places are not determined in advance, you need to distribute arbitrarily.
- Comets can be made from orange plasticine - drop-shaped elements stretched from head to tail. You can also mix plasticine, such as brown and orange, to create them.
- You can make a contour for planets and a rocket - use thin plasticine flagella in the color of the object.
Such a craft can be individual or collective work.


Ideas of plasticine paintings on the theme of space:
- an amazing picture from a distant planet - there is an incredible landscape, and aliens, and the starry sky;
- a rocket made of plasticine balls is an excellent example of a craft that will be the best fine motor skills trainer;
- this is how an inhabitant of the Moon or other cosmic body might look like;
- more skillful work, because its constituent elements require dexterity and diligence from the author;
- and this is what the aliens look like when they decide to take a creative photo with a distant pretty planet;
- laconic craft, for which it is better to use light (airy) plasticine.
If you want to keep the craft for a long time, you can varnish the finished plasticine picture.


What to make of waste material?
From the material that is about to go to the trash, you can make chic crafts. They are good for a competition, for an exhibition, and for decorating a children's room.
From disks
If it's not clear what to do with old, already irrelevant disks, then here is the solution. One such disk can be turned into a flying saucer. And if you take a few, there will be a whole landing of a star mission. For preschoolers, an interesting option, for younger students too.
What to prepare:
- disk;
- food foil;
- cocktail straws;
- glue gun;
- multi-colored pieces of holographic film;
- rhinestones on glue;
- scissors;
- sharp pencil.


The work progress is as follows.
- Food foil needs to be crumpled (children especially love this), from the lumps to form two hemispheres.In the palms of your hands, you can roll two balls, each pressed against the table to form a bottom plane. Only it is not worth crushing the material too much, because in the future it will be impossible to make indentations in it under the antennae.
- Using a sharp pencil, you need to make small indentations in one of the hemispheres for the antennae. This will be the top of the dish. The antennas will be made from a cocktail tube.
- Both the disc and the antennas must be pasted over with fragments of holographic film. The disc itself must be double-sided, if on one side of the disc the surface is mirrored, on the other - a picture, you need to form the second side yourself. We'll have to glue two discs together, the sides with the picture will be fixed.
- The plate can be assembled. Only an adult should do this, since a glue gun is used. The parts of the plate will be connected to hot glue. The foil hemispheres are glued to the disk, while the antennae antennae are fixed in the recesses with the glue.
- It remains to decorate the aircraft with glue rhinestones. The bottom of the plate should also be decorated.
There can be many such plates: different colors are used, different types of cocktail tubes, even silver and gold foil can be taken.


From the bottle
A plastic bottle is the basis of many crafts, and why not make a chic space rocket out of it.
What you need to take for this:
- 2 plastic bottles of equal size;
- silver paint;
- Styrofoam;
- a cone made of thick paper / cardboard (to be made in advance);
- adhesive tape;
- marker.


Assembling the spaceship.
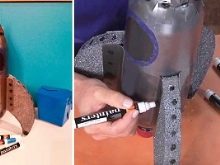
- The neck of the first bottle must be cut off. She, the neck, is attached to the bottom of the second bottle. The structure should be inserted into the rest of the bottom of the bottle with the cut off top.
- The resulting model at the joints of the parts can be fixed with glue.
- Now you can paint the rocket, silver paint is considered the most suitable.
- "Fins" are cut out of the foam. They will stabilize the flight of the rocket. By the way, you can take an old plastic card for cutting.
- They also need to be painted using silver paint.
- The cone is attached to the top of the container with tape. Fins are fixed on the sides.
- The portholes will be drawn with a marker. The ship's rivets as well as its name also appears with a marker.
The rocket is ready! At the school exhibition, she will definitely impress.


And a few more ideas for space inspiration:
- one large plastic bottle + two small ones from drinking yogurt = cool rocket to be completed in one evening;
- bottle, cardboard, paint and foil will help you get such a cute aircraft;
- if the house has stickers, silver cardboard, white gouache and a plastic bottle, the rocket can be considered almost finished;
- instead of silver cardboard, foamiran with sparkles is used, otherwise everything is traditional;
- part of the bottle will also make a flying saucer;
- ketchup containers can also be used;
- the original work will be submissive to those who love to draw with markers and improvise.


To learn how to make a UFO from a plastic bottle with your own hands, see the next video.


