Pape-art: what is this technique and what is needed for it?

The young creative direction of paper art has won the hearts of many needlewomen in a relatively short period of time. This is not surprising, because the technique allows you to create beautiful products from the materials available to everyone, reminiscent of forging, embossing and even artistic carving. We invite you to get acquainted with the features of this style - we will tell you how it arose, who invented it, and also how to create a masterpiece at home.


General description of the technique
The term "paper art" comes from a combination of two English words "paper" and "art", which literally translates as "paper art". This style involves decorating objects, as well as making art panels and paintings using ordinary napkins. Often, novice craftsmen believe that napkin plastic is the same as papier-mâché or decoupage. However, it is not. The only thing that unites these techniques is only the working material. Otherwise, they are different: paper art uses thin flagella twisted from napkins, figures are created in papier-mâché from pieces of cardboard, and decoupage involves the formation of paintings from napkin patterns.
Handicrafts in the style of paper art allow you to turn an old unnecessary thing into a chic element of the interior, unique in its originality.
This technique allows you to give things a somewhat vintage look, as if imbued with the spirit of antiquity. So, a box of household appliances after work turns into an old plaster, and the simplest glass jug is transformed into an unusual serving element.


The simplicity of execution and decorativeness of the finished handicrafts have become the main factors for the success of the peyp-art technique. Day by day, the number of her fans is constantly growing, and new craftswomen come up with new ornaments and patterns. Moreover, not only experienced needlewomen, but also children can master the work.

History of origin
The creative direction was developed by the Russian artist Tatyana Sorokina in 2006. The very first crafts in this style were presented at the same time at the All-Russian Children's Exhibition. Their success was so great that Tatiana soon wrote a book, where she told about all the rules of napkin plastics.


Pape art very quickly conquered children and adults. Nowadays, style is studied in technology schools and in creative associations. And the craftswomen come up with new interesting options for decorating and processing napkin flagella.


Popular patterns and colors
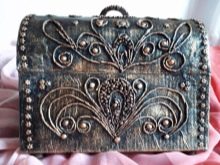
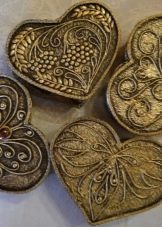
Paper art is notable for the fact that it can be used in a variety of ways: when creating primitive children's works in a kindergarten, and for serious interior decoration. Usually, experienced craftsmen use metallic spray paint with napkins. This decor allows you to create an imitation of chasing, the color looks organically on a complex relief made of paper threads. As a result, things look like they came to us from past centuries and, by pure chance, were well preserved.
The technique is especially loved by steampunk fans. In their homes, you can often find decorative elements based on this combination.
The technique allows you to create the illusion that the decor item is made of metal or even clay. In this case, the desired effect is created by brown-pastel colors. When they are mixed and the relief is painted, they form a pattern that visually resembles unevenly sintered clay.


However, there is a large group of minimalism lovers. They decorate their interior items with threads from white napkins and paint over them with the same paint. Using this approach, you can create the illusion of porcelain or stucco molding - in this case, the product will have to be additionally varnished on top.


Some people prefer bright and colorful paper art. Thanks to the deep range of colors, stylish jewelry can be made in modern and ethnic styles. Multicolored panels or even neon clocks for the hall look especially good.


Thus, we can safely say that napkin plastic represents the broadest scope for creative thought. If desired, anyone can choose the direction that interests him, in which he wants to express himself. This style of decoration is rapidly developing these days, therefore it is always interesting to keep track of fashion trends and methods that appear among lovers of needlework in the course of work.


What can be decorated?
The advantage of paper art is that this technique can be used for all types of surfaces. That is why needlewomen got a taste and today they decorate a lot of a wide variety of items. Most often, caskets and bottles are decorated with napkin plastic. Using the minted style, a simple box can be easily transformed into a treasure chest and a bottle into a Greek amphora. The flight of fantasy is not limited here.


Paper art is suitable for making fundamentally new elements of interior decor. For example, using papier-mâché and towels, you can make plates to decorate your kitchen block. Figurines and dolls are made in a similar way.


The technique is in demand when preparing panels and paintings, although this direction is a little less popular these days. It involves continuous monotonous work and requires unlimited patience from the master. Each detail of the pattern here should be done with multi-colored threads, so that the result is a whole picture. Such decors are formed on a cardboard or wood surface, most often a box lid or a piece of plywood.


Using the paper art technique, you can make organizers, vases, housekeepers, flower pots and many other stylish little things for your home.


What do you need to work?
Napkin plastic is an affordable hobby that does not require serious financial investments. You need to prepare the most basic consumables.
- Napkins - it is advisable to take monochrome, without patterns and blotches. Embossed workpieces will twist worse. In addition, they do not fit well and adhere poorly to the finished product.
- Water - to prepare the flagella, you need to slightly moisten the paper with it.
- PVA glue - it is advisable to choose a hypoallergenic composition. You will have to contact with him for a long time, so you need to make sure that there is no sharp chemical smell, and also that it will not cause unwanted reactions.
- Template or diagram - a sketch of what you are planning to do. It is better to prepare it well in advance. If you waste time on this in the course of work, then the threads will dry out and it will become impossible to work with them.
- Toothpicks / tweezers - it will be required if it becomes necessary to correct the pattern already fixed on the surface. However, any subtle objects can cope with this task with which you can correct a curved curl without spoiling the pattern.
- Towel - sooner or later, water may flow through the product. In this case, you need to take a kitchen towel and blot it before it has washed out the glue base.
- Craft surface - any bottles, old boxes, caskets or furnishings will do.
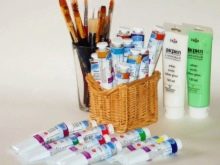
- Paints - you can use aerosol, gouache or acrylic.
- You will also need scissors and a brush in the work.


All these things are inexpensive, so the craft will not entail serious cash costs. You can find them at any office supply store or supermarket utility section. The most important thing is not to skimp on napkins and glue, since they will become the basic component of the finished “needlework”.


Step-by-step master class
Well, in conclusion, we will give a step-by-step master class and tell you how to roll the threads from paper napkins into a pattern with our own hands.
First, think about what exactly you will decorate and what pattern you plan to use. Find the ornament you like, draw it by hand or print it out. If the stencil suits you, you can start preparing the base.
Take the time to clean up. Get rid of old paint residues, dust and dirt. Be sure to degrease the object - for this it will be enough to wipe it with a simple alcohol-containing napkin.


At the final stage of the preparatory work, the surface should be sealed with one or two layers of napkins. Let the glue dry, and while it dries, start creating flagella.
Making napkin threads is quite simple:
- cut napkins into strips 3-4 cm thick;
- moisten the strip with a brush, drip a little glue on it and distribute it evenly over the entire length;
- slowly use your fingers to roll a tourniquet out of it.


As a result, you will get a lot of threads, from which you can already fold figures on a plane. The most important thing is not to let the threads dry out. As soon as you make a dozen blanks, proceed to creating a pattern.

It is advisable to start the craft with elongated lines, they are the base of the pattern. Draw the outline of the design with a brush dipped in glue, and carefully lock the thread. It needs to be fixed on the surface, and then using a needle, toothpick or tweezers to correct the position. Excess bundles can be cut off, but do not rush to throw it away - it is possible that you will need these small pieces in the future.
Keep in mind that in the course of work, ready-made harnesses dry out. To prevent this from interfering with your handicraft, place them on a moistened napkin or periodically run a brush dipped in water over them. If moisture accumulates on the product, collect it as soon as possible.
After the pattern is formed, let the garment dry thoroughly, usually it takes 2-4 hours. The exact time depends on the air temperature in the room and the volume of the surface to be decorated.

Finally, you can paint the product. There are no strict requirements here. Everyone chooses a shade range depending on their tastes and wishes. For greater decorativeness, finished works can be decorated with beads, pebbles, gears and other elements. And in order for the aesthetic appearance to be preserved as long as possible - cover the finished craft with varnish.


