Variety of cardboard crafts

Cardboard - this is the most accessible material, it can be found anywhere and often for free. At the same time, it is durable, so many unusual and functional things can be made from it: useful items for the home, decorative ornaments or toys. Let's talk about the most interesting ways to use cardboard.


Autumn options
Crafts on the theme of autumn can be very diverse. First of all, these are the gifts of nature: trees, mushrooms, birds and other representatives of the forest fauna. In a word, everything that you associate with the autumn season.
If you are celebrating Halloween, you can try to make an unusual pumpkin... To do this, you need a cardboard toilet paper sleeve, which is cut into thin circles.

PVA is applied to one part, sprinkled abundantly with sequins and left to dry. Decorating with glitter must be repeated with each piece.


The circles are collected in twine, forming an autumn fruit. After that, it remains only to fix a wooden stick or branch in the center of the pumpkin.


A pumpkin from cardboard sleeves is ready.

Autumn is the rainy season, so together with your girls 5-6 years old, you can make a voluminous umbrella for dolls. For him you will need:
- thin colored double-sided cardboard;
- pencil;
- compass;
- scissors;
- glue;
- thread;
- wire.

The work is done in stages.
- Prepare 16 round blanks of equal diameter from colored cardboard. Fold each workpiece in half twice.
- Fix the blanks with glue in the upper rounded part. If you do everything right, they will be collected on top and open at the bottom.
- A pair of blanks are glued together at a right angle.
- Thus, all the blanks are glued around the circumference, forming the upper part of the umbrella.
- The craft is almost ready.All that remains is to weave a handle out of the wire and fix the paper block on it.


Very beautiful autumn leaves can be made from thin cardboard. To do this, you need to make 10 square blanks measuring 8x8 cm (10x10). The finished square is folded so that a rhombus is obtained. You will need 6 such figures in total.

Take the remaining squares and fold them to form triangles.

Glue a pair of diamonds to each other and pin one triangle in the center. Repeat these manipulations with all the details. After that, put the blanks together by folding the leaf. Secure with glue.


After you glue all the leaves together, decorate them. For example, you can draw a funny face on them.
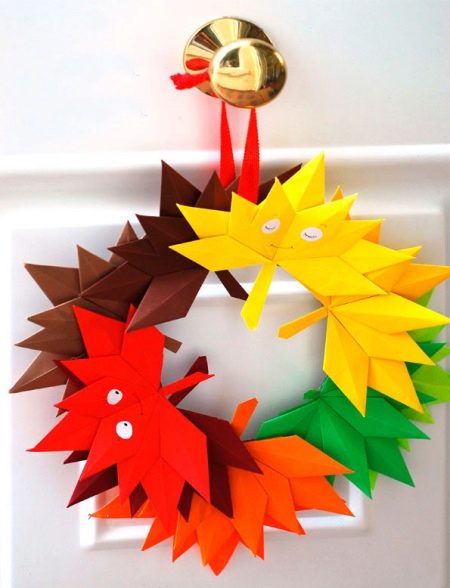
From autumn leaves you can make a beautiful garland, it is used to decorate premises in kindergartens and schools before the autumn holiday. You will need thin colored cardboard, a leaf template, and working tools (scissors, a pencil, a needle, thin rope and tape).
First, take the leaf templates and transfer them to cardboard.

Cut carefully with scissors and string onto the string through the needle. You will get such a beautiful garland.

What can you do for Teacher's Day?
If you are lucky and your child learns from a real teacher who gives all of himself to his work, take your time and effort and prepare a gift for him with your own hands. Believe me, your teacher will remember your surprise with joy and warmth for many years. Postcards using the scrapbooking technique are especially effective. To create them, you will need special cardboard with an unusual relief or print, colored paper, black buttons and other decorative elements.
A cardboard sheet of neutral color with a noble but unobtrusive pattern is taken as a base. Cut a rectangle out of it as large as you want the postcard to be.

To make the craft more accurate, the resulting blank is glued to snow-white cardboard so that a light edging remains on all four edges. To do this, you just need to draw a slightly larger rectangle on white cardboard, as a rule, the difference in size is 1.5-2 cm. Cut and connect both blanks.

Now you can take care of the decoration. Teacher's Day is celebrated in the fall, therefore, maple leaves are taken as the basis for the decor - they are obtained from coated, velvet or foil cardboard of yellow, red and orange colors.
Then pick up some pretty quote or greeting text. Print on a small rectangular piece of paper using a decorative font. You will also need a small, narrow piece of paper with an unusual print that matches the height of the postcard. It can be any piece of wallpaper with floral or geometric designs.

Prepare a small white cardboard rectangle, its size should approximately correspond to the text of the greeting. Write the word "Diary" on it and draw the lines on which the student's personal information is usually signed. It is advisable to make the edges of the diary a little aged. To do this, they can be shaded with dark paint or slightly singed.
A similar rectangle is prepared from corrugated cardboard of gray and light green colors, but with rounded corners. In this case, the gray should be slightly larger than the green. Additionally, a narrow strip is cut out of the first, the width of which corresponds to a rectangle.
The green and gray fragments are connected with a glue stick.


A gray strip is glued on top, and convex buttons, prepared in advance, are directly on it. As a result, you should have an image of a knapsack with clasps.
Then you can go to postcard assembly... A piece of wallpaper is attached to the center of the base.A congratulatory text is placed on top, and decorated with blanks of leaves around the perimeter.
A diary and a knapsack are placed below, they are also decorated with maple leaves. So with some effort, you will get an elegant postcard using the scrapbooking technique.


Other crafts
The variety of types of cardboard gives rise to many non-trivial ideas for creativity and needlework. Cardboard can be thick and thin, as well as corrugated or metallized. In addition, this material has all the main characteristics that help to realize any baby's fantasy. It is easy to cut, it bends well, but at the same time it is durable and very strong material. Postcards, appliques, boxes, as well as houses and toys are made from it. And this is not the whole list.



Flat
The youngest creators can try to make applique... There are a huge number of options for such crafts for children. You will need a thick piece of cardboard and colored paper. The guys cut out figures from thin sheets and glue them onto a cardboard blank. And in order to make the picture even more spectacular, it can be decorated with beads, sparkles or ribbons.

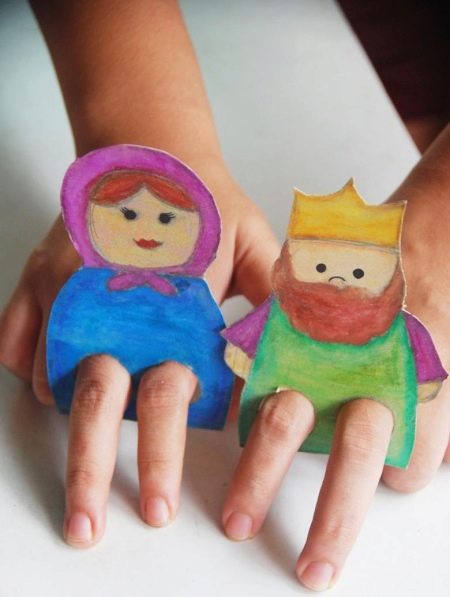
Finger puppets can be made from cardboard. With their help, any kid can easily arrange an impromptu theater at home, playing colorful performances based on their favorite stories and fairy tales.
This activity will not only captivate the baby, but also contribute to the development of creative thinking and imagination. It's very simple to make them:
- first you need to prepare several rectangles of cardboard 3 cm long and 5-6 cm wide;
- each blank is twisted into a tube for one turn and the joint is glued with glue;
- images of the heads of fairy-tale characters are prepared in advance from sheets of cardboard;
- after that, it remains only to attach the heads to the cardboard cylinders and cut the holes for the fingers from the bottom.
On the eve of the New Year, cardboard can be made postcards... They are decorated with unusual decor (sequins, beads, buttons, faux fur, cotton wool, foil and tied snowflakes), signed with warm words, and then handed over to relatives and friends.

If you wish, you can make such an unusual animal out of cardboard. The basis of the craft will be solid elements, pre-cut according to templates. They are connected to each other so that they move in the same plane. Any movable toys invariably evoke joyful emotions in kids, so try to make a funny bear with your little one, cheerfully waving his paw.
The whole work includes a few simple steps.
- First, prepare the templates and transfer their outlines to hard cardboard. Cut out.
- Using an awl, carefully poke holes in the body and legs.
- Place the parts one on top of the other and thread the thread through the holes. You need to tighten it loosely so that the bear retains its freedom of movement. Pull the thread into a knot.
- The muzzle is glued to the body motionless. The craft is almost ready - all that remains is to draw pretty eyes, nose and mouth with a felt-tip pen or glue the animal.

If your child has begun to study letters, numbers and the world around him, you can make an unusual baby book for him and place voluminous illustrations in it. First you need to prepare several sheets of cardboard, glue on them images of houses, trees, flowers, pets and heroes of fairy tales in accordance with the plot. Let the kid come up with his own fairy tale and put it into practice.
The sheets are held together with a spring, tape or rings.

Cardboard can be used to create and puppets - it can be robots or funny people. To do this, you need to cut out all the main elements-parts of the body and fasten them to each other using mini-fasteners, you can buy them at any scrapbooking store. If not, use a thin beading wire.You will need a small piece 2–3 cm long, thread it through the holes of the parts to be joined and twist the ends on both sides. As an alternative to fasteners, you can use metal rings.
Advice. If you want your figurine to resemble a real puppet, connect the arms and legs with two threads. To make them moveable, one thread must connect the legs, and the other - the arms.

Volumetric
From boxes you can make Dollhouse. And if the area allows, then you can build a whole town out of them. This task will interest the kid even more.
First, you need to prepare templates. To do this, using a ruler and an ordinary pencil, sketches of walls, roofs, windows and doors are applied to cardboard.

Take sharp scissors and carefully cut out the prepared templates according to the resulting outlines. They must be glued together into a single structure.
To make the future house look more naturalistic, decorate the blanks with cotton fabric. The main details of the house are wrapped in cloth, bringing notes of originality and creativity to the cardboard craft. For example, the walls can be made in light shades, and the roof - in those that are darker. For windows and doors, it is recommended to use a material of a different texture. Such a variety of possibilities contributes to the development of imagination in the baby.
Paper blanks are wrapped with a cloth, after which the latter is fixed to PVA glue from the inside. During work, you need to ensure that the fabric remains slightly taut. To prevent the appearance of wrinkles, first iron it with an iron or starch.

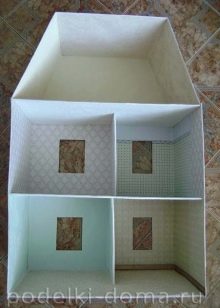
After that, you can proceed to the design of the windows. This stage is considered one of the most time-consuming and requiring accuracy. To make the edges of the windows smooth and even, you need to take a blank with a pre-glued material and put it on the table in front of you. After that, with a clerical knife or nail scissors, the fabric must be cut from one corner to another diagonally. At the exit, you will have 4 triangles - they are wrapped on the inside and fixed with glue.

Advice. To make the window look more realistic, use ice cream sticks or matches for the window frame.
Young children really enjoy working with cardboard. By creating even the simplest thing, they gain good experience with adhesive, sharp scissors and develop fine motor skills. This lesson is included in the compulsory practice of all kindergarten pupils. So, on the eve of February 23rd or Victory Day guys often make small cardboard airplanes. The master class is very simple.
- Draw a T-shaped outline of your future aircraft on cardboard and cut out the prepared template.
- The contour according to the template is transferred to cardboard and two identical parts are cut out.
- The blanks are glued to the matchbox so that one part is on top, the other on the bottom.
- As a result, you get a voluminous plane, the ends are glued into the tail.
- Using red colored paper, cut out a pair of stars and a propeller. The propeller is glued to the nose of the plane, and the stars are sent to the wings, one for each.

Many interesting crafts can be made from corrugated cardboard... It has an unusual appearance, and its strength is much higher than usual. Any corrugated cardboard includes several dense layers. In cross-section, they resemble waves glued to the base in a checkerboard pattern. This packaging material is used when transporting expensive equipment. During transport, it absorbs shocks and thus protects the contents from destruction. The structure of corrugated cardboard is very interesting, so craftsmen often use it to make unusual crafts and decor items.


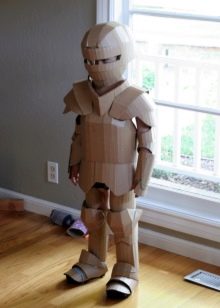
Having shown imagination, you can even design from cardboard carnival costume... For example, boxes of recently purchased household appliances can be used to create outfits for armored knights or robots. All parts are cut in advance and assembled into a finished product. After that, all that remains is to decorate it with paints and decor items.


In conclusion, we offer you more several original ideas for cardboard crafts... You can make an owl, stork, hedgehog, dog, and kitten.


From packing cardboard, train cars and trains themselves, cars and auto tracks with traffic lights are obtained.


Products made from the material in question can be functional. Try to make from it flower stand or photo frame.

If you wish, you can always find cardboard manufacturing schemes. pieces of furniture: racks, shelves and even sofas.

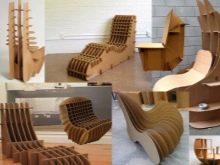

Cardboard is a versatile material that allows you to make products of any complexity.
6 cardboard craft ideas in the video.


