Crafts with children 2-3 years old

Kids at the age of 2-3 years are already beginning to take an active interest in the world around them. To spend time usefully, to develop the child in the right direction, you can work with him to make simple crafts. As practice shows, even two-year-olds are happy to take on a new occupation for them.


Features of work
Two years of age is optimal in order to start developing fine motor skills of hands, perseverance and attention of the baby. Before making a craft, you need to take into account certain features of working with children of this age.
- A child cannot be left unattended, even if he is making the simplest thing. A 2-year-old kid can easily pull plasticine, scissors, paper into his mouth.
- It should be remembered that a child of 2-3 years old does not have the proper perseverance, and concentration is poorly developed. Crafts should be as simple and quick to make as possible so that the baby does not lose interest.
- Choose only environmentally friendly materials that are not capable of harming the health of the child.
- When creating a craft, you cannot work in complete silence. Tell your child about the subject you are doing, you can think of a short story or a fairy tale. Be sure to ask questions about shape, color, application.
- You should not expect quick results and complete understanding from your child. All this will come with time, but for now, the task of the parents is to encourage the baby and praise him for even minor successes.
- For work, it is better to equip a special place in which you will only be engaged in creativity. Put all the necessary materials, clothes there. Pick up non-marking furniture.
- Despite the fact that the child is still very small, you should not do the craft for him. Let it not be as expected, but made by the hands of a baby. Parents can show by example and only help with small details.
The finished craft must be put in a prominent place so that the baby can see the result of his work.


Plasticine products
Plasticine is one of the favorite materials for creativity among people of different ages, but children especially like it. For kids 2-3 years old, it is recommended to choose soft plasticine so that it is convenient to warm and knead it in the hands. If this is the first modeling lesson, the kid needs to be told about the peculiarities of working with this material.
Show how to roll out plasticine, divide it into pieces, roll balls and "sausages". Teach your kid to connect different parts of the plasticine, forming the desired figure. There are a lot of modeling options for children of two years of age. We will consider several master classes that are most often offered to babies.


Gingerbread man
The craft process is incredibly simple:
- sculpt a large yellow plasticine ball;
- we create 3 more small balls: 1 will be the nose, the other two will be legs, we fix it in the proper places;
- we sculpt two small white balls (eyes) and 2 tiny black balls (pupils), attach them to the head;
- roll up a thin red "sausage" and use it to create a smiling mouth.


snowman
This craft is also not very difficult:
- we make 3 balls from white plasticine: large, medium and small;
- we connect the balls by placing one on top of the other;
- roll up two tiny white balls, fasten on the sides (these will be "hands");
- we sculpt small eyes from black plasticine, fix them on the upper ball;
- we sculpt a bucket on the head, fix it (you can replace it with a toothpaste tube);
- take a small twig and insert it into one of the "handles" of the craft.


Caterpillar
One of the simplest crafts that kids can do on their own.
Work process:
- roll up 7 multi-colored balls (1 large, 4 medium and 2 small);
- we connect all the balls with a match;
- we sculpt white eyes and black pupils, attach to the head;
- sculpt a small red ball (nose), fasten it in place;
- insert 2 matches into the head of the caterpillar, forming horns;
- we attach small balls to the ends of the horns;
- we form a smiling mouth in a stack.


These are not all the crafts that you can master with your baby. Children of this age may well blind with their own hands:
- hedgehog;
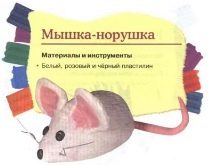
- mouse;
- a robot;
- flowers;
- utensils for dolls;
- treats for toys and more.


What can be made from paper?
Even a 2-year-old child can perform simple children's applications at home. At first, introducing kids to paper, parents will need to cut various elements out of it themselves. A little later, when the child understands the cutting technique, he can try to master it himself. It is important that the scissors are rounded. Here are some interesting options for kids 2-3 years old.
- Chaotic gluing. The simplest task is to cut a few elements like circles and triangles and ask the kid to draw a figure out of them. In this case, the child should be able to use a glue stick.
- Bonding to a template. There are many simple templates available for download on the Internet today. You can cut them yourself. For example, a large Christmas tree on which the kid can arrange the balls in any order. Another idea is to carve a tree. The child should glue ripe paper apples on it. You can also print an empty basket, putting mushrooms there, an aquarium, filling it with fish, and much more.
- Other applications. Separate elements corresponding to a certain pattern are to be cut out of paper. For example, the picture shows a bear. You can supplement it with paper balls by placing them in your hand.Or, for example, print and cut out a doll, dressing her in a beautiful dress. Also, the baby can assemble his own applique. The snowman will consist of round paper elements, the fish will consist of ovals and triangles.
Of course, with kids 2-3 years old, you can try to make real paper crafts such as a turntable, snowflakes, and a flashlight. However, it will be difficult for children of this age to understand the technique, and only the parent will be engaged in making crafts, which will not bring much benefit specifically to the baby.


Ideas from plastic bottles
Simple crafts for the little ones can also be made from ordinary plastic bottles, which are definitely found in every home. Such interesting solutions can become a real decoration of a house or yard. Here are some good ideas.
Vase
Making a flower vase from a plastic bottle is a snap. Cut off the top, and then paint the bottle with acrylics, finger paints, gouache - here the choice is yours. Additionally, you can decorate it with large paper or cardboard flowers, rhinestones, sparkles, beads.
You can even cut out a volumetric appliqué. Then you should take corrugated paper, roll it well, forming flowers. The twigs are also made of the same paper, but in a dark color. Having connected everything in a bunch, an impromptu bouquet is placed in a vase.


Trough
This kind of craft is done in just five minutes: you just need to cut out a "little window" in the bottle and fill it with bird food. You can put cereals, pieces of bacon, millet, berries and nuts. The finished feeder is taken out into the yard and hung on a tree.
It can also be placed on an unglazed balcony.


Piglet
From the bottom of a plastic bottle, you can make a funny and very cute pig for all sorts of little things. Cut off the bottom, paint it pink. On one side, we attach a nose cut out of pink colored paper, as well as eyes bought in a store for creativity. You will also need to glue the paper ears. We glue a paper tail at the back. The pig is ready.


Octopuses
A small octopus can be an interesting addition to a child's creative space. Paint a half-liter bottle blue or purple (although you can use any color), then cut the bottom and cut the bottom into stripes. Spread them out so that the octopus appears to be seated. At the end, glue the eyes.


Options from cereals
Sorting through small cereals, the baby uses certain parts of the brain, which allows the motor skills of the hands to develop faster. Cereals are one of the most useful creative materials for young toddlers. As a rule, crafts from cereals for small children come down to one thing - sprinkling according to a pattern. A simple image is drawn on a sheet of paper, most often an animal. You can just print the drawing you like. Then the colors are determined: millet can be yellow, buckwheat brown, poppy black can be. The drawing is coated inside with glue, and then covered with cereals. It turns out a kind of coloring of an unusual shape.
Looks pretty cute, for example, a hedgehog. The muzzle is made with black poppy, and the back is lined with buckwheat. Millet serves as a framing. In addition, it is not at all necessary to use cereals alone. You can sculpt apples from plasticine or cut out apples from paper, planting them on hedgehog needles. Or you can go even further by pasting real dry leaves from trees on the bottom of the picture. A small bear looks incredibly beautiful. Such a craft will become a decoration of the kitchen. On thick cardboard we draw the outlines of the beast, as well as the shapes of hearts around. We coat the bear inside with glue, line it with rice groats. Separate parts, such as ears, nose and others, are made using coffee beans. We fill the hearts with the same material.


Educational and creative crafts
There are many more options for crafts for kids 2-3 years old. Let's consider in more detail the most interesting and exciting ones.
Finger painting
Children 2-3 years old love working with paints. Finger paints do not cause allergies, they are easy to use and easy to clean. Using them is quite simple: you just need to pour a little paint into the cap and offer it to the child. The youngest children can be offered a handprint. Use different colors for a beautiful drawing. You can just smear the substance on the paper, alternating shades.
For children 3 years old, it is recommended to prepare a more difficult task - coloring. It should be a simple shape such as a ball or square. Have your child fill it with colorful strokes. Most often, for handicrafts with finger paints, drawings are used that imply the presence of round elements. For example, it is a good idea to draw a tree with branches, and then invite your baby to put leaves on it with his fingers. Another option is the image of a girl with many balloons.


Using stamps
Very beautiful and creative crafts are obtained using stamps. They can be made, for example, from potatoes. We cut out a figurine on the potatoes, and in parallel we dilute gouache in a plate, adding a little glue to it. You can take several plates at once to have more flowers. We dip the potato in paint and print to paper. A beautiful signet is ready.
In addition to potatoes, you can use old hat pom-poms as stamps.


Cotton pads
From cotton pads, which can definitely be found in every home, you can make many beautiful and spectacular crafts. Here are the simplest ones.
- Caterpillar. Take 6 discs, paint everything in a different color. Glue to a thick cardboard base so that the discs follow one another, but not too evenly. The very first will be the head. Horns are made on it in advance with scissors. You will also need to draw the eyes and a smiling mouth.
- Piglets. We take 2 discs, paint in pink. Draw the grass on a colored cardboard base with paints, and then glue future piglets onto it. Nose, ears, tail and legs can be drawn or molded from plasticine. It is better to buy eyes in a store for creativity.
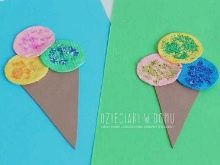
- Ice cream. First, we cut out a brown horn, which we glue on cardboard or colored paper. Then we take 3 cotton pads, paint in your favorite colors. We glue it on top of the cone like real ice cream. Decorate with sparkles or beads.


New Year's crafts for children deserve special attention. So, you can focus on the following options.
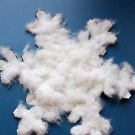
- Cotton wool snowflake. A contour is drawn on blue paper, and the baby, meanwhile, can tear the cotton wool into pieces. Then he will apply these pieces to the contour smeared with glue.
- Painting with wax. Use a wax candle to draw a winter drawing on the paper. When the kid starts painting it, the wax will come out from under the paint.
- Candy from toilet paper rolls. The sleeve is wrapped in bright shiny paper and tied at the ends like a candy.
- Crafts from salt dough. They can be not only New Year's, but any other. With the help of the form we mold the craft, dry it, paint it.


To learn how to make a simple and bright application of "Cherry" from colored paper, see the next video.


