Glue Gun Crafts

A glue gun differs from a 3D printer paired with a laptop in that the human brain plays the role of the laptop, and the hand holding the pistol plays the role of the printer. With hot melt glue, you can make thousands of useful things and simple crafts.


How to make jewelry?
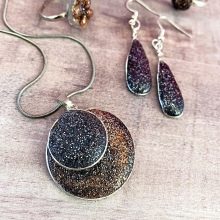
The creation of jewelry from hot melt glue, despite the "trick" of the execution, is actually not difficult. This may require metal pendants for curtains fastened with crocodiles, perhaps steel wire (it will give the decoration extra strength), from which a loop for a lace or chain is made. The process of making jewelry from hot glue is debugged step by step.
- Bend a loop of wire, previously cleaned from traces of scale, rust (if it has formed there). It is important to make a symmetrical loop, as the transparent hot melt glue will immediately demonstrate inaccuracy in the manufacture of "antennae" located in its thickness.
- Choose a suitable mold and apply some hot glue to it to create a layer on one of the flat sides of the future decoration.
- Carefully, evenly place the wire loop on the resulting glue "blank". Apply a new layer of glue so that the tendrils of the loop are in its thickness. The second layer of glue will adhere firmly to the first. To prevent the loop from shifting, you can support it with tweezers, forceps or the tips of scissors. Wait for the glue to harden.


If the glue is transparent, or you don't like the color, you can make the product matte by sanding it with fine sandpaper and then painting it in the desired color. Then the loop will not be visible from the inside. When dressing with glue and when dyeing the resulting product, give free rein to your imagination.
Similarly, you can make a bracelet using a strip of tin from a tin can - after the glue hardens, it can be easily removed.


For how to make cute jewelry with a glue gun, see the next video.
Making a candy bowl
Having coped with the manufacture of simple elements and decorations, you can proceed to using a heat gun in the manufacture of more complex ones. For a candy vase you will need: spray paint, a glass or porcelain cup, cling film, hand cream with a significant fat content.
- Wrap the cup with cling film and cover with a layer of cream - it will help the cured glue to remove after hardening.
- Form the bottom of the vase from the glue. The pattern that forms the vase should start at the bottom, gradually rising to its top edges and forming whimsical elements. The beauty of a vase is limited only by your imagination.
- After waiting for the glue to dry and harden, remove the resulting product from the base.
The vase is ready for revision. For example, it can be painted, glitter is applied over the paint, which will stick tightly to it when it dries. The product is suitable for fruits and sweets.


More ideas
Hot melt glue turns into a material for crafts not only for adults, children also use it. Of course, the work is carried out under the supervision of adults.
Shoes for Dolls
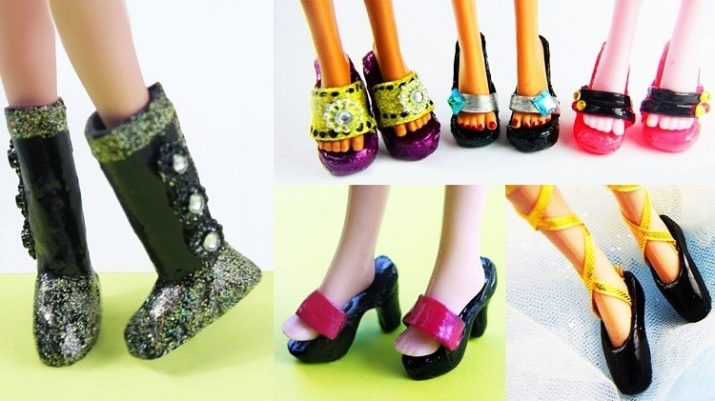
This doll accessory is made with scissors, a marker, a brush, paints, nail polish can be used. In addition to the doll, you will need a stick and a film. To make shoes for a doll, they wrap its legs with foil, then apply glue to the sole. Comparing the results obtained, two identical shoes are obtained.
Having formed the base, heels are made. You can use a sharpened match or a toothpick. She, in turn, breaks in half and is glued with the same glue to the heel of the shoes. Glue is applied to it, its excess amount is peeled off at the same time. After giving the shoes the desired shape, sand them with sandpaper and paint.

Heart
A hot melt glue heart is made quite simply. You will need shells, they are shaped like a heart. Other materials include cardboard, burlap, fiber, twine cord for garden plants, and scissors. A blank in the form of a heart is made from hot melt glue. To fix it in the upper part of the heart, holes are drilled using an ultra-thin drill (up to 1.5 mm).
Tow and sisal are glued on the front of the product. Burlap will be used to make a heart of large dimensions. That, in turn, is fixed behind its cardboard counterpart. Where the elements are fixed, the twine is pulled, from above it is attracted with the help of a knot. The front side is sealed with shells. The edges of the received souvenir are tied with twine.


Buttons
This option is suitable for craftsmen who can add novelty elements and a non-standard approach to fashion to their wardrobe. Hotmelt and glitter buttons are not just a squeak of fashion, but one of many thousands of incarnations of individualism.
Glitter, which is a crushed substance, scatters in the form of small circles in advance, and is not applied to the glue after it has been cast in the form of large round drops. The glue will stick a layer of glitter onto itself. After the glue has dried and hardened, using a toothpick or a drill with a small drill, two adjacent holes are made - on each of the buttons.
You can sell the decoration in the form of buttons - there will always be connoisseurs of the original.


Interior decoration
Examples are vases and flower pots, candlesticks, customization or making Christmas tree toys from scratch. So, to create or modify pots, flat decorative pebbles are taken, for example, collected on the seashore. They decorate the appearance of the pot, allow you to change the appearance of a casket, a small chest and much more.
After gluing, the stones are coated on top with varnish or paint of a non-standard color and with fillers, which make it possible to improve the quality of the applied layer for many years. To improve the appearance of an existing vase, symmetrical lines are drawn along its entire plane or perimeter. This step will be difficult without the help of an assistant.


In order for a snowflake made from hot melt glue to last a long time, while its appearance is not lost over the years, paints, parchment and templates for making snowflakes are required. To form the latter, do the following:
- after drawing a snowflake on paper, lay parchment on it and distribute the glue;
- after the glue has hardened and dried, remove the parchment;
- color the resulting product from all sides.
The decoration is ready.


Waterfall
A decorative fountain designed as a waterfall will require the following materials:
- decorative stone - specimens of different sizes;
- a box or stand rounded at the base;
- green felt or plastic mock-up of a plot of grassy lawn.


To make this souvenir, you need to perform a number of steps.
- Wrap a round box with felt, or use glue to glue a model of a lawn to it.
- Form a small model of a well from the pebbles, into which water flows. Fix the stones to the base with hot melt glue.
- Build a mock-up of a wall that supposedly pours a waterfall.
- Use glue to form a stream of water. Direct the glue streams downwards - the waterfall should look natural. Use glue to create the appearance of seething water at the bottom of the well.
To prevent the souvenir from falling apart, do not spare glue: the stones must hold firmly. This is not an epoxy glue that would help them grab each other faster. Do not try to replace the hot melt glue with another substance, such as liquid nail glue - it will not hold the stones as firmly as needed. As a result, the souvenir will turn out to be unique, which has no analogues. Time this souvenir to coincide with some significant event.


Candlestick
To create a candlestick, you need a vase or glass, acrylic or spray paint, vegetable or spray oil. The container must be wide enough to be used as a candlestick. The fact is that molten paraffin can soften the glue, and a flame that accidentally gets there can melt or even set it on fire. We offer a master class on making a candlestick.
- Remove traces of other substances and products from the vase that may have been there. Cover it with a little oil.
- Form an original, at your discretion, pattern of glue on the outside of the glass or vase. The glue lines must touch each other.
- When the glue is dry, carefully peel it away from the glass or vase. If it sticks well, then use a knife or screwdriver.
Wash the glass with dish detergent and paint the resulting candlestick the desired color using acrylic paint.


