Variety of crafts "Solar system"

Before you start making crafts on the theme of the "Solar System", pay attention to the layout of the planets, their colors and sizes. Then you can choose the master class you like from the ones below and get to work.


How to make from yarn?
Prepare thick woolen threads in different colors:
- for the manufacture of Mercury - gray and brown;
- for Venus - yellow and white;
- for the Earth - light blue and green;
- for Mars - red and orange;
- for Jupiter - orange and white;
- for Saturn - light yellow;
- for Uranus - light blue;
- for Neptune - blue;
- for Pluto - brown;
- for the Sun - bright yellow or orange.

In addition to threads, you will need:
- sheet of whatman paper;
- paints (gouache, watercolor, acrylic - not essential) in black, blue and white;
- balloons;
- food film;
- sunflower oil;
- PVA glue (preferably intended for furniture);
- water;
- starch;
- scissors.


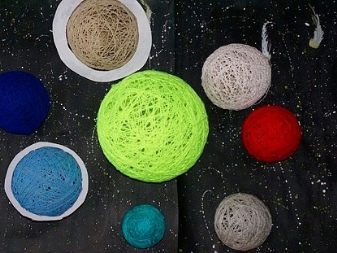
First, let's make "planets" - thread balls:
- inflate the balloons, making sure that they come out in different sizes - just like our heavenly bodies;
- wrap each of them with cling film;
- 2 tbsp. l. mix starch with 30 ml of water, then pour the mixture into PVA;
- dip the yarn into the resulting adhesive substance and leave it there for half an hour so that it is thoroughly soaked;
- grease each ball wrapped in foil with oil;
- now start wrapping the balls with threads of the appropriate color - first make a circle, then fix the thread by tying a knot, and then continue winding in a chaotic manner;
- Hang ready-made installations in the fresh air, for example, on a balcony or veranda, leaving them to dry for 7-8 hours;
- when complete drying is achieved, remove the balls, find a knotted tip in each of them, gently dissolve the knot so that the air comes out;
- pull out the deflated ball together with the film.


So, our "planets" are ready. Let's start creating a layout:
- paint a sheet of Whatman paper blue, wait for the paint to dry, apply a black layer;
- sprinkle white paint on the paper (randomly);
- glue the "planets" to the Whatman paper in the required order.


Making a movable model
The school curriculum from grades 1 to 4 includes a subject called "The World Around", where children study natural phenomena, flora and fauna, and also get acquainted with outer space. It is for this lesson that your child may be asked to make a model on the theme "Solar System". We offer you, together with your children, to make a rotating volumetric model for the school.
Tools and materials:
- foam balls of the following diameter - 127, 102, 76, 64, 51, 38 (2 pcs.), 32 (2 pcs.) mm;
- a sheet of foam plastic 127x127 mm with a thickness of 13 mm (useful for creating the rings of Saturn);
- paints of different colors (you can be guided by the true colors of the planets, or you can make them brighter, as in the picture - at your discretion);
- glue;
- a stick or branch of a tree about 80 cm long - we will attach our heavenly bodies to it;
- transparent fishing line;
- Cup;
- marker;
- teaspoon;
- glass jar;
- scissors;
- stationery knife;
- brush;
- water;
- skewers, orange sticks.


Algorithm of work step by step:
- stick skewers into all foam balls to the middle;
- the order of placing the balls: 127, 32, 38, 38, 32, 102, 76, 64, 51 mm;
- on a sheet of polystyrene using a cup, draw the rings of Saturn: circle it with a marker, draw a smaller circle inside, cut out the “ring” with a clerical knife;
- smooth the edges of the rings with a spoon;
- paint the stick on which we will hang our "planets" black;
- color the balls in accordance with the colors of the "planets";


- take a glass jar and put the painted balls there with skewers down (like a bouquet) to dry;
- when the "planets" are dry, glue its "ring" to Saturn;
- cut the fishing line into several pieces of different size, at the end of each tie a fairly large knot;
- pull out wooden sticks from all the balls, and insert the resulting knots into the remaining holes;
- fill them well with glue, leave to dry;
- at the end of the work, tie each thread to a black stick - the base.
Children's rotating craft "Solar System" is ready.


More ideas
Preschool kids can be delighted by creating a space model from plasticine.
You will need a plasticine mass of the following shades:
- orange - for the Sun;
- brown and orange for Mercury;
- a similar range will be needed for Venus, but orange will prevail;
- green and blue - for the Earth;
- black and red are for Mars;
- brown (light and dark) - for Jupiter;
- beige - for Saturn;
- gray and blue for Uranus;
- blue is for Neptune;
- gray for Pluto.

In addition to plasticine, prepare the following materials:
- toothpicks;
- stack;
- plastic board, oilcloth, silicone mat.
Stages of work:
- starting with the manufacture of the Sun, cut off pieces of plasticine of the required color, knead them, roll up balls;
- do not bring two-color "planets" to homogeneity - let beautiful stains remain on the surface;
- do not forget to form a ring at Saturn by blinding and flattening a "sausage" from plasticine of the desired color and attaching it to the ball;
- note that all "planets" are of different sizes, try to stick to this rule;
- Form Jupiter as follows: mold a ball from a mass of a darker shade and wrap it with a "ribbon" of beige plasticine;
- when all the balls are ready, stick a toothpick into each of them and insert them into the sun ball, which will need to be placed in the center of the installation.


Fabric layout
In order to get an educational toy for a kid, you can sew a model of the solar system from scraps of fabric with your own hands.
You will need:
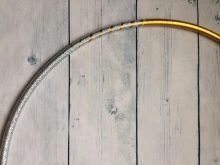
- hoop for rhythmic gymnastics;
- a piece of black fabric;
- various shreds;
- lace or thin silver ribbon;
- stuffing (for example, holofiber, synthetic winterizer);
- scissors;
- sewing accessories;
- Velcro for clothes.


Algorithm of actions.
- Place the hoop on the fabric, circle it, cut out the resulting circle, leaving about 4-5 cm "in reserve" around the edges, so that you can make a fold over the hem. For further removal of the fabric and washing, supply the "circle" with a drawstring, sewing it from the wrong side - a rope will be threaded there to fix the material.
- We sew the Sun. To do this, take a yellow fabric, preferably satin. Form a hemisphere of 3 wedges by stitching them together. The edging - "rays" - make from the same fabric, sewing a strip in the manner of a ruffle. Stuff the Sun with your chosen volume filler.
- Sew a silver ribbon onto the black base, forming equidistant rings around the sun.
- Sew planet balls from 6 wedges each, fill. Sew Velcro to each of them.
- Determine the location of each planet on the layout, sew the pieces of Velcro on and there. Now the kid will be able to arrange the "planets" by himself, learn their names and the correct location.
Additionally, you can decorate your sky map with silvery stars, a comet or even a flying saucer, still sewn from pieces of fabric.


For information on how to make the original "Solar System" out of paper, see the next video.


