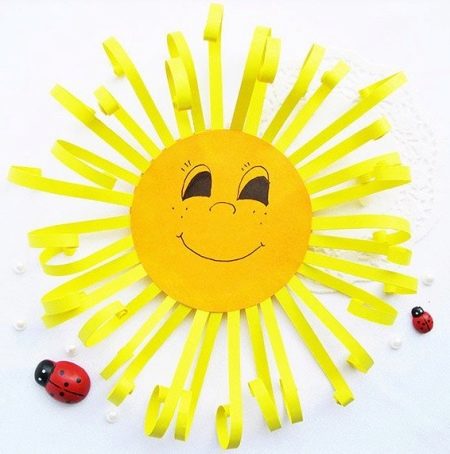
Variety of crafts "Sun"

"The Sun" is one of the most popular topics for crafts to school or kindergarten. When creating it, only basic tools and materials are usually used, and it does not cause difficulties even for the smallest children.

How to make from paper?
Pupils of the younger group of kindergarten are often invited to make a sun from their palms with their own hands. Its creation begins with the fact that a saucer, placed upside down, is traced on a yellow cardboard with a pencil, as a result of which a circle is obtained. If the household has a disposable plastic or cardboard plate, then it is this plate that can be taken as a basis, having previously painted it in a bright yellow shade. Further, on yellow and orange sheets of paper, the palm of the child or all family members is circled several times. Each "ray" is cut with scissors with a small allowance necessary for gluing. Alternately, the palms are fixed on the inside of the base. "Lichiko" is most convenient to paint with felt-tip pens.


A similar round blank made of yellow paper can be adapted to create an autumn craft. The rays are created from wooden clothespins painted with acrylic paints in yellow, red and bright orange colors, reminiscent of multi-colored leaves. There is no need to glue dried clothespins; it will be enough to simply fix them around the perimeter of the round base. In the upper part of the product, it is worth piercing a hole into which a thread will be threaded to hang the sun.

To implement another original master class, A4 colored cardboard, fluorescent paper, scissors, an adhesive pencil and felt-tip pens will be useful. At the first stage, a circle with a diameter of 8 centimeters is cut out of yellow cardboard, and 20 strips from fluorescent paper of a suitable shade. The beam blanks should be 1 centimeter wide and 12 centimeters long. In principle, all these blanks can be made in a different size. Then the circle turns over, and rays are glued from its inside out. Next, the rays will need to be bent, which can be done in several ways.
The first requires the use of a simple pencil, with which the rays are twisted forward at the same distance. The result should be the same curls.
In the second case, with the same pencil, the rays are bent at different distances: part of it is twisted almost completely, and the other - only at the end. It is wiser to alternate between small and large curls.
Finally, the third method involves curling some rays forward and others backward.
If desired, the strips can also be folded like an accordion or wrapped around a pencil in such a way that an elongated curl is obtained.

Eyes are glued to the finished sun, a face and a bang are drawn.
Craft from fabric
To make a more complex craft "Sun", you will need a piece of fabric, yellow fringe and thread, cardboard, cotton pad, wooden skewer or thin stick, as well as Titan glue. Instead of a cotton pad, it is not forbidden to use a piece of padding polyester or foam rubber. First of all, a circle of the required size is cut out of the cardboard. Then a figurine of the same shape is cut out of yellow fabric, but its radius should be 1-1.5 centimeters larger. A cotton pad is laid out on a cardboard base, which is then covered with a yellow cloth.


Having turned the workpiece over, it will need to be fixed with light threads, first following over the edge along the circle of the fabric, and then with a needle from one side to the other, firmly pulling the edges. Of course, it will be easier to simply glue the edges to the wrong side by cutting the ends of the fabric by about 0.3 centimeters and stacking them on top of each other. The rays of the sun can be made from a finished fringe, secured from the inside out in a circle. And also on the inside, a wooden stick is fixed, which is then closed with a cardboard circle slightly smaller than the base. It will be more convenient to draw the face of the sun with acrylic paints.

Making from scrap materials
For kids to get a radiant winter sun that will illuminate even the darkest day, you need several old CDs, colored paper, PVA or Titanium glue, as well as a ruler, felt-tip pens and a pencil.


A4 sheets of yellow and orange colors are cut into equal strips 1 centimeter wide.

The edges of the disc are coated with glue, and paper rays are glued to them, alternately.


Further, the already fixed strips are folded in half to obtain loops, and their free end is also fixed to the glue on the other side of the disk.

At this time, another disc is outlined with a pencil on yellow paper and immediately cut out. A little face is drawn on it, after which a paper blank is glued over a disk with rays. By the way, it can be made a little smaller than a disk, and, thus, a sparkling rim can be formed around the face.


It will probably be interesting for children to experiment with different materials, coming up with what else you can get the rays and the base of the sun from. For example, when creating an applique, you can create rays from dried leaves, pasta of a suitable shape, woolen threads, plastic straws for drinks, ribbons and ribbons. The circle can also be molded from plasticine, after which you need to stick the "wings" of seeds, for example, maple, into it. The handicraft obtained from an old tire and plastic bottles painted in a pale yellow shade will become original.


How to make a paper sun, see the video below.


