How can you make an owl craft?

Owls have always been of interest to people - these cute birds easily win hearts with their cute eyes and fluffy plumage. Getting an owl as a pet is not easy at all - not every person will be able to take care of it properly, it is much easier to independently build an article depicting a nocturnal predator. We invite you to familiarize yourself with the methods of self-making figures of these adorable birds.


How to make from cones?
An autumn craft for an exhibition in a school or kindergarten is best made from a cone - this material allows you to show your imagination and make different figurines, including an owl. To make a figurine with your own hands, prepare the necessary tools and materials:
- pine cone - a cedar cone is most suitable, but a medium-sized spruce or pine cone will also look great;
- felt - you will need small pieces of felt in four colors: brown, yellow, white and orange;
- toy eyes;
- glue gun;
- scissors;
- felt-tip pen.


Consider, step by step, making a cute bird for an exhibition in a school or kindergarten.
- Use a felt-tip pen to draw the details of the owl on the felt. On a brown sheet, draw the outline of the muzzle and teardrop-shaped wings, on white and yellow - small and medium-sized circles, respectively, and on an orange - a triangle.
- Cut out all the elements with scissors.
- Collect the owl's face. First, glue the middle yellow circles to the muzzle, then small white circles on top of them. After that, glue the toy eyes to the base, and between them - a triangular beak.
- Glue the parts of the craft together. Glue the muzzle to the narrow side of the cone, and the wings on the sides.For more stability, glue the figurine to a small branch cut or other stable platform.
A simple figurine of a bird made from a cone is ready, now it can be installed as an interior decoration or taken to an exhibition.


Making from plasticine
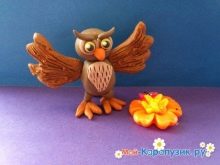
Plasticine gives maximum scope for creativity, because it can be used to make both flat pictures and volumetric figures. You can try making a nocturnal predator in either of these ways.


First, let's take a closer look at the method of sculpting an owl on a plane. For the craft, you will need several items: a set of plasticine, stacks, cardboard and a pencil. Having prepared everything you need, follow the step-by-step instructions.
- Draw an owl image on thick cardboard with a pencil.
- Cut off equal pieces of brown and black plasticine in a stack and roll them into small sausages. Starting from the very bottom of the torso, cover the body, wings and head with feathers, crushing the sausages.
- Use the yellow and black balls to create large wise eyes for the owl, and a sharp beak from the orange material.
- Attach black plasticine legs to the base of the body.
- To make the image look complete, plant the bird on a tree - sculpt a plasticine branch under it and add green leaves.
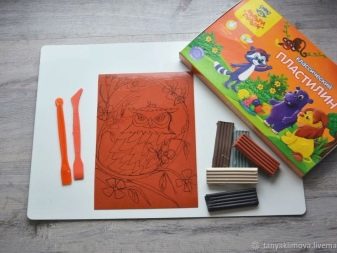


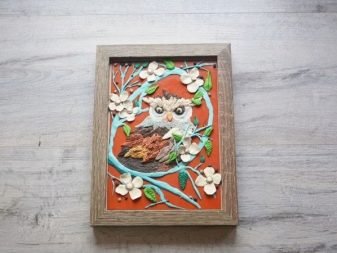
The volumetric predator from plasticine is performed in the same technique, only instead of cardboard it is necessary to take an oval made of plasticine with elongated ears as a basis. To simplify the task, you can depict feathers not as separate pieces of plasticine, but by creating grooves with a toothpick in the right places. A volumetric owl can consist of either one oval or two balls: a body and a head. Wings and other small parts must be molded separately and carefully fixed on the bird's body.


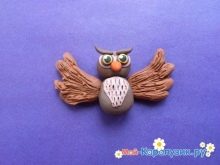
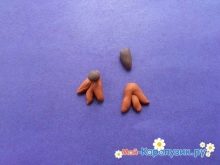
More ideas
A cute owl is a great idea for an autumn-themed school craft, because this animal is associated with knowledge and wisdom. The wise bird is also an excellent decoration for the interior of classrooms and work tables. We suggest that you familiarize yourself with a list of various methods for creating a night predator with your own hands.


From saws
Thin cuts of large branches are a suitable base for creating a cute little bird. To make an owl yourself from saws, prepare, in addition to wood, buttons of different sizes and felt of yellow and brown colors. Let's consider step by step how to create an owl from a tree.
- First, draw with a felt-tip pen or burn out the wings on the side parts of the saw cut - draw the halves of the ovals and decorate them with feathers.
- Glue the eyes from buttons of different sizes: first a large eyeball, then a smaller iris and a very small pupil. Glue the eyes close to the top edge of the wings at a short distance from each other.
- Decorate the felt details - cut a triangular beak from yellow material and brown legs, then glue the details to the owl.
- Drill a hole at the top of the saw cut and thread a string through it.


You can make several such crafts, and then hang them on a branch of a Christmas tree or on a tree in the courtyard of a summer cottage.


From the bottle
With a little effort, a simple plastic bottle will make a big, cute owl. The neck of the bottle will serve as the base for the bird, and the bottom will serve as its ears. First, you need to paint the body in the desired color, apply a pattern of feathers, beak and varnish the body.


From another bottle, cut out the side parts in the form of ovals and also cover them first with paint, then with varnish. Paint the two bottoms from the plastic container yellow - these will be the legs. Then take two CDs and two bottle caps, glue the corks to the middle of the discs - these are the future bird's eyes.


Assemble the bird from the resulting details: glue the wings on the sides of the body, place the eyes just above the drawn beak. Next, set the owl on a hemp or other flat surface - glue the neck of the bottle from which the body is made to the hemp, and attach paws to the sides of it.


From twine
The string is suitable for making papier-mâché crafts, and the color of this thread is very similar to the shade of an owl's feathers. To craft a figurine using this method, follow the instructions.
- First, you need to inflate two balloons: one larger, the other smaller.
- Fill a large container with PVA glue to wet the string in it.
- Wrap the balloons with a well-dampened thread and wait until the glue is completely dry.
- Pierce the balls with a needle and remove the remaining rubber.
- Glue the balls of thread together. The small ball is the head and the big one is the torso.
- Add some details to the owl: using tousled threads, create wings, a tail and feathers around the eyes. Glue the pieces to the body of the craft.
- Make the eyes of the figure from cotton pads and buttons, and the legs from wire wrapped with twine.


A smart bird will perfectly complement the interior if you place it in a twine nest and put it in a visible place.
From a glass jar
It is very easy to make a cute owl from a glass jar; even children aged 4–5 years old can handle it. For the craft, you will need the following items: a transparent jar with a lid, colored paper, glue, as well as cones, acorns or pieces of bark. Let's look at creating a simple craft step by step.
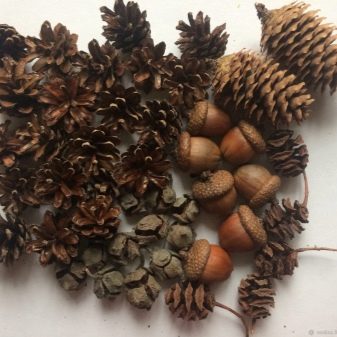
- Fill the jar with pine cones, acorns, and wood and cover it with a lid.
- Cut out the wings, eyes, ears, legs and beak from paper of suitable colors.
- Glue the wings on the sides of the can, attach the legs to the bottom, and fasten the eyes, ears and beak just below the lid.


The figurine turns out to be very neat, it is great for an exhibition in a garden or for decorating a kitchen.
Wreath
The wreath owl will decorate the doors as effectively as a New Year's wreath made of pine branches, toys and tinsel. To create such a craft, you need to collect dry materials: leaves, grass, tree bark and grapevine. You will also need cardboard, scissors, glue, twine, and decorative materials. Having prepared everything you need, follow the simple instructions.
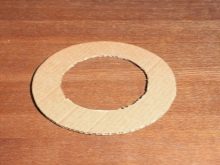
- Cut a ring out of thick cardboard - this is the base of the wreath, so choose the size carefully.
- Glue dried materials on both sides of the ring in a circle: leaves, acorns, pieces of bark and grass. Continue gluing until the circle is complete.
- Spiral the vine around the ring to secure all materials.
- Add decorative elements to the wreath: eyes, ears and beak. You can also add nice details: bows or flowers from ribbons.


Tie a piece of twine to the finished craft and you can safely decorate doors or walls with a wreath.


Application
To make an applique owl, it is necessary to apply the contour of the owl and its surroundings on thick cardboard, then pieces of colored paper, fabric or other materials must be glued to the drawing. We propose to consider several options for making such a creation.
- Made of colored paper. It is necessary to cut all the parts of the bird from suitable paper colors and glue them to the cardboard.
- From dry leaves. For such a craft, it is necessary to glue even dry foliage to the drawing, starting from the bottom and ending on the head. It is better to make the legs and face of an owl from colored paper.
- Combination of materials. In such a craft, you can use any materials: paper, flowers, beads, fallen leaves, bark and branches.


The method allows you to make a wide variety of crafts: from simple pictures with owls from a pair of simple shapes to complex, detailed birds with open wings.
Origami
The origami technique seems complicated at first glance, but such a craft has a very important positive quality - it does not use glue. To make the origami bird, you will need colored paper and a felt-tip pen. There are many ways to fold an owl, we will describe one of them in more detail.
- On a square sheet, make two diagonal folds and unfold it. Turn the square at an angle to you.
- Bend the top corner to the middle and unfold, then bend the same corner to a new line and fix.
- Bend the sides of the square to the right and left of the folded corner to form an edge.
- Bend the bottom corner so that it touches the top folded corner. Bend the tip of the same corner down - this is the beak.
- Fold the right corner towards the center and unfold, fold the same corner again to a new fold. Then bend again along the marked line - this is the wing of the bird.
- Turn the bird upside down.
- Fold the right corner to the left.
- Bend the bottom corner up along the marked line. Create a pocket along the fold line.
- Flip the owl over again.
- Bend the left corner in the opposite direction.
Using a felt-tip pen, draw the eyes and feathers for the owl.


From buttons
Making a craft from buttons resembles an applique: buttons and beads must be glued onto a sheet of paper or cardboard so that they fold into the image of a bird. Let's take a closer look at the creative process of creating a mosaic.
- The first step is to take a piece of cardboard and draw the outlines of the future craft on it.
- Lay out the buttons and beads so that they look like an owl, but do not glue it yet - first make sure that the arrangement of the elements suits you.
- Take a picture of the most successful arrangement of the buttons, then gradually glue all the accessories using the electronic template.


When making mosaics, carefully select the shades of the buttons, and also use their unusual shape and size difference. For example, to create eyes, you can use two pairs of round buttons: large white and small black. This combination will make the bird's expression irresistible. To make the beak, a gold or orange triangular button is perfect. There is also a button shape that is suitable for decorating the legs - this is an asterisk. If you cover the edges of the stars with a button from the body, you get nice legs.


From disks
Many homes are likely to have mountains of old DVDs and CDs lying around that have long since deteriorated or are out of use. Instead of taking it all out in the trash, you can make an unusual, colorful owl.
Prepare the following items for the craft: 10-15 discs, glue gun, decorative elements. It is better to prepare discs with a margin - when cutting, they may burst or break.


A small bird of prey will be created from two vertical rows of discs. Before joining the craft, the edges of the disks must be processed - make cuts around the perimeter of the disks at a distance of 1–1.5 cm from each other to create a fringe. Then glue the discs in two rows from top to bottom, and then one more top and bottom on the reverse side - this is the body of an owl.
Make the finishing elements and details of the owl from foil or other decorative materials.


In the package
To make a simple craft in a bag, you will need the following items: a transparent bag, dry leaves, scotch tape, colored paper, scissors, and glue. Stages of work:
- fill a bag with dry leaves (there should be a lot of leaves in a plastic bag to make the bird lush);
- seal the bag with tape;
- with elastic bands or threads, pull off the two upper corners - these are the ears;
- cut out the eyes, beak and paws from colored paper;
- glue all the paper parts to the owl.
Even a small child 4–5 years old can make such a simple bird figurine.


From dry grass
Choose long, fluffy, dry grass to make the owl look voluminous. For the craft, you will need: an acorn, long grass, buttons and twine. Then follow the instructions step by step:
- bend a dense bundle of grass in half and fix it in two places: the head will be at the bend, and the tail will be at the cuts and tips;
- gently distribute the fluffy grass so that folded wings are guessed on the body;
- glue button eyes and an acorn beak to the head, and create lush ears from fluffy grass;
- attach the bird to the saw cut to keep it stable.
A ready-made owl made from dry grass is perfect for an exhibition in a school or kindergarten. A bird will decorate a summer cottage if you install it on a tree branch or place it in a hollow.


Of spikelets
Wheat has a very unusual structure - its spikelets resemble bird feathers, therefore they are a good base or decorative element for creating a figurine of a night hunter. To make a cute owl, they use spikelets without a stem - so they look more like plumage.

When you have a lot of wheat ears at your disposal, make the whole body of the owl and the head from them, and separate parts (beak, eyes, legs) from additional accessories. Such a golden bird is imbued with the spirit of autumn through and through, because wheat symbolizes the time of harvest.
When you have very few spikelets, use them as a finishing element in an applique made of different materials (cones, acorns or other seeds).

A suitable place for wheat is the ears of an owl, the ears will perfectly emphasize the lush structure of the bird's plumage.
Of feathers
The applique of an owl made of feathers is the most realistic among all the described manufacturing methods. The craft made of white feathers looks very impressive - it resembles the famous bird from the Harry Potter film series. However, you can use a variety of materials to give your craft a unique look.

For creation, you will need short fluffy feathers - large feathers will not stick well and knock out of the picture. Also prepare glue, a piece of cardboard and two sheets of felt for work: white and black. Then follow the instructions.
- Draw the outlines of an owl on cardboard.
- Start gluing the feathers from the bottom and gradually work up to the top of your head. The feathers should go slightly over the previous row.
- Cut out small circles from white felt - highlights for the eyes, and from black - circles for eyes and a beak. Glue the details to the bird's head.


The feather craft already looks impressive and can be considered complete, but if you have ideas, you can add more details.
To learn how you can make an owl out of cones with your own hands, see the next video.


