Variants of making crafts "Mill"

Mill - this is an interesting version of the craft that you can make with your children. An interesting layout can be a wonderful decoration for both a nursery and a summer cottage. You can also make original mills, for example, from coffee beans, which are perfect as a gift.


How to make from cardboard?
For a kindergarten, a paper windmill will become relevant. And you can make an applique, volumetric version or origami. In any case, such a craft is easy to do with your own hands, and with the whole family it is also fun. For the simplest version in the form of an applique, it is enough to cut out all the parts of the mill and then stick them on a sheet of paper. This is especially convenient for the little ones.
Older children should be offered the option - voluminous paper craft "Mill"... To do this, you should prepare in advance cardboard, sheets of colored paper, a sleeve, glue, scissors, sticks, paints, wire.
For a denser structure, you can use cardboard.


You can assemble the mill following simple instructions.
- You need to start with a sheet of red paper, which is folded in several layers in the form of a triangle.
- Then, rectangular slots are made on the sleeve on both sides.
- After that, the sleeve must be pasted over with blue paper.
- Two strips are made of cardboard, on the edges of which orange wavy squares are attached. Both strips must be connected with glue crosswise, and then a hole must be made in the center.
- A hole must be made on both sides of the sleeve with scissors.
- The cocktail tube is cut from one end in two places. It will need to be passed through all the holes.
- After putting on the windmill, it is necessary to straighten the cuts on the tube so that they fix the blades.
- A red triangle is inserted into the side holes and fixed with glue.
- A strip of orange paper is glued to the bottom of the mill.

If a child needs an autumn vegetable craft, then it can be harmoniously supplemented with an origami mill.
- A sheet of A4 size must be made into a square, which folds in half, and then unfolds.
- The sides of the sheet need to be bent towards the center, which can be marked with a dotted line.
- The tops should be folded inward towards the center and then expanded.
- The lower corners should be turned to form boats, and then crushed up. Do the same for the upper corners.
- All the resulting triangles along the edges should be bent down. In this case, they need to be expanded a little from the inside.
- In the middle, they should be connected with a pin or button. If desired, you can attach a stick to such a windmill.


Making from flower pots
For a summer residence, a bright and interesting mill from the simplest flower pots will be an excellent solution. You can do such a craft with your own hands, armed with:
- three plastic pots for flowers of different sizes;
- skewers;
- plastic ice cream sticks;
- a couple of wine corks;
- masking tape;
- hot glue;
- acrylic paints.


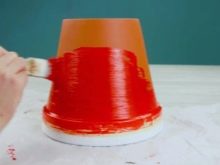
The most convenient way to assemble the mill is to follow the step-by-step instructions. The top rims on all three flower pots are painted over with white acrylic paint and dried. In the next step, you need to glue them with masking tape, paint the rest of the pots, and let them dry.
When the pots are ready, the inside of them must be coated with hot glue, and then set on top of each other with a pyramid. On its surface, paint windows, doors and other details using paint.


Mill wings are made from three wooden skewers. Of these, one should remain long and the other two short. From two ice cream sticks you need to bite off one rounded edge.
Now all the skewers need to be folded together, aligning the blunt edges. Ice cream sticks are glued to them with hot glue on top so that their straight ends are turned towards each other.


To the resulting piece of the blade, short parts of the skewer must be glued perpendicularly, and then another skewer should be glued to their edges. Three more wings of the mill are made in the same way. The painted fenders are attached to the wine cork. It must be connected perpendicularly with another pointed cork using a skewer.
A hole should be made at the top of the pyramid, the diameter of which will be less than a pointed wine cork. It is into it that the structure with the wings is inserted.


Natural material options
A decorative mill can be made from a variety of natural materials. This is especially true if you need to complete a craft on the theme "Autumn". However, it is more likely that schoolchildren can do it. A jute mill looks unusual and interesting. It is worth noting that it is done very simply. It is enough to make suitable forms out of cardboard, which are then wrapped with twine. It is convenient to make the blades from skewers.
Such a windy beauty will look even better if you supplement it with miniature bags, a trolley, and emphasize the windows and doors with beans or other gifts of autumn.


From coffee beans
A coffee bean mill will be an original craft option for school. It is not difficult to make such a fragrant beauty with your own hands. However, you will have to stock up on everything you need in advance, including a base in the form of a bottle or box, rope, small wooden slats, coffee beans, wire, cloth for bags and herbs, paints, varnish, fiberboard. Of the tools, it is advisable to have on hand a brush, ruler, pencil, glue, tweezers, scissors, a needle and thread. To make a coffee mill out of all of the above, it is enough to go through a number of stages.
- At the first stage, the roof is made of cardboard. To do this, a circle is cut out, which is then glued into a cone, painted brown and pasted over with coffee beans.
- Walls are made from a bottle or box that is wrapped with rope. Now they can be decorated with coffee, preferably imitating brickwork.
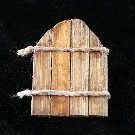
- The simplest doors can be made from thin wooden slats, then painted and decorated as you wish.
- It is good to make the blades of a mill from thin strips or wooden skewers. It is enough to glue them to each other crosswise.
- If desired, after installing the mill on a piece of fiberboard, it can be supplemented with grass, bags and other elements.


Made of wood
Wood mills look harmonious in a small size. For example, a meter-long structure will be a great addition to any garden plot. For crafts to school, you can make an even smaller version. Before making a wooden mill, you will have to prepare a block house lining, double-sided lining, screws, self-tapping screws, wooden planks, threaded spire, antiseptic, bearings, paint or varnish, drill, felt-tip pens, tape measure, jigsaw.
It is worth clarifying that the creation of such a structure must necessarily be carried out together with adults. You should start by marking and cutting the materials into the necessary parts. For everything to work out, it is advisable to draw up a drawing of the mill in advance and apply all dimensions to it. When all the parts are ready, then they should be processed. For example, some may need sanding, antiseptic coating, painting or varnishing. The next stage is the assembly of the mill. First, the roof is created, then the very base of the structure is assembled, and at the end the windmill is mounted.
After installing the mill in a permanent place, it can be supplemented with interesting elements if desired.


How to make a windmill for garden decoration?
The garden can be decorated with various sculptures or decorative elements, and one of the most popular is the windmill. Among the many ideas, attention is drawn to stone beauties with wooden blades. Even in spite of their small size, they look very impressive and are able to complement both a composition next to a pond and become part of a unique lighting. And also, if you wish, you can hide something under it.
When the sketch is drawn up, you can start building. For a brick structure, you will need a cement-sand foundation with reinforcement. After it has completely dried, a brick base is made in the form of a trapezoid or cone. In the base of the structure, a threaded rod should be inserted in advance, on which the wooden blades will be attached. The mill is completed with a gable roof made of tiles or any other material.


For information on how to make a decorative mill with your own hands, see the next video.


