Overview of winter crafts

Parents with children of different ages often have the problem of creating winter crafts. A joint project may also be required in order to have fun with the child when the weather is bad outside the window. Crafts on a winter theme can be made of various materials, mainly from those that are always at hand at home.


What can be made from paper?
Winter crafts that can be done with a child can be very diverse. This process allows developing not only fine motor skills of the child's hands, but also thinking and imagination. Quite often, the kindergarten is asked to bring hand-made crafts. They can serve as a decoration for a group in a preschool institution. Sometimes a competition is held in the garden for the best craft on the theme of winter. It is worth showing a little imagination, and from the materials at hand you can get various applications, winter bouquets or houses for bullfinches.


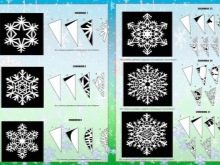
The simplest paper craft that you can make with your child is a paper snowflake. Having folded the white sheet several times, you can draw outlines for cutting out a future snowflake yourself or print the proposed templates from the Internet. A child who confidently holds scissors will cope with this task without any problems. The process of creating winter snowflakes from paper will not leave indifferent any kid.


You can also invite your child to make animals out of paper, for example, a winter bunny or a polar bear. This will require glue, scissors, paper, felt-tip pen, and napkins.
How to make a bunny
A large ball must be rolled out of paper or napkin, which will act as the body of a hare. They also make a small ball that will become a tail. After that, the parts are glued together. A horseshoe-shaped base is cut out of paper. These will be the paws of a bunny. The paper body is glued to the legs.
After that, an oval is cut out. On the one hand, it is necessary to make an incision in the form of two adjacent hemispheres. These will be bunny ears. On the other hand, with a felt-tip pen, you need to draw the eyes, nose, mouth and antennae of the animal. After the muzzle is painted, it can be glued to the body.


How to make a bear
You will need to prepare paper that will act as the basis. It can be decorated with paints or felt-tip pens. On a blank sheet of paper, you need to circle the hand of an adult or child, and then cut it along the contour without a thumb. These will be the legs of the bear. On the tips of your fingers, you need to draw two stripes, which will indicate the claws of the beast.


A circle is cut out, the diameter of which is much larger than the palm, which has become the legs of the beast. This will be the torso. Next, draw another circle, which is 2 times smaller than the body. Ears are drawn to it, after which they begin to cut out the shape of the head. Ears are drawn on the head. To create a muzzle, a small oval is cut out on which the nose and mouth of the future bear are drawn. Eyes can be glued or painted on request. Paws are glued onto a cardboard base, and on top of them are the body, head and muzzle. The white bear is ready.


Winter decorations
The most popular of these is the paper ring garland. For manufacturing, you will need colored paper, from which small strips of the same size are cut out. A strip of paper is folded into a ring and the edges are sealed with glue, tape or a stapler. The next strip of paper is threaded into the assembled ring and secured. Do the same with the rest of the prepared strips. This bright garland can be used to decorate not only the Christmas tree, but also other rooms in the apartment. You can make a garland by cutting out circles, stars or bells from paper.
The cut-out parts are easiest to connect together with ordinary threads.


Making from cones
Natural materials are a great option used to create winter-themed crafts for school. They can make beautiful winter-themed crafts. Even a 1st grade student can cope with creating crafts from cones.
Animals
Various types of animals can be made from cones, since the natural material has a convenient shape, which most often acts as a little body. Elongated cones are suitable for creating penguins, and from round or oval cones you can make an owl, hedgehog, squirrel or deer, as well as other animals.


Let's see how to make a penguin. Before starting work, you should pay attention to the fact that at room temperature the cones can begin to open, since they are at a different temperature outside.
To keep the bump closed, it must be placed for half a minute with wood glue, then pulled out and allowed to dry thoroughly.
If it is necessary to speed up the process of opening the cones, they can be dried in the oven or put on a warm battery.


To create a penguin, you will need plasticine and toy eyes. The bud can be dyed white to create a white penguin body. A ball is rolled from black plasticine, which will be the head of the future animal. A bright orange or red beak is glued to the head, as well as eyes. For the eyes, you can use plasticine in other shades and use eyes purchased at any craft store. After that, 2 sausages are sculpted, which are flattened a little so that they take the shape of wings. The craft can be set on a solid foundation.


To make a squirrel or hedgehog out of a cone, you need colored paper or felt. The bump will serve as a little body, and the head, tail and legs are made of felt or paper. The cut parts are attached to the bump with a glue gun.
Only adults should work with this equipment, as the pistol heats up to high temperatures and the child can get burned.
The eyes of a hedgehog or a squirrel can be made from dark beads.


Decorations
From cones, you can make a beautiful ball that will decorate any part of the house. To do this, you need to prepare a foam ball, wire, a number of cones, ribbon and glue. The technology for creating this solution is quite simple.
The bump is pushed onto a wire and then stuck into a foam ball. Also, the cones can be glued to the base. After the completion of the cone design, a tape is attached to the ball so that it can be suspended. Cones can be used to create garlands. To do this, they are tied together with beautiful ribbons. Such ribbons can also be decorated with other beautiful details.


Christmas tree
It is one of the options for decorating space for the New Year. To create a beautiful Christmas tree, you need a solid base on which the buds will be laid out in such a way that a cone is formed. You can also use a foam mold as a base and attach the bumps to it with glue or wire.

snowman
A snowman can be made in the same way as animals. First, the bump turns white. The head, nose of a snowman and a hat are made of plasticine, which are then attached to the body. Also, a snowman from a pine cone can be made using cotton wool and buttons.
The pineal body is filled with cotton wool in free spaces. The head is made of cotton wool, gathered in a tight circle. Then these parts are connected. The craft is decorated with beads, buttons or other decorative elements. The complexity of such a craft will depend on the imagination of a child or an adult.


Candlestick
Using the cone material, you can create an original candlestick.
When using such a decorative element, fire safety measures should be observed, since the elements used for crafts are flammable.
You will need to prepare a toilet paper sleeve, tape, glue, pruning shears, plain paper, bumps, glue gun.


To make a candlestick, you need to cut the paper into various strips, which are then wrinkled by hand for extra volume. A base is made from the sleeve, on which crumpled paper is attached. For this it is worth using tape or glue.


After that, the workpiece is given the shape of a jug or cone, gluing the entire surface with paper. It is necessary to arrange the bottom and top of the workpiece in such a way that a flat candle can be installed.
For the stability of the structure, you can use any weighting agent, for example, rice grits or small stones.


The scales are detached from the cone with the help of a secateurs and attached to the workpiece from top to bottom. At the final stage, a tablet candle is placed in the resulting blank. An original and beautiful candlestick made of cones is ready.


Products from cotton pads
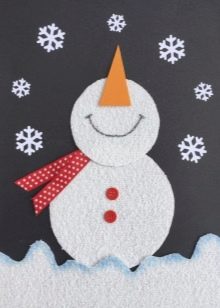
Cotton pads are also a popular material for winter crafts. From the discs, you can make an applique, on which a cotton disc, painted black with a yellow edge, will resemble a bullfinch in the forest. You can also make a snowman out of these parts, glued to thick cardboard. The material is versatile and allows you to create paintings from different materials and cotton pads. The main thing is to show imagination.


Plasticine ideas
Plasticine is a favorite material for children, since it can be used to mold any shape, as well as an applique. It is suitable for creating figures of Santa Claus, Snow Maiden, Christmas trees and other characters and decorative elements. Depending on the preferences of the child, you can use air plasticine. Various crafts are first sculpted from it, and then they are left to dry. After that, they can be played like toys.


What to do with felt?
Felt also does not limit imagination, but not all children are able to make original crafts out of it. Most often it is used to make various toys, for example, snowmen, stars, snowflakes, fairy-tale characters. A synthetic winterizer or holofiber can be used as a filler for felt toys.

Options from improvised means
In addition to the above methods, for crafts, you can use threads at home, which are dipped in glue and wound around an inflated balloon. After which the structures are allowed to dry. The ball is pierced with a needle and pulled out through the remaining slots. A finished ball can be a great piece for a large snowman.
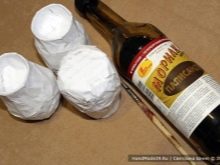
To do this, you just need to decorate the snowman's body, assembled from two or three balls, with a nose, eyes and buttons. Appliques made of cardboard or felt are perfect for this. It is important to carefully connect the balls to each other so that the structure becomes stable. Also, a voluminous snowman can be made of plastic cups glued together.


Various elements can be used to create the most interesting winter-themed crafts, most of which are often at hand. Everything will depend on the imagination of the creators of winter crafts. For inspiration, you can look at photos of light crafts on the topic.


Very unusual crafts are also obtained using salt - children will definitely appreciate such creativity. You will find a detailed master class in the next video.


