How to learn to play the violin?

If you try to make a list of those musical instruments on which it is almost impossible to learn how to play on your own, then the violin will be, if not in the first, then in one of the first places. This four-stringed bowed instrument, which conquered classical music lovers, has too many nuances to be understood by an absolutely untrained person without the help of a professional violinist.
Preparing to play
Even the performance of an aspiring violinist with an instrument requires some time and special exercises before picking up the violin. Therefore, the first lessons are held without an instrument and a bow. The student is taught from scratch to stand correctly, breathe evenly, relax different parts of the body, increase tone, correct posture.
All this is achieved both by ordinary exercises, for example, by jumping and bending the body forward with a simultaneous wave of the arms and their complete relaxation from the shoulders to the hands, and by special exercises that prepare the student for the correct holding of the instrument with the left hand, tilting the head, placing the fingers on the bar, placing the right hands with a bow. And each such exercise is aimed at a certain result, strengthening muscles, relieving tension, working out a position, and the ability to control the body.

The violin is played for all students in a standing position, while the body weight should be distributed evenly on both legs.
But this does not mean that the beginner conducts all classes in such a frozen stance. Periodically, he can slightly shift some of the weight from one leg to the other to give the legs a rest.
However, this should not be an overt action in which from the outside it seems as if the musician is swinging. But immobility does not lead to anything good either: the legs become numb, a general tension of the body sets in, the hands lose their freedom of action, the fingers do not obey. All of this should be avoided from the very first lessons.
The violin should be held with the left hand under the neck of the neck at the nut, between the index and thumb. In the first lessons on setting, you do not need to use the remaining fingers of your left hand, since you first need to learn how to correctly place the instrument for playing. To do this, you should practice, several times picking up the instrument and applying it to the playing position under the chin with support on the left collarbone. Later, you can do some exercises to change the depth of the neck between the index and thumb, reducing the distance between them. It is necessary to remember: the fingers should not squeeze the neck - it’s just the neck that should sit comfortably in the “bed” between them.
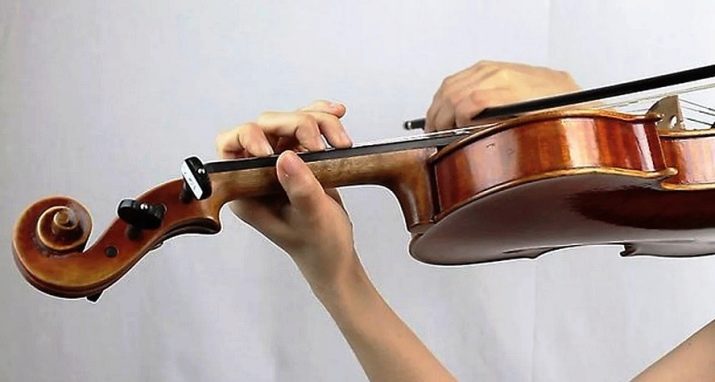
As for the position of the instrument for playing, it is restrained in the region of the musician's left collarbone, holding the head with his chin slightly inclined and turned to the left. The student's eyes should be looking at the neck, and the left hand should be positioned under the neck so that the fingertips can clamp the strings in a perpendicular position to them. In this case, the hand is a continuation of the forearm (their axes coincide). It is also necessary to devote a lot of time to working out the correct position with the instrument, perhaps a few lessons, until the desired and comfortable option is developed. After that, you can start placing your fingers on the bar.
At the same time, you can also prepare your right hand to hold the bow. First, you need to practice with a regular pencil, placing your fingers on it as follows:
- the little finger touches the pencil only with the tip;
- index - the middle of the second phalanx;
- the middle and unnamed are located between them with the greatest convenience;
- the thumb is below - opposite either the index or middle, or between the index and middle (find the most comfortable place).

When, finally, comfortable places are found for placing all the fingers, you should mentally fix this position, and then work it out through numerous repetitions. The next step is to transfer the sensations and training to the bow.
As you can see from what is written above, it is quite difficult to master the violinist's staging on your own. - this requires a teacher who has methodological knowledge and methods of preparing a future musician directly for playing the instrument.
The student himself, even with a high-quality textbook in which these techniques and exercises are set out, with all his efforts to perform them regularly, it is unlikely that he will be able to feel and evaluate all the sensations correctly, since in principle he cannot know what they should really be ...
Overview of basic strokes
The future violinist needs to know the basic performing techniques of playing the violin, which are called strokes. All of them have as their goal to make the sound of the instrument clean, expressive, melodious. And in this, the technique of the right hand plays a predominant role, which controls the bow. The bow is the main means of sound production on this instrument (as well as any others belonging to the group of bowed ones).

At the same time, of course, one cannot underestimate the importance of the left hand, whose fingers are responsible for the accuracy of the sound, its same purity and timbre. In addition, the fingers of the left hand not only participate in the performance of certain technical strokes, which are, by and large, the result of the well-coordinated work of both hands, but are also primarily responsible for their own performing techniques, where their role is undoubtedly the main or even "solo" such as performing vibrato.
The main technical touches for violinists are:
- legato (from Italian legato);
- detache (from fr.détacher).
For beginners, it is necessary to explain in more detail these playing techniques related to the violin bowing technique.
Legato
The legato stroke means the coherent extraction of several sounds by the continuous movement of the bow to one side. In notes, a coherent sound (that is, legato) of two or a group of sounds is indicated by a league (an arched line connecting the first with the last note of the group):

Detache
This technique of playing, on the contrary, involves extracting each note separately by necessarily changing the side of the bow movement. But there should be no separation of the bow from the string, so that the sounds do not sound like another articulatory stroke, called "staccato". The detache technique smoothes out the sharpness of the bow direction change precisely due to the motion without separation from the string.
This stroke is indicated in the musical notation in the form of a dash above / below the note (or does not stand out in any way):

The following groups of strokes should also be highlighted for beginners:
- abrupt, which includes staccato (Italian staccato) and martle (French martelé);
- jumping: spiccato (Italian spiccato) and sautije (fr. sautillé).
The designations of these techniques can be found among other strokes in the figure below:

Abrupt and jumping strokes are distinguished by the fact that when performing the first (staccato, martle) there are pauses between the sounds by stopping the bow, but the latter acts without breaking away from the string, and the second (spiccato and sautije) require the bow to be removed.
The student gets acquainted with the nuances of the execution of any strokes gradually, and confirms his knowledge by compulsory practical working out of the relevant exercises as he progresses.
Next, we will take a closer look at how to properly play the left and right hands on the violin.
How to play with different hands?
Before playing with both hands at the same time, you should learn how to move the hands separately. And you need to start with the right hand, since it is in it that the main means of sound production on the violin is located - the bow. The fingers of the right hand can also be played, but only the so-called pizzicato trick. And it is used on this musical instrument quite rarely.
Right
The beginner learned to hold the bow correctly even in the preparatory period of training, which was described above. Now you need to master the technique of moving it along open strings without the participation of the fingers of the left hand.
For a better understanding and assimilation of the text, below is an image of a violin and bow, indicating the names of their main parts:

The drawing will help the beginning musician to place the bow correctly when playing the first exercises.
Let's consider how to place the bow for sound production.
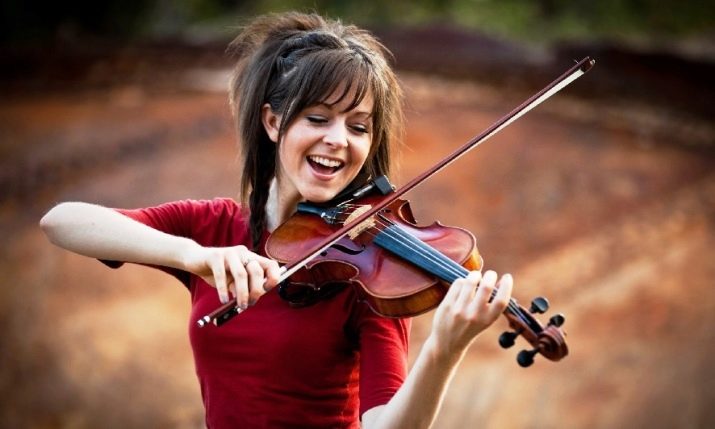
- The bow is placed on the string in a perpendicular relation to it.
- In addition, it is parallel to the top of the instrument.
- For beginners, the place to place the bow on the string is midway between the stand and the violin neck.
This position is perfectly demonstrated below by violinist Lindsey Stirling:
First, you need to learn how to lead the bow along the strings from the block to the middle. In this case, the arm is bent at the elbow, creating an acute angle between the shoulder and forearm, the hand is also slightly bent, being in a position above the strings. As you lead the bow to its head, the hand will straighten, and the elbow will unbend.
So practice several lessons in a row:
- study the movements and sound on each open string with long notes, starting from the first;
- the bowing algorithm is as follows: first from the block to the middle (lower part of the bow) and back, then from the middle to the head (upper part of the bow) and vice versa, and after firm mastering of the bow in its individual parts, you can start wide bow movements for the whole length (but at first with a mandatory stop in the middle).
While practicing the technique of playing with a bow, it is necessary to achieve beauty and expressiveness of sounds, at the same time training auditory sensations.
Left
During the period of mastering the bow, one should not forget about the left hand.You should continue the preparatory exercises for placing your fingers on the strings in arbitrary places on the neck, but do not use the bow at the same time. Add double to single finger strings according to the scheme:
- fingers 1 and 2 are simultaneously put on the same string with a light pressure on it, and then just as easily, without tension, pushing off from it;
- then exactly the same is done with fingers 2 and 3;
- now with fingers 3 and 4.
When the fingers begin to feel the strings in full measure, you can engage in single pressing of the strings to the neck, and for a specific purpose, for example, finger 1 presses the fourth string, and finger 2 - the third, but slightly higher up the neck. By this time, you can learn the tuning of the violin.

The final exercise in preparing the left hand fingers before playing with sound is to place all fingers on different strings at the same time.
Useful exercises
Teaching adults and children to play the violin takes place according to certain programs, which are not much different. But for adults, the time of one lesson can be 2 or even 3 times longer (up to 1.5 hours).
Children are not recommended to practice for more than half an hour at a time.
For adults, it is better to start lessons on playing both hands at the same time by learning scales: first in an upward movement, and then in full (up and down). Children are more interested in learning children's songs. A few useful exercises for the latter:

Adult scale with left hand fingering:

Recommendations
You should understand some of the initial nuances of learning to play the violin.
- The instrument should be positioned on the left collarbone and not on the shoulder.
- Placing a pillow under the violin deck is a bad decision. The sound of the violin deteriorates. But for practicing at home, it will be quite suitable for long rehearsals.
- The mastery should be learned at a slow pace, analyzing and improving the sound and rhythm. Haste without proper experience leads to "swallowing" some sounds.
- There is no need to push the string with the bow - it should only sound under the weight of the bow.
- You need to press the bow only where the composer intended, for example, when performing some strokes.
It is always necessary to follow the instructions of the teacher on the technique of the game with a full understanding of why this is done and why. In case of any doubts, it is better to ask the master again what is the purpose and use of the task.


