How to change strings on a guitar?
Sooner or later, every guitar owner has to change the strings. Surprisingly, despite the fact that this process is quite simple, not every musician succeeds in putting the details correctly.


Replacement features
You need to start with the fact that today guitar strings are produced in two types - nylon, they are also synthetic, and also metal. The softer nylon is most often used for classical instruments, while the harder metal is suitable for acoustic varieties. To understand which threads are suitable for a particular instrument, it is enough to assess its appearance - nylon threads are always fixed on the snare, and metal ones - right in the body, reinforced with a wooden plate that can withstand the stress of the material.
The need to change strings arises in many cases. For example, this should be done if the parts stopped shining, darkened, or began to rust. It is better to replace the threads even when the guitar starts to sound worse or has not been used for a long time.
Professional musicians often need to change the details - they do it before each performance, while amateurs, even regular practitioners, will need to do it every two months.


How to remove old strings?
The first thing to do to replace guitar strings is to remove the worn out parts. It all starts with weakening: the thread must be pulled, and then start to twist the peg. If the sound becomes thinner, this means that the string, on the contrary, is being pulled, and the rotation is in the wrong direction. In the event that the sound becomes lower, you can continue to move.
Once the twisted rings have loosened enough to allow the thread to hang freely, it can be gently pulled out of the corresponding hole. This sequence of actions is repeated in turn for each string. For convenience, you can use a special turntable.


In the next step, it is important to remove the pegs holding the threads at the bottom. It is most convenient to work with a flat, sturdy object - a wooden ruler, a tablespoon, or a tool designed for this purpose. Experts warn that the use of pliers in this situation may not be a good solution, since under its influence a weak peg will break into pieces.
The part is hooked up from below, after which it is removed using the lever method. By the way, it is important to wait until the strings are completely weakened, and then proceed to the pegs. The resulting details are saved and just put aside for a while.


After removing the strings from the plug holes, they can be thrown away or left in reserve just in case. It should be mentioned that the strings of some guitars are fixed without the participation of pegs, simply on miniature knots - it will be even easier to get rid of them.
The disassembled guitar is wiped with a soft cloth, and the neck is cleaned of dirt. You can additionally check the tension and also adjust the bar by rotating the truss rod. I must say that some amateurs prefer to barbarously cut old strings, but this method is difficult to call safe - it can lead to injuries to people nearby. In addition, sudden changes in tension negatively affect the condition of the guitar neck.
It is worth clarifying that the stage of getting rid of old strings is the most appropriate time to take care of the body of the instrument. Of course, you can use specialized products, but the use of warm water and lemon oil will be no less effective.


It all starts with wiping the fretboard with a damp cloth to remove grease, dirt and dust. When the surface dries up in a few minutes, it's time to start oil impregnation. After applying a few drops to the bar and bridge, all you have to do is rub them with a napkin. After that, the guitar should acquire a slight sheen.
In the next step, a microfiber cloth is impregnated with polish and used to treat the case on both sides. The headstock also cannot be ignored. Excess oil is removed with a dry cloth.


Installation on different guitars
Replacing strings with new ones begins with unpacking the purchased set. As a rule, spare parts are sold already packaged in accordance with the serial numbers, or they have multi-colored balls at the base, allowing you to understand the sequence. If the parts are not numbered, then they will have to be decomposed in ascending order from thick to thin, and then start work with the thick one. Since the strings in the package are rolled into a ring, they will also need to be expanded and straightened.
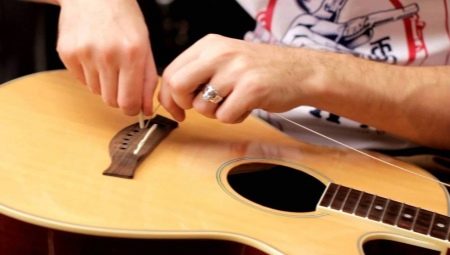
On the acoustic
The first step is to secure the threads in the holes of the pegs. It is correct to do this in such a way that the ends of the strings with a small, usually colored ringlet are in space. The fastening is fixed until it stops, and the remaining end of the string is temporarily removed to the neck pegs, on which it is to be wound. Pull the strings on a 6-string guitar starting with the sixth strand. Its main part will have to be wrapped around the peg axis so that the tip is under the coil.


Further, in order to tie a knot for greater reliability, it makes sense to make a couple of movements with the fittings themselves - thereby the tip will be fixed between the turns, and the string itself is unlikely to pop out during the game. It is better to put the string on the peg, holding it lightly with your hand. Similar movements are repeated with the remaining tuners.To tie the sixth, fifth and fourth strings, the peg will need to be twisted from left to right, and the third, second and first strings, respectively, counterclockwise.
You should be prepared that if the strings were not initially pulled out all the way into the lower mount, then they will do it on their own with a tangible sound.


When you have finished putting on the strings, the tips protruding from the tuning pegs should be cut with a suitable tool. Otherwise, metal fragments will interfere with both playing and further tuning the instrument. When finished, you'll need to use a tuner or tuning fork to get your guitar ready for use. After completing the tuning, it is better to put the structure aside for a while and let the strings settle.
It is worth mentioning that, when pulling metal strings, it is better to adhere to the sequence "first-sixth, second-fifth, third-fourth." Thus, the threads already fixed will not interfere with those that have yet to be tightened. Making turns around the tuning pegs, we must not forget that the more there are, the more often the guitar gets upset. This means that their number should be minimal, but at the same time withstand voltage. The knot in this case will just cope with the task. In the event that the guitarist still decides to make a large number of turns, he must make sure that they do not overlap each other, but walk next to each other in a spiral.


On the classic
To pull the strings on a classical guitar, you will have to act in approximately the same way, but with some modifications. The main difference is that in most cases you will have to fasten the threads at the bottom without pegs by tying a knot. This is done as follows: first, a loop is formed, then it should be inserted into the lower part of the bridge, and then the rest of the string is threaded through it. Basically, it is relatively easy to understand how a knot is tied if you look at how it was originally made. Classical guitar also requires adjustment of the tuning pegs, which are often loose from vibration.


When tidying up their course, one should strive for the absence of backlash, and the resistance during scrolling should be only slightly noticeable. At this stage, you can use a screwdriver if necessary. Some classical guitars are equipped with plugs, so you will have to put on new strings, taking this into account. First of all, a fold is formed on the thread, which will prevent the pin from flying out. Next, you have to install it in the right place on the bottom of the guitar and fix it securely with a peg.
The work begins again with the sixth string - first it is inserted into the hole in the tuning peg, and then pulled up until it reaches an even and non-twisted state. Having intercepted the thread at the level of the next splitter, it must be pulled back until it stops. Ideally, about 2 centimeters of headroom should be used for tension. Holding the string with the pad of your finger, it's time to twist the peg so that a couple of turns from top to bottom are formed.
Winding with a loop will be more reliable.


In this case, the string is also brought to the next peg, then pushed back, after which one hand presses the string to the neck, and with the other hand, its edge bends along the inner radius. The tail of the piece is wound under the string, and then "surrounds" it so that the edge reaches its original position. The peg is wrapped from the inner radius to the outer one, which gives a couple of turns from top to bottom. The loops on the other side are processed in the same way, taking into account the fact that you will have to twist in the opposite direction.
By cutting off the ends with pliers, you can proceed to tuning the guitar. By the way, while the strings are stretching, it makes sense to grease the nut with graphite grease, placing the substance in the groove under the threads.


Nylon strings are pulled in the same order as metal strings: first to sixth, followed by second to fifth, and finally third to fourth. When threading the nut through the hole, it is better to stick to a length equal to 10-12 centimeters. The strings of a classical guitar will shrink for almost a week.


Helpful hints
- Novice musicians are advised to follow the process of updating the instrument carefully and without haste. In general, a complete replacement takes no more than 15-20 minutes, even for beginners.
- It is also important to give the guitar a rest at the end. The neck should stay in place and the wood should adjust to the thread tension.
- To prevent the strings from breaking prematurely, it is important not to overtighten them, but to leave them quite slightly loosened until the instrument is tuned.
- Some experts recommend not biting off the string tails until they stretch.
- When purchasing an acoustic guitar from a manufacturer, it makes sense to immediately replace the installed strings, since they are of rather low quality.


For information on how to properly change the strings on an electric guitar, see the next video.


