How to string the strings on a classical guitar?

For a beginner who is new to installing nylon strings on a classical guitar, this process can seem quite daunting. Synthetic strings, differing from metal strings by the absence of fastening clamps and retaining pins on the side of the tailpiece on the instrument deck, can slip out of the knot if they are not securely fastened. How to properly change and tighten the nylon string set on a classic guitar, and how to fix it on the nut and headstock, can be found later in the article.
How do I install strings in a tailpiece?
Changing the strings on a guitar becomes not only a matter necessary to improve its sound and playing comfort in general, but also a good reason for useful actions in caring for a musical instrument. That is why you need to take the opportunity to completely remove the strings, without which it will be much easier to thoroughly clean the top soundboard, tailpiece, and also lubricate the fretboard with special oil from cracking.

Guitar care products (wipes, soundboard cleaner, and fretboard cracking oil should be purchased from musical instrument stores).
It turns out that the first thing before putting on a new string set is to remove the old... This operation should begin with the thickest string - the sixth, and then continue in this order: fifth, fourth, and so on. This order makes sense - the neck of the guitar is exposed to minimal unbalanced loads from the tension of the threads.
Important: before starting to remove all strings, it is recommended to relax by 2-3 turns in order to avoid the occurrence of at least the slightest forces on the fret distortion.
Any string is removed according to the following algorithm:
- its tension is weakened by rotating the corresponding peg until it becomes possible to freely remove the end of the string from the peg hole;
- the fixing knot is untied from the side of the tailpiece on the guitar deck;
- the other end of the string is pulled out through the tailpiece hole.
Cutting the stretched strings in order to reduce the time of their replacement is definitely not recommended: it is not known where they will "shoot" with their ends.
Besides, spare strings are in any case of better quality than those that are not available at all. It often happens that a string breaks at the most inopportune moment, and you cannot find a music store nearby and a hundred kilometers away. Cutting a whole string is somehow unprofitable.
Once you have taken care of your guitar, you can start installing new strings. Installation is performed in the reverse order of removal - start with the 1st string, and finish with the 6th. This way there will be no problems with the remaining ends on the saddle.
Leave the ends with a slight margin and point towards the thinner strings. If you do the opposite, then the free ends of the previous strings will interfere with the installation of subsequent ones.

The string is first fixed on the saddle, and then - in the tuning mechanism... Fastened on both sides, by rotating the peg, you need to pull it up to a stable resistance. Do not overdo it with the tension force when installing. The necessary adjustment will take place after the installation of the entire accessory.
Bridge anchoring
Now about how to properly tie the entire nylon set on the saddle. It is necessary to follow a certain sequence of actions when performing this task.
- The process starts with the thinnest string (the lowest positioned on the instrument). It is called the "first" in the six-string guitar teaching literature. One of its ends must be inserted into the through hole of the bridge, corresponding to the installation location of this particular element of the string set (bottom hole). It is better to insert from the outside of the tailpiece, since not all models of a classic instrument have the ability to easily pass the string into the saddle hole from the neck side.
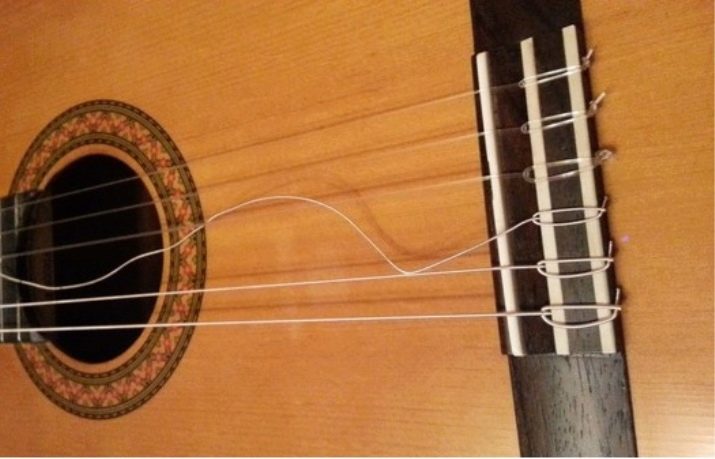
- Carefully pull the nylon piece through the hole towards the headstock to the splint, designed specifically for him (the first lower peg). Leave an 8-10 cm free stock outside the bridge for easy knotting.
- Holding the string with the fingers of the left hand from the side intended for fixing in the tuning mechanism, with the fingers of your right hand, wrap the end left on the outside of the bridge around it at the exit from the hole of the tailpiece... In this case, the turn is directed counterclockwise, passes under the string at the exit from the hole and returns to the beginning of the turn at the entrance, just prying the "tail" under the turn in the same way.
- Gently thread the remaining end straight into the groove from the outside of the bridge, in which holes are drilled, with the remainder of the "tail" pointing down.
- Pull up the knot with your left hand before giving it a solid and aesthetic-looking form.

Usually, one turn is enough to firmly fix the knot, but on thin threads that do not have a winding, it is possible to make an additional 1-2 turns around the string for greater reliability. In this case, the remainder should in any case be brought under the beginning of the first turn in the outer end of the tailpiece.
All other elements of the nylon kit are attached using the same algorithm as described above.
Double or triple knots for threads with winding should not be done: their appearance deteriorates, and strength is hardly added.
If the "tails" are too long, then they can be cut off. But trimming should be done only after the maximum stretching of the strings and stabilization of the tuning of the guitar occurs. This can happen no earlier than 2 weeks of playing with a new set.
If you come across a string set that has fasteners on one side, then in this case it is not at all difficult to put the strings in the tailpiece: the strings are simply passed through the holes until the stoppers stop, after which it remains to fix them in the tuning pegs.
Mounting in tuners
In the peg mechanism, nylon should be fixed in almost the same way as metal counterparts:
- the free end is inserted into a special hole on the column (peg axle), the thread is pulled through it, but not until it is fully pulled from the hand (a small angle remains if you pull the string away from the neck);
- supporting the tensioned state of the thread with your hands, a half-turn of the free end is performed around the column from the exit of the string from the hole back to the entrance;
- one more time the end is pulled into the hole of the peg axis until it stops, after which the rotation of the adjusting screw (wing) begins to the side from itself;
- rotation lasts until the free stock is selected and a slight thread tension.
For the first time, it is possible that fixing the nylon set on the guitar tuning mechanism will not work perfectly, there may be mistakes: double-deck turns on the tuning pegs, uneven turns, too few turns, which will cause unnecessary troubles in the form of poor tuning, slipping of strings from fasteners and so on.
It is necessary to fasten the nylon on the tuning pegs, taking into account the fact that the number of turns on the column should not be more than 4 or 5. Excess "tails" should be removed, but after stabilizing the tuning of the guitar.

String tension
The next step after installing a new set of nylon is to tune it to the standard tonal scale of a classical guitar. Novice guitarists are advised to stretch the strings to the desired sound using an electronic tuner (chips, for example, attached to the headstock) or special programs on a computer, tablet, smartphone. The choice, of course, is those that automatically determine the sounds produced when tuning the instrument.
Classic Guitar Tuning Next:

After changing the strings, it is better to start stretching them with the thinnest - the first, and finish the sixth. You need to be prepared for the fact that immediately after tuning the guitar will need to repeat the same operation, since nylon is a rather soft and prone to stretching material.
I can advise you not to be too zealous on the first day with the endless tuning of the instrument with new strings.... Adjust, play a little, adjust again and leave for a couple of hours or until the next morning. The strings need not only to stretch, but also to adapt to the surrounding atmosphere: moisture in the air, temperature in the room.


