How to tie nylon strings?

Every thing has its own service life. This also applies to nylon strings. After a certain point, the spent elements have to be changed. Thin strings of this type do not have hammers, the parts that hold them to the tailpiece. In this article, we'll talk about how to attach nylon guitar parts to make them last longer.
What will be required and how to prepare?
Nylon filaments are specific calibrated lines in combination with many chemical elements, the blanks of which, when viewed, appear as small balls. The starting material is heated, passed through the required opening. Then they are threaded through the device, pulled, cooled. This multi-stage technology makes nylon elements the most durable.
Nylon strings are more commonly used by musicians due to several advantages:
-
nylon is a soft material, so it is much more convenient to play - beginners to learn, and pros to work out complex elements;
-
the sound coming from under such strings sounds soft;
-
they have a relatively low cost;
-
do not injure fingers;
-
the tension of the nylon thread in the classic tool is the best option.


There are also disadvantages - setup difficulties. Nylon doesn't lend itself to crisp tones. The main thing is that the chords are consistent, there is no falsehood.
Not all musicians will be able to pull nylon threads on their own at the first attempt, so we provide detailed instructions.
The choice of threads is important. They are quite soft, so even on the guitar they will be as if in a weakened state for several days.With constant play, new threads will have to be tightened for about a week. A the change of threads must be carried out every 3 months.


First you need to remove the old strings. During work, it is sometimes necessary to snack on old elements: for these purposes, wire cutters are well suited. Do not forget to weaken the string beforehand.
If the string parts are drastically loosened, the neck can fail, and under strong tension, the bitten nylon thread can ruin the coating of the instrument and injure the master. To prevent this from happening, it is recommended to use a typewriter - a Stringweider turntable, which turns the tuning pegs well. Then the process of removing old strings will not seem like a very difficult process.


Here are the old elements removed successfully. Now the best thing to do is take a soft flannel rag, remove dirt and dust from the body of the instrument, and then apply a polish for a smooth guitar finish. You do not need to touch the matte layer. Clean the fretboard with a specific conditioner with lemon oil.
How to pull?
There is no point in rushing to work: do everything sequentially. Carefully read the set you purchased, sort the string set in order of thickness: thin to thick.


How do I attach the strings to the bridge?
Let's take a look at the sequence of fixing the strings on the bridge.
-
It is best to place the strings in pairs. For example, the sixth and first strings are set, then the fifth and second, and then the third and fourth.
-
On the string ball in the lower part, we fix it with a pin, and then we check all the elements for strength.
-
The thread should be in the splitter, after which we give it backward by 5 centimeters. Such a reserve will be needed when you need to wind the strings for the guitar tuning of the tuning pegs.
-
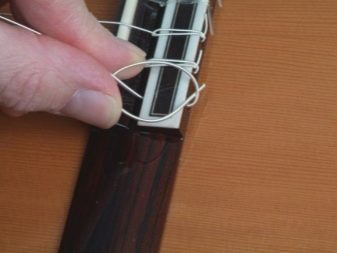
Having resorted to the help of a turntable, we make 2 turns, one of which will act as a loop. You do not need to do many turns, the instrument will have to be constantly tuned. Remember to press the end of the string against the bridge along the back wall below the edge of the bridge itself. If the end of the thread is pressed from above, then with constant tension the knot will weaken, and the thread will bleed off.
-
When winding, pay attention to the head of the neck: fix 1-3 strands clockwise, and 4-6 strands must be tied in the opposite direction.
-
Nylon does not tolerate strong tension: you just need to fix it in the splitter hole, create a working tension to a minimum. It is better to tie the string smoothly.
-
Then we take the nippers, remove the excess length, leaving an allowance of 1.5 centimeters.


Sometimes you can replace the threads in pitch. After changing strings during the day, the guitar does not always strike the correct notes, the tuning floats. This is due to the fact that all the elements adjust to each other.
How to fix in the pegs?
When tuning the strings on a classical guitar, the changing and setting patterns are the same as on an acoustic guitar. But the strings must be set correctly when there is no ball.
Here is the sequence of actions.
-
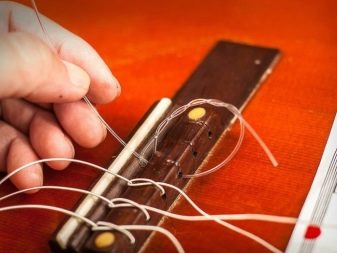
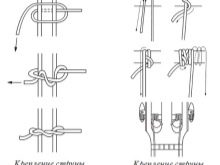
We pull the strings about 10 centimeters through the eyelet of the hole. After passing the end of the string under the base, form a loop. We thread the edge of the thread through the main part and insert it into the loop. Then we press the main part to the deck: we pull the end and the main part to the sides, pulling it into a strong knot.
-
Insert the end of the thread onto the splitter shaft, turn the shaft half a turn. This will cause the end of the string to float up. We wrap the end of the thread around the main part. We turn the peg several times to achieve the required tension. As a rule, you have to make up to 4 turns.


With the pros, everything is clear - they will do everything with enviable speed. And for beginners, before installing, we recommend listening to the advice of professional musicians.
-
While forming the turns, make them towards the middle of the shaft and the string hole. You don't need to pull them towards the headstock. Otherwise, the strings will break for no reason.
-
Do not bend the thread around the splitter. Therefore, for 1 and 6 threads, it is better to plan the turns to the right of the string hole, and for the rest - to the left.
-
Long string tails should not be left in reserve: they spoil the soundboard.
-
In order for the nylon elements to last longer with frequent use, it is necessary to install strong tension parts with copper windings on the guitar.
-
Observe the optimal temperature conditions for storing the instrument. Temperature changes will negatively affect the strings as well.
-
It is recommended to sit at the guitar only with clean hands, and after playing the strings, process the strings with a special compound.
-
As an option and additional insurance at the end of the string in the area of the saddle, you can make more ordinary knots. It happens that nylon is already sold with such insurance, then the optional knots are not needed.
-
Beginners, please note that sometimes nylon string bundles already have balls at the ends, like metal elements. Then you can change strings even faster.
-
Do not try to pull metal strings on a classic instrument with nylon threads. The neck will go to the sides, and then it will completely break.
-
After all the manipulations with the thread setting, it is recommended to tune the six-string instrument with a digital tuner or tuning fork.
-
Choosing between nylon threads and metal strings, everyone decides for himself what is important: clearly conveyed sound or ease of performance, beauty of playing or juicy sound. But in fact it is better to have several string sets. It is also worth remembering that the sound volume depends on the thickness of the thread.


Changing and tightening nylon strands and then tuning the guitar is a painstaking process that requires attention. It is performed slowly only by a true connoisseur of the instrument. Of course, it will take a newbie more time for such a process. But with regular work, experience will come, and difficulties will be left behind. Have a nice game!
How to tie nylon strings, see the next video.


