How to make a shoe dryer with your own hands?
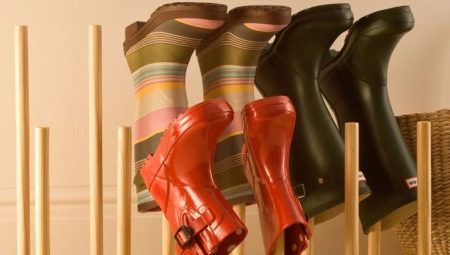
It is difficult to keep your shoes dry during rainy and slush periods. And this is not only a matter of comfort, but also of health. To solve this, you can make a shoe dryer. Its use will help the shoe to always be in good condition.
Tools and materials
Due to the fact that the shoe dryer is made by hand, its cost will be much lower. Hence, you need to choose materials from available tools. It can be the remains of pipes, strong wire, construction tape, terminals, heating elements... Some materials and tools will have to be purchased, but in general, a homemade shoe dryer should be inexpensive but functional.


Dryer manufacturing options
Different types of shoe dryers can be made depending on the materials, complexity and functionality. We suggest that you familiarize yourself with the following solutions.
Flexible
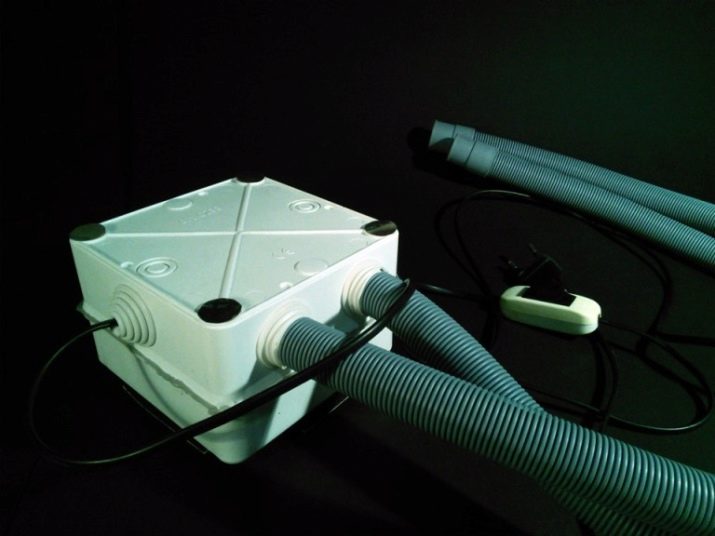
To make this dryer, you will need a corrugated pipe (1 m), a box and a hair dryer, a computer cooler or a small fan.
The principle of this device is that air from one hole in the pipe spreads into 2 shoes, which are located at the other ends of the structure.
- First you need to design a boxin which the fan will be located. You can buy it ready-made or make it yourself.
- After that, you need to put a fan in it. and make holes for pipes through which air will pass. If the blades will not fit, they can be cut.
- The corrugated pipe must be divided into 2 parts 50 cm each and insert into the holes.
- The fan in the box must be connected to the network using a wire with a plug.You can also use a power supply with an on / off button.
- After all the parts are connected, you need to check all the holes so that air does not escape from them... You can eliminate the gaps with rubber pads or electrical tape.


This shoe dryer does not take up much space and is easy to carry out. If your shoes are wet, it will take her about 5 hours to dry them. If you need to ventilate or dry your shoes slightly, you can leave the dryer running for 2-3 hours.
It does not damage the outer surface of the shoe, since it dries exclusively from the inside.
Electric
This type of shoe dryer may seem difficult to manufacture, but it is not, here you only need to have an initial level of knowledge in connecting wires. To complete the device, you will need a thermal conductor or heating cable, which is often used in a heated floor system, a wire with a plug, two wires for connection, electrical tape and a knife. You may need to purchase some materials from a hardware store or market.
- First you need to cut off 2 pieces of thermal conduit each 50 cm long and strip from one side. Then twist into a circle so that the end with the non-insulated ends is separate, and secure with electrical tape.
- Also, you need to connect 2 wires to the wire with a plug.that will be attached to the thermal conductors.
- It remains only to connect the structure in this order: a wire with a plug - wires - thermal conductors. All connections must be wrapped with electrical tape so that there is no access to the bare terminals.

This dryer operates from a 220 V outlet.
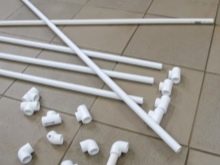
From plastic pipes
The plastic pipe shoe dryer is powered by the heating system in the house, so you don't need to use electricity in this case. Its principle is that hot water is driven into the pipes, the temperature from which dries the shoes. Polypropylene pipes are used because plastic has a higher thermal conductivity than metal, which means more heat will be generated..
To make such a dryer, you will need plastic pipes, corners, tees, crosses, Mayevsky taps, floor and wall fixings.
- The number and size of parts depends on the dimensions of your drying, so it is important to calculate everything correctly before starting assembly.
- The most important step is assembling the bottom shelf. It should be level and clearly horizontal. Next, you need to add as many shelves as you need.
- Each tier must be secured with a soldering iron or other mounting method. This can be done only after you have made sure that the structure is even.
- On the upper shelf, it is worth attaching Mayevsky taps in order to release the air pressure stagnant in the pipes.
- Next, you need to attach the dryer to the wall, making sure that the shelves are held firmly.
- After that, you should run a water pressure into the pipes and check all joints for leaks. If everything is in order, then you can start using it.

In order to improve the drying performance, there are several steps you can take to help it perform better.
- To prevent the heat from deteriorating the soles of your shoes, use wooden coasters to act as a barrier between the hot pipe and the shoes.
- To prevent water and dirt from dripping from your shoes onto the floor, you can put a container on the floor in which this water will be collected. But it is best to wipe and clean your shoes from dirt before putting them on the dryer.
- Also check regularly that no water leaks from the pipes. To do this, you can connect a water drainage tap.
There is another way to make a shoe dryer from plastic pipes. The product will be smaller in size, and it is attached to the battery.

How to do:
- first, you need to make a shelf from PVC pipes and make fasteners in the form of loops or hooks, with which the shelf will be hung on the battery;
- Tighten all connections carefully to keep the dryer sturdy.
Shoes on this dryer can be positioned in any position.
The main thing is that it does not touch the hot battery, otherwise the material may be damaged.


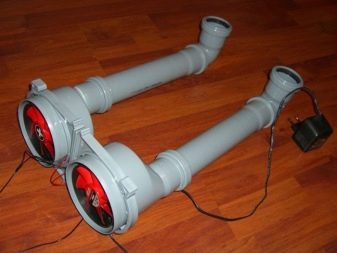
From fans
This shoe dryer is suitable for both low boots and high boots.
To make it, you will need two fans from a computer, a power supply or a wire with a plug, connecting wires and plastic pipes.
- If you are using a cable with a plug to run the dryer from an outlet, then you need to connect it to two fans. And if you have chosen a power supply unit, then you need to connect it to it. This is easiest to do with connecting wires, which need to be stripped beforehand.
- Plastic pipes must be attached to the fans so that the dryer can be used to dry tall boots or ski boots. Then the air will be directed to the very bottom of the shoe. This is where she gets wet.

Precautionary measures
Experts highlight several important rules that should not be neglected when making shoe dryers.
- If you work with wires and use electricity, be sure to keep your hands completely dry.
- Use rubber gloves when working.
- Do not check if there is current in the network with your bare hands.
- Do not insert heated and switched on electric dryers into shoes. First insert the device, and only then turn on that the shoes are warmed up and dried gradually.
- Do not leave electric dryers unattended for long periods of time.
- Do not place powered dryers on the floor or other unsuitable surfaces. Use ceramic or metal coasters.

A master class on making an electric shoe dryer is further in the video.


