Heating element for a thermopot: how to check and connect it?

The heating element is the most important part of a thermopot, like any heater. Periodically, every 2-3 years, it breaks down. From the article you will learn how to check the heating element for a thermopot, how to connect a new clamping heating element with a power of 750W and other heaters.
Species overview
Convenient if hot water is always at hand. For this, a thermopot has been created - a device that resembles a kettle and a thermos at the same time. He has 2 tasks:
-
heat water to a boil;
-
maintain the temperature in the region of 75-95 ° С.
To make water easy to pour, a pump is built into the device. Press the button and you have a full cup of hot tea or coffee.
Such devices are manufactured by well-known companies:
-
Zojirushi - expensive elite models;
-
"Delta" - simple and affordable offers;
-
"Hotter" - mid-range devices.
And many others. But the designs of these devices are almost the same.
The internal volume of the body is different - from 2.5 to 8 liters. The most popular are 5 liter models.
Different body materials are used:
-
heat-resistant plastic;
-
glass;
-
metal;
-
ceramics.
Ceramic models are the most compact and reliable. And also environmentally friendly. They heat up the water in 5-10 seconds. Of course it depends on the power.
The power of such devices is 600-1000 watts. The more, the more people one thermopot will be enough for. But buying a device for the sake of occasional use is not worth it - too much money will be spent on electricity.


But a thermopot is more convenient than an electric kettle, because it has a lot of additional functions:
-
LCD display with modes display;
-
timer;
-
sound notifications;
-
delayed start (come home from work, and the water is already hot);
-
options for filling the glass - fully or half;
-
all kinds of protection and a lot of other useful functions.
Of course, only expensive models boast of such options.
And to make it easier to pour water, thermopots are equipped with pumps. Expensive - electric, with an operating voltage of 12 V. Budget - a manual pump.

Another plus of expensive devices is a double heating element. One part (powerful) boils water, the other (weak) only maintains a given temperature.
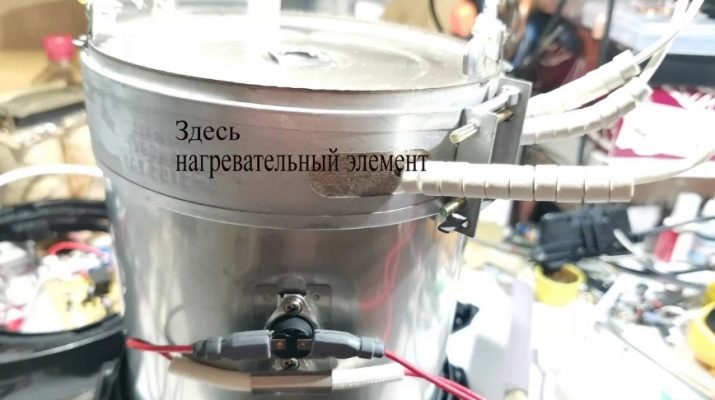
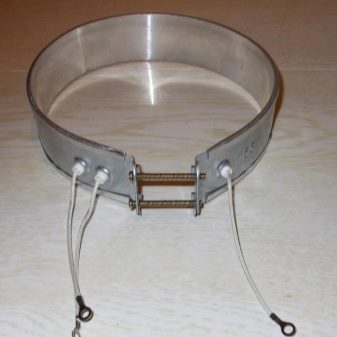
And there are no fundamental differences in the design of the heater. The heating element for a thermopot is a tubular electric heater, inside which a nichrome wire is placed in turns. There is a layer of insulation (usually made of mica) between the wire and the tube, which prevents the device from being electrocuted.
As you can see, the design is simple, so everyone can check it on their own.
How to check the heating element?
Before disassembling the thermo-pot, make sure that it is the heating element that is faulty. If the heater takes a long time to heat up or switches off too early, check for limescale deposits. And it is possible to identify a heater breakdown by its characteristic features.
-
The thermo-pot does not boil water, the heating lamp is on.
-
The water takes too long to heat up. Perhaps the heating element of boiling has broken down, and only heating works.
-
The device is often switched to boiling mode. Defective heating element.
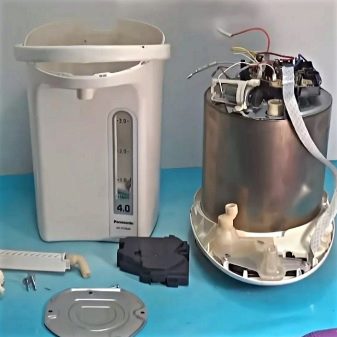
If you have such problems, it's time to start repairing. Disassemble the device to access the heater.
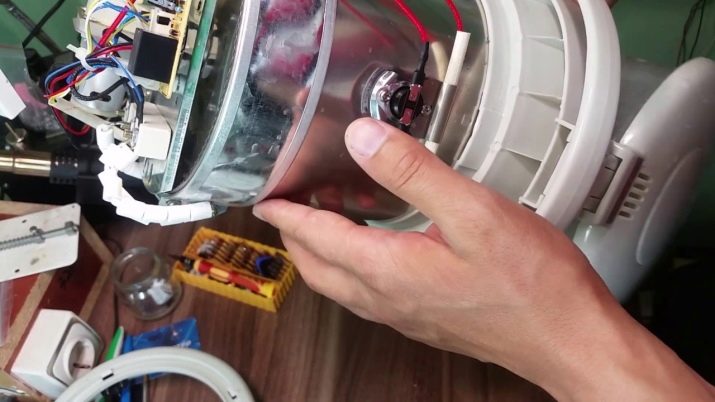
Important! Capture the process with a camera, so that later it would be easier to assemble.
-
Disconnect the thermo-pot from the mains, and drain the water.
-
There are several screws on the bottom. Unscrew them.
-
Part of the fastener is hidden by a plastic ring. Use a flat screwdriver to remove the ring and unscrew the fasteners.
-
Remove the bottom pallet.
-
Disconnect the hoses from the pump and remove it. Be careful, water may spill out of them. Don't let her get into electronics.
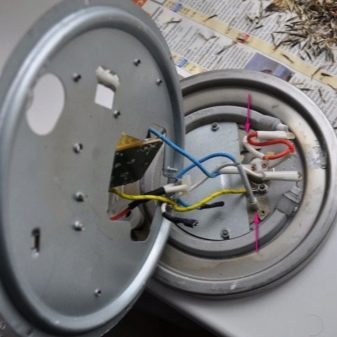
-
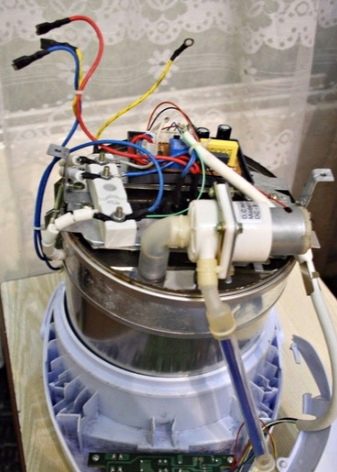
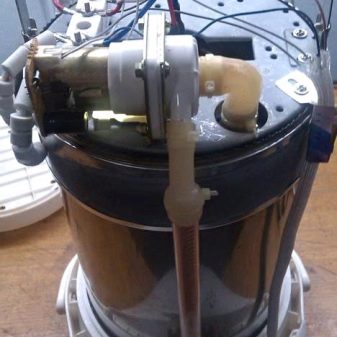
Turn the device upside down for more convenience. Move the circuit board aside. Work carefully so as not to break loops and wires.
-
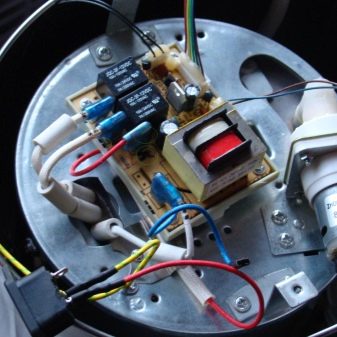
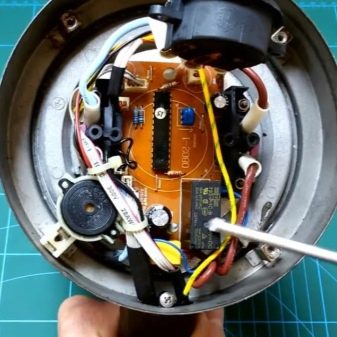
There is a cover under the board that hides the heating element. Usually 8 screws hold it. Unscrew them and remove the cover.
-
Dismantle the heater.
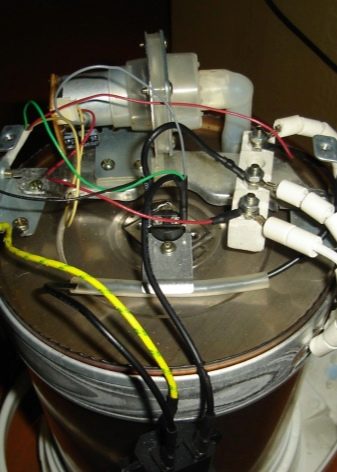
Do not remove the heating element immediately. Check if the wires are well connected to it. Sometimes solving a problem is easier than it sounds.
This manual is suitable for most models. And if you have any difficulties, then do not risk it, and contact the professionals.
Now you can start checking. But first, some calculations.
The main purpose of the test is to measure the resistance of the heating element with a multimeter. It can be preliminarily calculated using well-known formulas.
Let's say the rated power of the thermopot is 900W. The working voltage in the network is 220V. Then the current strength will be:
900W / 220V = 4.1 Amps.
Now calculate the resistance:
220V / 4.1A = 53.7 Ohm.
For a heating element with a power of 2 kW, the resistance should be 24 Ohm.
According to such formulas, any heater is calculated - both clamp, and tape, and others.
For a complete check, pay attention to the low power diode through which the weak part of the heater is powered. It halves the operating voltage. Call him a tester. The current should only go in one direction, and in the other - infinite resistance.
To ring any heater, proceed in this sequence.
-
Set the multimeter to measure the minimum resistance. Then touch one terminal of the multimeter to the case, and the other to each of the leads in turn. The resistance must be endless.
-
Further increase the measurement limit, and repeat the operation. The result should be the same. If the resistance is equal to infinity, then there is no short circuit to the case, and the device can be checked further.
It is necessary to gradually increase the measurement range so that the multimeter does not burn out in case of a possible short circuit. If you are confident in the device, set the measurement limit to MΩ right away.
Then measure the resistance between the contacts of the heating element. It should roughly match the calculated data.
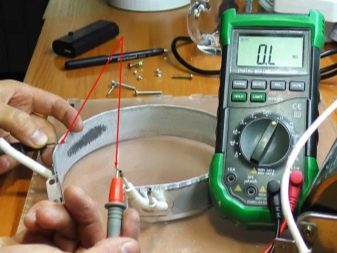
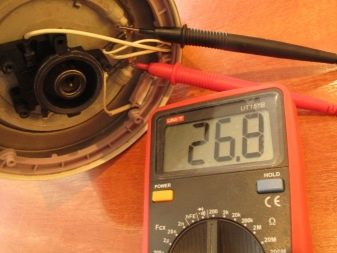
Important! Make sure that the contact between the probes of the multimeter and the terminals of the heating element is good, otherwise the measurement results will be inaccurate. Before measuring, it is advisable to wipe the leads with alcohol.
If the resistance is much less than the calculated one, then this is a short circuit, and if it is infinite, then the heating coil has burned out. In such cases, repairs are needed.
A broken heating element can be "revived" if it is disassembled and the spiral turns are mechanically connected. But this is a delicate and complex work, not every master will undertake it. And it's almost impossible to do it yourself, because the electrical insulation inside the tube is very fragile. Therefore, a broken heater is easier to replace. Moreover, it is inexpensive - the most common clamping heating element with a capacity of 750W is offered by stores for 500-600 rubles.
Connection
The assembly work scheme is the same as for disassembly, only in reverse order. And so that there are no problems, use the advice of experts.
-
The clamp heating element must fit snugly to the inner reservoir of the thermo-pot.
-
The screws for fastening the heating element, the board and the rest must be tightened evenly. If there are several of them, then tighten screws diagonally opposite.
-
Before turning on the device after repair, measure its resistance. To do this, attach the test leads of the multimeter to the terminals of the plug. The resistance of the thermo-pot should be greater than that of the heating element. It is advisable to make sure that there is no short circuit to the case. If all is well, feel free to plug the device into an outlet. So at least there won't be a short circuit.
-
Immediately after replacing the heater, it is advisable to connect the thermopot through a wattmeter in order to measure the power consumption. Ideally, it should match the declared one.
-
When the water is boiling, open the lid and see how even the heating is. This can be seen from the steam bubbles, they should appear evenly or in a ring.
-
Check the modes of operation of the thermo pot.
And finally, do not allow the appearance of "unnecessary" details.
The following video presents the features of the TENA check.


